Gantry Router
Operator's Addendum
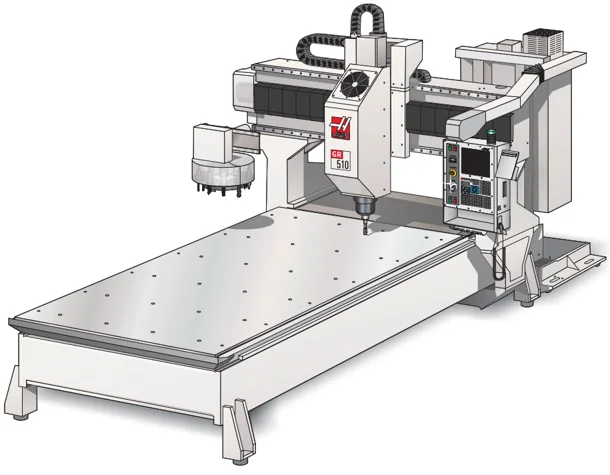
SAFETY
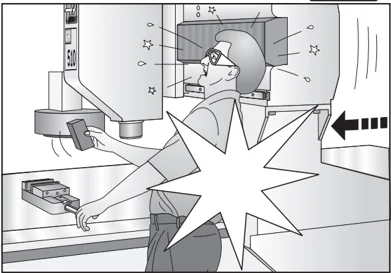
Read and Follow all safety warnings - Familiarize yourself with the safety section of the Operator's Manual. Be aware of the other people around you in the shop; flying chips can seriously injure people, who may not be a safe distance away. Always wear safety glasses. Initial cuts/setups should be cut at a slower speed to reduce the possibility of tool or machine damage. As with any open frame mill, chip screens are highly recommended.
This machine must be operated only by trained and qualified personnel in order to insure a safe environment. The following precautions are provided to help protect the machine operator against accidents. Every operator of this machine must read this section and understand the requirements necessary to operate this equipment in a safe manner. These guidelines are only available in English, it is the customer’s responsibility to make non-English speaking personnel aware of these guidelines.
Modifications to this machine or these procedures will not insure safe operation. The machine power must be turned OFF prior to the removal of any panels for the purpose of service or maintenance access.
Any additional guards or safety devices deemed necessary, are the sole responsibility of the machine operator.
The tool changer may start at any time. All personnel must be clear of the tool changer, when the machine is powered up.
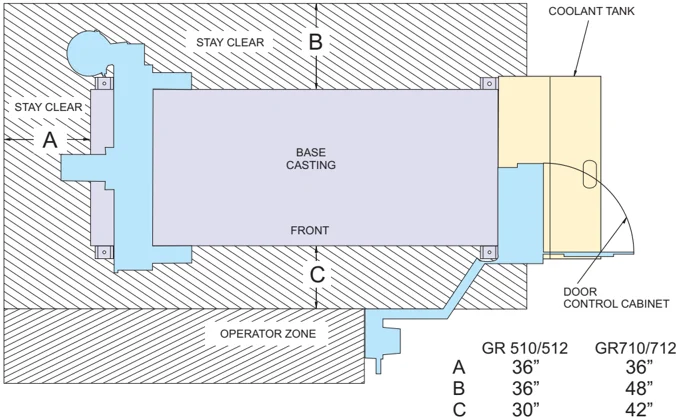
| GR 510/512 | GR710/712 | |
|---|---|---|
| A | 36" | 36" |
| B | 36" | 48" |
| C | 30" | 42" |
This machine is designed to be operated as an “Open Architecture” machine. “Open Architecture” refers to a machine that does not include every guard necessary to keep the operator out of the machining envelope. To avoid accidents the operator must stay within the Operator Zone (as shown in the following figure), during machining operations. During the operation of this machine all personnel must remain outside of the Stay Clear Zone.

DANGER
IMPACT HAZARD. STAY CLEAR OF THIS AREA DURING OPERATION. MOVING PARTS CAN CRUSH AND CUT. MACHINE MAY START AUTOMATICALLY.
Areas of the machine, especially on open frame mills, may have unguarded areas. The installation of the machine should be such that it will limit the access to the machine.
As the machine may start unexpectedly personnel or property could be damaged. This machine moves quickly. It is the shop owners responsibility to provide measures to safeguard the worker.
Photoelectric beams are used to stop the machine should personnel or equipment enter the protected area. This system will also stop the machine should a large quantity of coolant and/or machining chips pass through the beam. If this happens change the set-up or machining process to avoid this condition.
1. INSTALLATION
Air Requirements
The Gantry mill requires 4 scfm (standard cubic feet/minute) of air at 100 psi.
Electrical Requirements
AC input power is three phase Delta or Wye power, except that the power source must be grounded (e.g. leg or center leg for delta, neutral for Wye)
Frequency range of 47-66 Hz
Line voltage that does not fluctuate more than ± 5%
Harmonic distortion not to exceed 10% of the total RMS voltage
| Power Supply | Voltage Requirements (195-260V) | High-Voltage Requirements (354-488V) |
|---|---|---|
| Power Supply | 50 AMP | 25 AMP |
| Haas Circuit Breaker | 40 AMP | 20 AMP |
| If service run from elec. panel is less than 100’ use: | 8 GA. Wire | 12 GA. Wire |
| If service run from elec. panel is more than 100’ use: | 6 GA. Wire | 10 GA. Wire |
NOTE: The gantry mill will perform better when anchored. Refer to the Haas document ES0095 for anchoring instructions.
The installation of the Gantry Router is similar to the VF-Series mill (see the VF-Installation section of the Vertical Reference Manual. Some general guidelines follow.
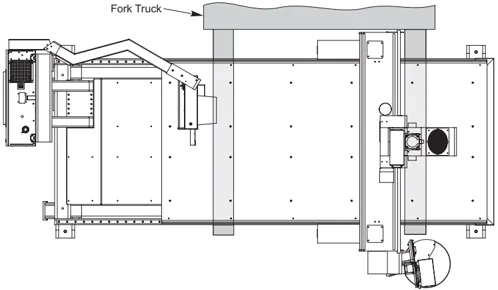
Moving the GR-Series Mill.
Use a forklift with at least a 18,000 lb rating. Use the illustration as a guide for proper fork truck lifting.
Shipping Bracket Removal
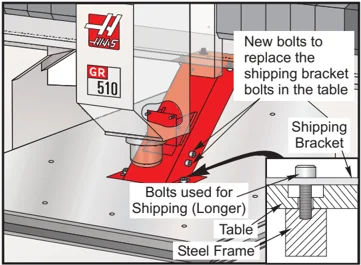
Remove the two long bolts that secure the lower shipping bracket to the table. The shipping bracket has two additional bolts threaded into it. These bolts replace the long shipping bolts in the table. The long shipping bolts should be threaded into the shipping bracket and stored in the event the machine is moved.
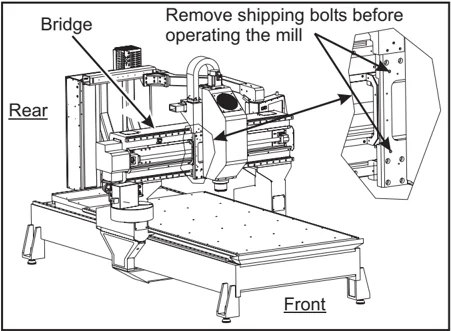
Remove the shipping brackets which secure the head to the table. In addition there are shipping bolts which hold the Y-axis to the bridge that need to be removed. Install the sheetmetal cover over the sub-plate, on the tool changer side of the machine.
1.1 OPTIONAL 20-POCKET TOOL CHANGER
Machines with the 20-pocket tool changer are shipped with the tool changer reversed. Which saves space and reduces shipping charges. Before operating the machine the tool changer needs to be installed correctly.
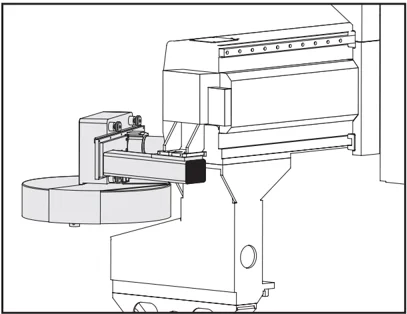
Shipping Position
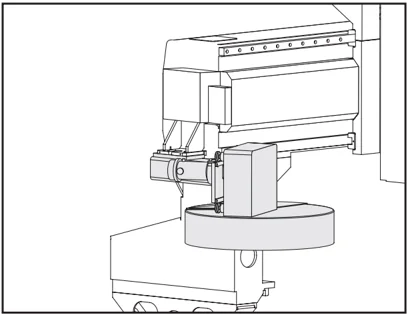
Operating Position
To do this the tool changer must be removed, and then installed in the operating position and aligned.
To remove the tool changer a lifting device will be necessary. The tool changer is very heavy and needs to be supported with additional mechanical means.
- Support the tool changer with an overhead crane or forklift.
NOTE: It is not necessary to disconnect any of the cables, but be careful not to tug on them when maneuvering the tool changer to the operating position.
- Remove the tool changer by removing the four bolts which secure the tool changer to the bracket.
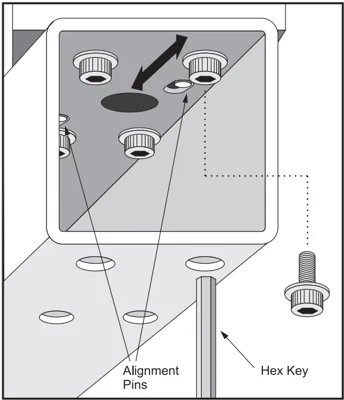
Alignment Pins
Hex Key
- Turn the tool changer around and reinstall. Leave the bolts loose in order to perform final alignment
ALIGNING THE TOOL CHANGER
- Jog the mill to machine 0 in the Y and Z axes. Place a tool in the spindle and then orient the spindle.
- Verify there is an empty pocket in the tool changer facing the spindle, then command a tool change. Press E-Stop as the tool changer begins to move.
- Manually push the tool changer towards the spindle and verify the spindle orientation and height of the spindle. If necessary adjust parameter 257. Important: As the tool changer engages the tool, make certain the height is correct. You may need to rotate the tool by hand as the tool changer engages.

Tool / Tool Changer Alignment
X-Axis Alignment
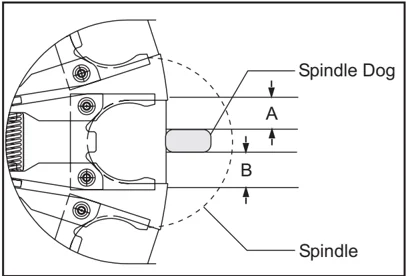
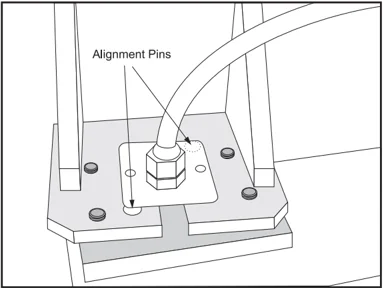
- As you move the tool changer in, check the alignment of the tool changer in the X-axis. Adjust the tool changer assembly at the point it mates with the mill, if necessary. The tool should be centered between the tool changer fingers. X-Axis Alignment – This figure illustrates the mounting bolts and alignment pins for alignment in the X-axis.
- Once aligned, tighten the bolts that secure the tool changer to the bridge.
- Rotate the spindle, by hand, until the tool is centered in the pocket.
- Enter DEBUG in the control. Go to the POS-RAW-DAT screen and write down the spindle encoder counts. This number is just to the right of the system time. Enter this number in Parameter 257 (Spindle Orient Offset); Exit DEBUG.
- Press Zero Return, then Zero Single Axis, this will move the tool changer shuttle out. Repeat steps 1 through 3 and verify the alignment.
- Remove the tool from the spindle. Command a tool change to an empty pocket in the tool changer.
- Place tool in the spindle and command a tool change. If further adjustment is necessary repeat the previous steps.
Verify Alignment
Place a tool in the spindle and command a tool change. Check for proper engagement. Put another tool in the spindle and command a tool change to a pocket 180° from the first tool. Check for proper engagement between the spindle and tool changer. If the tool changer does not move in to the proper position for the tool change the shuttle stroke may need to be adjusted. See the "Shuttle Stroke Adjustment" section of the Service manual.
Measure the distance from the table to the tool holder at the tool change position. Rotate the tool changer carousel 90° and check the height again. Do the previous steps again at the 180° and 270° intervals. This will verify that the tool changer assembly is parallel to the table.
SETTING PARAMETER 64 (TOOL CHANGE OFFSET)
Please read this section in its entirety before attempting to set Parameter 64.
NOTE: Setting 7 must be set to “OFF” before setting Parameter 64.
-
Without a tool in the spindle taper, initiate a tool change and stop the tool changer using the E-STOP button, just before the tool changer reaches the spindle. Insert a tool holder into the pocket facing the spindle.
-
Using a .0005 indicator and suitable magnetic base, zero off of bottom left edge “A” of tool holder (looking directly into pocket). Move indicator to bottom right edge “B” of tool holder. Any difference between these edges should be equally divided. For example: if a difference of .002 from left side to right side edge, adjust indicator dial so that indicator reads .001 when it is on either edge. This gives you the tool offset reference.
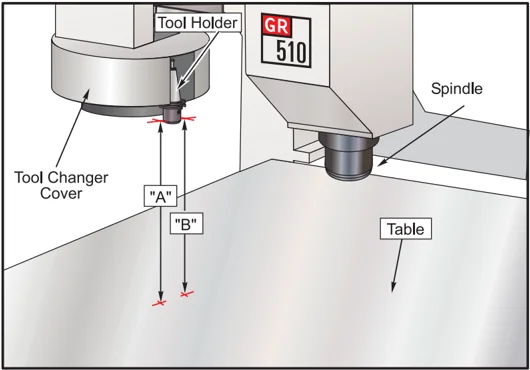
Checking Tool Offset Reference.
-
Carefully (so as not to disturb relative position) move indicator to one side. Remove tool from tool changer.
-
Press Zero Return, then Zero Single Axis, this will move the tool changer shuttle out.
-
Place a tool in the spindle.
-
Press Z and Home G28 to bring the Z axis to the tool change position.
-
Carefully (so as not to disturb relative position) place indicator under spindle and indicate on bottom left edge of the tool holder.
If spindle head is too far in the negative (-) or the positive (+) direction, go to JOG mode and choose Z-axis. Jog Z-axis in the necessary direction until it reads zero (0).
- Enter DEBUG, and go to Position Raw Data page. Write down number for Z-axis from the “actual” column. If Z-axis ‘actual’ display is negative (-), add the number to Parameter 64. If the number is positive (+), subtract it from Parameter 64, ignoring the decimal points.
Example: Parameter 64 = 917207 Z-axis Actual = .0390 917207 - 390 = 916817
-
To insert the calculated new number, place cursor at Parameter 64, type in new number and push WRITE key. ZERO RET Z-axis to initialize the new Parameter 64. Press Z and Home G28 to bring the Z axis down.
-
Recheck the offset with the indicator (Steps 1-5).
-
Insert tool holder in spindle taper and change tool. Watch closely as tool changer approaches spindle.
-
Change setting 7 to “ON”.
-
Exit Debug.
1.2 PENDANT ARM
The Gantry Mill has the pendant arm secured to the table for shipping. DO NOT operate the mill with the arm in this position.
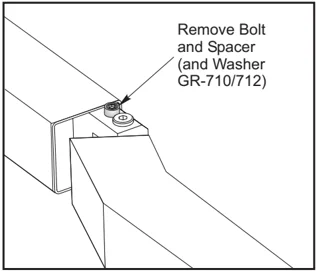
Remove Bolt and Spacer (and Washer GR-710/712)
Shipping Position
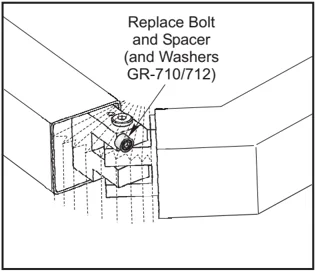
Replace Bolt and Spacer (and Washers GR-710/712)
Operating Position
Swing the pendant arm away from the table. Remove the bolt and spacer which is stored in the top of the arm joint, and install the bolt and spacer in the front of the joint. Loosen the clamps on the flexible boot. Position the boot over the joint and tighten the clamps.
1.3 PHOTOELECTRIC BEAMS
WARNING!! THE ELECTRIC SAFETY GUARDS MUST BE SET-UP BEFORE JOGGING ANY AXIS.
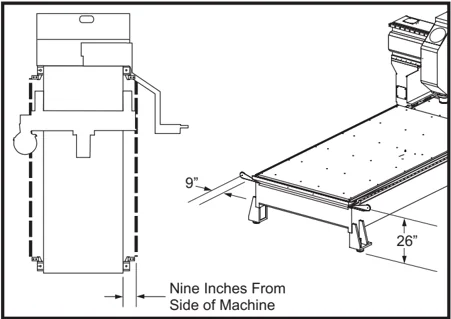
The GR-Series mills comes factory equipped with photoelectric beams. Once this system is set up the machine will halt should personnel or equipment enter the protected area. The beam fixtures are located at each corner and scan the length (the areas the gantry legs travel) of the table. Note that the width is not protected. The mill will go into feed hold and the spindle will stop if the electronic beam is broken. When this happens clear the area close to the machine of personnel or equipment and press Cycle Start to continue.
The mill will arrive with the beam sensor and reflector support brackets in their shipping position. These will have to be oriented correctly to align with one another.
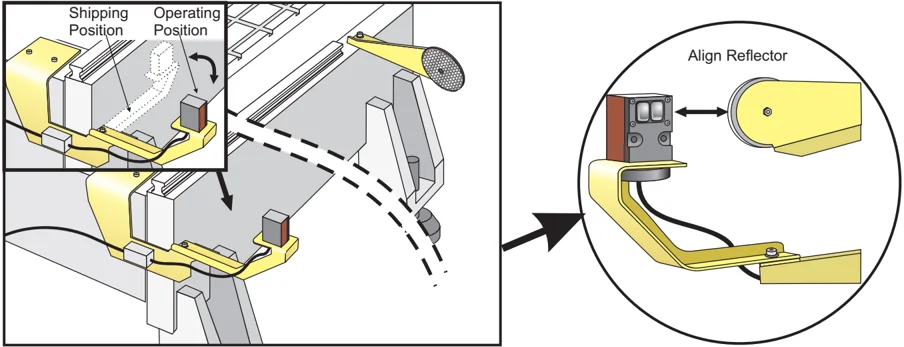
Set-up Each side of the table has a bracket with a reflector and a bracket with a sensor. These need to be positioned correctly in order for the system to function.
- Loosen the single bolt and rotate the arm 90°. This will have to be done at each corner of the machine. Snug the bolts.
- Move to the bracket with the sensor on it and adjust it until the lights (red and green) on the sensor come on. Do this with both sensors.
- Once aligned, tighten all the bolts on the four guards. Verify the lights on both sensors are still on.
1.4 LEVELING
Leveling of the machine is required to obtain the correct right angle geometry of the X, Y, and Z axes. Incorrect leveling will result in out-of-round circle milling and incorrect linear interpolation.
Use a precision bubble level with each division equal to 0.0005 inch per 10 inches, or .05 mm per meter, or 10 seconds per division. Before starting, check the accuracy of your level. Set it on the table on the X-axis and record the reading. Then turn it 180° and the reading should be the same. If it is not, the level is out of calibration and should be adjusted before you continue.
Screw the four leveling screws at the corners through the base until the base is 2-1/2" to 3" above the floor. That translates into a minimum of one inch of the leveling screw extending out of the bottom of the base of the machine, or one inch between the pads and the casting. Turn each screw until the tension is about the same as the tension on the other screws. Screw the jam nuts onto the four (4) leveling screws, but do not tighten them down.
ROUGH LEVELING
- Place the precision bubble level on the center of the table parallel with the table (X-axis).
- If the bubble goes to the front of the level, then the front end of the machine is high. Conversely, if the bubble goes to the rear, it means that the rear end is high. Raise the two front or back leveling screws evenly until the bubble is centered.
- Rotate the level 90° parallel with the Y-axis. Adjust the right or left leveling screws as needed until level.
- Repeat this process until both directions are level.
REMOVE PITCH AND ROLL (TWIST)
- Use Handle Jog set for 0.01 on the X-axis for this procedure. This provides a good rate of travel for manually moving the bridge. Jog the X-axis to machine zero and the Y-axis to the middle of travel.
- Place the level on the bridge parallel to the X-axis to check the pitch. Zero the level by shimming it. Jog the bridge to the other end to the machine. If the bubble goes to the front of the level, then the front end of the machine is high. And conversely, if the bubble goes to the rear, it means that the rear end is high. Raise both screws on the low end until level.
- Place level parallel to the Y-axis on the bridge to check for roll on the table. Zero the level by shimming it.
- Jog bridge to other end of machine. If the bubble goes toward the right, the right front corner of the machine is too high. And conversely, if the bubble goes to the left, the left front corner is too high. Adjust as needed.
- As process continues, leveling screws are turned in smaller increments — 1/4 turn, 1/8 turn, and smaller. Also, as machine is leveled, make sure tension continues to be equal on the screws at all four corners.
Repeat these steps until the machine is level. When leveling is completed, tighten the jam nuts on the leveling screws. Check again that all the screws are sitting tight against the pads.
Check the leveling screws a few days after installation. The foundation may settle which could affect the machine’s stability.
C HIP S HIELD I NSTALLATION
-
Fasten the chip shield to the chip shield bracket with the two plastic knobs.
-
It is important to ensure that the chip shield is lower than the longest tool in the tool changer. Adjust the chip shield by loosening the plastic knobs and sliding the shield up or down on the bracket.
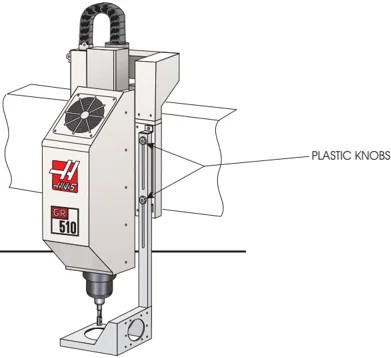
NOTE: If the chip shield is not lower than the longest tool, the chip shield and the tool will collide during a tool change and can cause damage.
2. OPERATION
Tool Changer
Follow these specifications to avoid damaging the tool changer:
• Use the correct tooling: BT or CT.
• The maximum tool weight allowable is 12 lbs per pocket, 120 lbs total, with 3.5" maximum tool diameters.
Table
• The maximum weight allowable on the GR-510 table is 6000 lbs distributed evenly.
CAUTION!
• Extremely heavy tool weights should be distributed evenly.
• Ensure there is adequate clearance between tools in the tool changer before running an automatic operation. This distance is 3.6" for a 10 pocket or a 20-pocket tool changer.
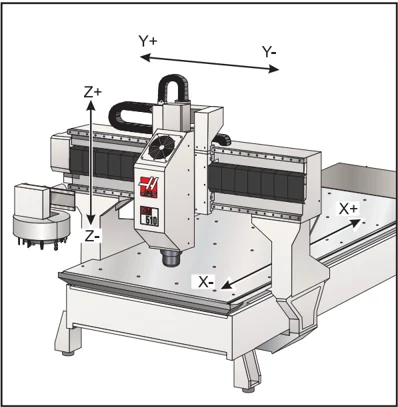
3. MAINTENANCE
The axes must be lubricated once a month. The axes are lubricated manually and have grease fittings on them. Use a synthetic grease with an NLGI grade of 1.5 or 2. Pump with 2 strokes of the included grease gun at each fitting. The grease fitting for the Y-axis and Z-axis is on the operator side of the sub plate. Each column has a grease fitting mounted in it and the X-axis ball screw grease fitting is under the machine. It is accessed by moving the gantry to the forward-most position.
Machines with an optional spindle may have a separate oiling system. Check monthly and add oil if required.
If equipped, check coolant level each 8 hour shift.
Coolant Tank
Clean the coolant tank each week. The coolant hoses may need to be removed from the pump, filter and if equipped, auxiliary filter in order to gain better access to the tank. Mark the hoses from the coolant pump and filter so they can be reinstalled to the proper fitting. It is possible to put the hoses on the wrong port, so it is very important that the hose are marked properly so they can be reinstalled correctly.
 Grease Ports
Grease Port