7 Services operating area 01/2008 7
7.1 Services main screen
7-358 SINUMERIK 840Di sl/840D sl/840D Operating Manual HMI-Advanced (BAD) - 01/2008 Edition

7.1 Services main screen
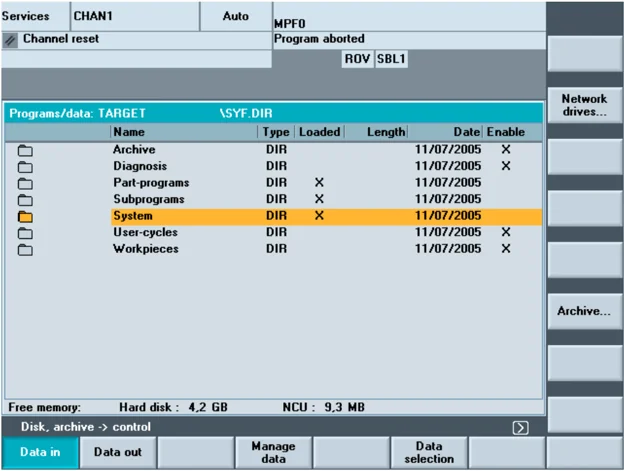
The "Services" Operating Area provides the following functions:
- Read data in/out
- Manage data
- Series commissioning
All programs/data stored on the hard disk or in the NC memory are listed in the "Services" main screen.
Display of the current file tree:

The following file attributes can be displayed for each file (depending on the default setting):
| Name | Description |
|---|---|
| Name | Directory name/file nameFiles with a maximum name length of 25 characters can be managed. |
| Type | Specifies the file type which matches the file identifier. |
| Loaded | To execute a program in the NC (through NC Start), it must be loaded into the NC main memory. To ensure that the memory does not become overloaded, however, related programs and data can be loaded explicitly (from the hard disk to the NC memory) and unloaded again (from NC memory back to hard disk).The current status of a file is indicated by an "X" in a column under "Loaded": File loaded, file can be selected and executed with an NC Start. |
SINUMERIK 840Di sl/840D sl/840D Operating Manual HMI-Advanced (BAD) - □□/□□□□ Edition
7 Services operating area 01/2008 7
7.1 Services main screen
Notice: Data may only be loaded for programs for which an enable has been set!
Length File length in bytes (directory length is not displayed)
Date Date of creation or date of last modification to file
Enable Enable (=selection/right to execute) activated "X" or not activated " " When you set up a program, you may not necessarily be able to process it immediately with an NC Start (e.g. if it is not ready or requires a trial run). To indicate that a program is ready for NC Start, it is possible to enable or disable the program. The current state of a file is indicated by an "X" in the "Enable" column (= enable activated).
Access authorization There are also 5 access rights for each file:
- Delete Corresponds to level 1
- Display Corresponds to level 2
- Write Corresponds to level 3
- Read Corresponds to level 5
- Execute Corresponds to level 7
The access right for each file is indicated in the file tree. Not every user should be able to edit data and programs on the control. Access levels are therefore defined for each file. They range from level 0 (SIEMENS password) to level 7 (key-operated switch 0). For how to set the access rights, see Chapter "Changing properties".
The access rights are not displayed as the numbers 1 – 7 in the display, instead the display only includes objects which can be executed depending on the rights assigned when the control was started.
7
Services operating area
7.1 Services main screen
Horizontal softkeys
Data in Read in archives/files:
- Archive from (directory "Archive" on the hard disk)
- USB local
- Diskette (if available)
Data from Read out archives/files
- Archive to (directory "Archive" on the hard disk)
- USB local
- Diskette (if available)
Manage data Files/directories can be created, loaded, saved, deleted or copied and their attributes can be displayed/changed.
Log This softkey can only be selected if a log is available, i.e., after a transmission request has been initiated, a log is generated and the softkey becomes active.
Current actions, errors and any prompts are displayed in the job list. Prompts must be acknowledged.
The "Job log" lists, for example, errors that have occurred in data transmission.
Data selection By using the "Data selection" softkey, you can choose the directories that you wish to have displayed in the "Services" main screen.

Expanded softkey bar:
Series comm. You can archive data for a series commissioning. The softkey is password-protected.
To update the SINUMERIK solution line, select "NC" as the archive content during the series commissioning.
Upgrade The update function is only available on the SINUMERIK powerline. This function supports updating of the NC system software. For this purpose, you can create an update archive.
7 Services operating area 01/2008 7.1 Services main screen

Vertical softkeys
The vertical softkeys allow you to select the source area (for data import) or the target area (for data export). The yellow title in the window indicates the area.
- Floppy disk
- "Archives" directory on hard disk
- "Archives" directory on the NC card
Note: Users with access authorization to level 3 and higher can access this softkey. It is displayed only if archive _N_ORIGINAL_ARC is stored on the NC card.
7.1.1 Reading-in data
Function
When reading in archives and files, the following are possible source areas:
- Archive (i.e. the "Archives" directory) in the directory tree (even if it is not displayed under "Data selection").
- USB memory module
- A diskette drive
- The NC card, if formatted on a Flash File System.
When archives are read in, their format is recognized automatically. Data with longer file names (> 8 + 3 characters) can be read in from diskette.

7
Services operating area 7.1 Services main screen 7
Sequence of operations
Data in The "Programs/Data" file tree is displayed. The vertical softkey bar changes.
Mark the file into which you wish to read the archive.
Select the source area (see title in window):
- Diskette drive: Shows the contents of the diskette. Select the archive you wish to import.
Floppy disk Archives NC card
- Opens the "Archives" directory on the hard disk. Select the archive you wish to import.
- The contents of the archives directory on the NC card are displayed. Select the archive you wish to import.
7.1.2 Reading-out data
Function
Create archives: With the "Data out" function, the source area (see title in window) for data transmission is the displayed directory tree. Possible target areas are:
- The "Archives" directory on the hard disk
- USB memory module
- A diskette drive
- Free memory areas on the NC card.
Sequence of operations
Data from The "Programs/Data" file tree is displayed. The vertical softkey bar changes.
You have marked the data that you wish to save/archive.
Select the target area (see title in window):
- Diskette drive: The diskette contents are displayed. Enter the name of the new archive file.
Floppy disk
7 Services operating area 01/2008 7.1 Services main screen
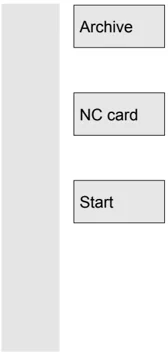
Archive NC card Start
- The contents of the "Archives" directory on the hard disk are displayed. Enter the name of the new archive file.
- The contents of the archives directory on the NC card are displayed. Enter the name of the new archive file.
When exporting data from diskette/archive, press the "Start" softkey, otherwise the control is ready to receive immediately. The data transfer is initiated. The vertical softkey bar changes. The softkey labeling of the target area changes to "Stop". To abort data transmission, press the relevant softkey again.
Additional information
Archives to be stored on diskette need not fit completely on a single diskette. Distribution of the archive over several diskettes is supported.
When archiving workpieces that contain job lists of the same name, in the case of m:n, you are asked whether the job lists to be unloaded are to be executed. You can terminate the action with "Abort", otherwise all job lists are executed and archiving is then started.
7.1.3 Displaying the log
Function
A job log is generated automatically for each transmission. You can press the "Log" softkey to display the following information:
- The transmitted files in the job list
- The error list, which displays messages regarding whether the transmission has been successful or not.
Sequence of operations
Services
The "Services" operating area is selected.

7
7.1 Services operating area Services main screen
Log The "Log" window is opened. The source or target of the job is displayed in the header. The vertical softkey bar changes.
Manage data Jobs are assigned to the vertical softkeys, i.e. jobs for
- "Manage data"
Floppy disk
- Floppy disk drive
You can switch between windows with these softkeys. The softkey label displays "...Stop" if a job is not running. You can abort a job in progress by pressing the "Stop" softkey again.
A message line is displayed in the "Error list" field to indicate whether or not errors have occurred during data transmission.
In the case of queries, the prompt "Please acknowledge query in log window" appears in the user response line.
Confirm the prompt with one of the vertical softkeys:
- Do not confirm
- Confirm all
- Confirm
- Change name/type
- Abort complete job
No Yes, all Yes Name/type Stop Delete log
The currently displayed log is deleted. The log window is closed when the last log is deleted.

7 Services operating area 01/2008 7.2 Managing data
7.2 Managing data

Function
Files/directories can be created, loaded, saved, deleted or copied and their attributes can be displayed/changed in the "Manage data" dialog.
Workpieces, part programs, subprograms, standard cycles, user cycles and manufacturer cycles can also be managed as in the program main screen.
This ensures standardized data management.
This affects the following applications:
- Creating new directories and programs
- Loading programs and files to the program memory
- Loading programs and files from the program memory to the hard disk (unloading the program memory)
- Creating new files
- Copying and pasting files
- Deletion operations
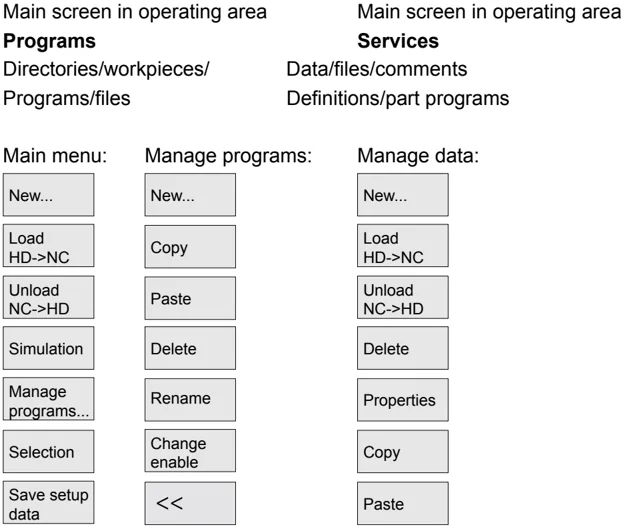
Comparison
Vertical softkeys
Main screen in operating area Programs Directories/workpieces/ Programs/files
Main menu: New... Load HD->NC Unload NC->HD Simulation Manage programs... Selection Save setup data
Main screen in operating area Services Data/files/comments Definitions/part programs
Manage programs: New... Copy Paste Delete Rename Change enable <<
Manage data: New... Load HD->NC Unload NC->HD Delete Properties Copy Paste
7
Services operating area 7.2 Managing data 7
7.2.1 New file/new directory
Sequence of operations
Press the "Manage data" softkey. The horizontal and vertical softkey bars change.
The "New" window appears.
Enter a new file name.
If the pre-assigned file type does not match, use the "End" key to switch between input field "Name" and "File type". Select the new file type.
The new directory/file is set up in the directory overview.
7.2.2 Loading and unloading
Sequence of operations
Press the "Manage data" softkey. The horizontal and vertical softkey bars change.
Position the cursor on the desired file. The selected file is deleted from the hard disk and loaded to the NC memory. In the display the entry "X" = loaded is added to the file.
See also Chapter "Job list".
The selected file is deleted from the NC memory and loaded to the hard disk. In the display, the entry " " = not loaded is added to the file.
If you want to "load/unload" a workpiece directory and a job list with the name of the directory exists in the job list, that job list is executed. If a job list does not exist, all the files in that directory are loaded/unloaded.
SINUMERIK 840D sl/840D sl/840D Operating Manual HMI-Advanced (BAD) - 01/2008 Edition



7 Services operating area 01/2008 7
7.2 Managing data
Loadable compile cycles
You can use the HMI user interface to transfer the loadable compile cycles (CC) easily to the NC using an NC card. Further storage locations are any external drive, such as a disk drive, USB memory module or network drives 1 to 4. This storage location appears in the Service operating area under "Manage data".
You can also use the SinuCom NC or SINUCOPY-FFS commissioning tool to transfer the loadable compile cycles into the control.
Load a compile cycle
Each time the NC is booted, all loadable compile cycles with the extension .ELF, which are available in the /_N_CCOEM.DIR directory, are automatically loaded into the NCK system software. Loadable compile cycles are always loaded on an NCU reset.
For a detailed description of how to install compile cycles, please see: /FB3/, TE0 Installation and Activation of Loadable Compile Cycles.
7.2.3 Copying and inserting
Function
Copy compile cycles
Following a reset, the optionally available compile cycles are stored on the NCU in the Flash File System (FFS) in directory /_N_CCOEM.DIR and can be copied selectively from/to an external drive, disk or NC card.
It is thus possible to archive individual compile cycles. The "Insert" function is available in addition to "Copy". You can copy
- A single file,
- Several files or
- A complete directory.
You can display any existing compile cycles in the Diagnostics operating area under Service displays/Version/Compile cycles.
Sequence of operations
Press the "Manage data" softkey. The horizontal and vertical softkey bars change.
Select the source files that you wish to copy.

Manage data
SELECT

7 01/2008 Services operating area 7.2 Managing data 7
Copy A second window for the target directory (see title in window) is opened. If available, select the target device via the vertical softkeys.
Programs/ data The contents of "Programs/data" are displayed.
NC card Archive files or complete directories can be copied from an existing NC card.
USB local You can use the “Local USB” softkey to access the USB interface on the front panel. This is activated as soon as a USB memory has been plugged in and recognized.
Floppy disk If a diskette drive is installed, you can copy to or from diskette. The diskette contents are displayed. Select a target directory.
Paste The source files are copied to the target directory you have selected.
On SINUMERIK solution line, the NC card softkey has the same functionality after pressing the expansion key.
NC card
With this copying action in operating area "Services" the names remain unchanged. See Chapter "Copy/Insert" in the "Program" operating area.
7.2.4 Deleting
File Directory
Function You can delete a single file or a group of files (multiple selection). You can delete a directory and all its contents.
The system settings relating to deletion determine whether a prompt appears before files/directories/data are finally deleted. See Chapter "Commissioning operating area"

7 Services operating area 01/2008
7.2 Managing data

Sequence of operations
Manage data
Press the "Manage data" softkey. The horizontal and vertical softkey bars change.
Position the cursor on the desired file.
Delete
A query window appears.
OK
You can delete the highlighted file by pressing "OK".
Archives stored on the NC card can be deleted by selecting "NC card" under "Manage data".
7.2.5 Changing properties

Function
This function allows you to view the contents of a file (or directory) as well as other information, to view file/directory properties and to change some properties.
You can perform the following actions:
- Rename a file
- Convert a file to another file type
- Change the access rights to the file/directory
- View the contents of readable files. The contents of text files are displayed.
You can change access levels only if you have the appropriate access rights to do so.

Sequence of operations
Manage data
Press the "Manage data" softkey. The horizontal and vertical softkey bars change.
Properties
The "Properties" window is opened. Enter the changes you wish to make, e.g. rename the file or change the file type.


7
Services operating area
7.2 Managing data
7

Rename file Place the cursor on the file name and press the "Edit" key (displayed next to the type list), enter the new file name.
There are two ways of renaming files:
- Renaming the workpiece directory
- Renaming a directory in the workpiece directory
Rename a workpiece directory: When you rename a workpiece directory, all the workpiece files under that directory that have the same name as the directory are renamed. If a job list with the name of the directory exists, the instructions in that job list are also renamed. Comment lines remain unchanged.
Example: Workpiece directory A.WPD is renamed B.WPD: All files with the name A.XXX are renamed as B.XXX, i.e. the extension is retained. If a job list called A.JOB exists, it is renamed as B.JOB. If this job list contains instructions of file A.XXX and these are located in this workpiece directory, then that file is also renamed B.XXX.
Example:
If job list A.JOB contains an instruction
LOAD/Work.DIR/A.WPD/A.MPF
it is renamed as
LOAD/Work.DIR/B.WPD/B.MPF
However, if a job list contains the instruction
LOAD/MPF.DIR/A.MPF or
LOAD/Work.DIR/X.WPD/A.MPF
the files are not renamed.
Rename a directory in the workpiece directory: If you rename the files in the workpiece directory, all files with the same name but a different extension are renamed. Exception: If a job list of the same name exists in the directory, then this one is not renamed.
SINUMERIK 840D sl/840D sl/840D Operating Manual HMI-Advanced (BAD) - 01/2008 Edition

7 Services operating area 01/2008 7.2 Managing data
Change the file type Use the "Edit" key (displayed next to the type bar) to show the list of file types to which the file may be converted.
Only the file types are displayed which are permissible in the directory where the file is located.
Use the "Direction" keys to display the new file type. Confirm your selection with the "Input" key (displayed next to the file type you have selected). The file is assigned the new file type.

Additional information
- No check is made to determine whether or not the file contents may be stored under the new file type!
- The contents of a file are not altered when the file type is converted.
- All data types may be stored in the "Clipboard" directory.
- The file type is displayed in the properties window for network drives or disk, and the extension with 0 to 3 characters can be modified in the "Type" input field.

