SIEMENS
SIMATIC
S7-200 Programmable Controller System Manual
This manual has the order number:
6ES7298-8FA24-8BH0
Edition 08/2008
A5E00307987-04
| Section | Page |
|---|---|
| Preface, Contents | |
| Product Overview | 1 |
| Getting Started | 2 |
| Installing the S7-200 | 3 |
| PLC Concepts | 4 |
| Programming Concepts, Conventions and Features | 5 |
| S7-200 Instruction Set | 6 |
| Communicating over a Network | 7 |
| Hardware Troubleshooting Guide and Software Debugging Tools | 8 |
| Open Loop Motion Control with the S7-200 | 9 |
| Creating a Program for the Modem Module | 10 |
| Using the USS Protocol Library to Control a MicroMaster Drive | 11 |
| Using the Modbus Protocol Library | 12 |
| Using Recipes | 13 |
| Using Data Logs | 14 |
| PID Auto-Tune and the PID Tuning Control Panel | 15 |
| Appendices | |
| Index |
Safety Guidelines
This manual contains notices which you should observe to ensure your own personal safety, as well as to protect the product and connected equipment. These notices are highlighted in the manual by a warning triangle and are marked as follows according to the level of danger:
Danger Danger indicates an imminently hazardous situation which, if not avoided, will result in death or serious injury.
Warning Warning indicates a potentially hazardous situation which, if not avoided, could result in death or serious injury.
Caution Caution used with the safety alert symbol indicates a potentially hazardous situation which, if not avoided, may result in minor or moderate injury.
Caution Caution used without the safety alert symbol indicates a potentially hazardous situation which, if not avoided, may result in property damage.
Notice Notice indicates a potential situation which, if not avoided, may result in an undesirable result or state.
Qualified Personnel
Only qualified personnel should be allowed to install and work on this equipment. Qualified persons are defined as persons who are authorized to commission, to ground, and to tag circuits, equipment, and systems in accordance with established safety practices and standards.
Correct Usage
Note the following:
Warning This device and its components may only be used for the applications described in the catalog or the technical descriptions, and only in connection with devices or components from other manufacturers which have been approved or recommended by Siemens.
This product can only function correctly and safely if it is transported, stored, set up, and installed correctly, and operated and maintained as recommended.
Trademarks
SIMATIC®, SIMATIC HMI® and SIMATIC NET® are registered trademarks of SIEMENS AG.
Some of other designations used in these documents are also registered trademarks; the owner's rights may be violated if they are used by third parties for their own purposes.
Copyright Siemens AG 2008 All rights reserved
The reproduction, transmission or use of this document or its contents is not permitted without express written authority. Offenders will be liable for damages. All rights, including rights created by patent grant or registration of a utility model or design, are reserved.
Siemens AG Bereich Automation and Drives Geschaefsgebiet Industrial A utomation Systems Postfach 4848, D- 90327 Nuernberg
Disclaimer of Liability
We have checked the contents of this manual for agreement with the hardware and software described. Since deviations cannot be precluded entirely, we cannot guarantee full agreement. However, the data in this manual are reviewed regularly and any necessary corrections included in subsequent editions. Suggestions for improvement are welcomed.
© Siemens AG 2008 Technical data subject to change.
Siemens Aktiengesellschaft 6ES7298-8FA24-8BH0
Preface
Purpose of the manual
The S7-200 series is a line of micro-programmable logic controllers (Micro PLCs) that can control a variety of automation applications. Compact design, low cost, and a powerful instruction set make the S7-200 a perfect solution for controlling small applications. The wide variety of S7-200 models and the Windows-based programming tool give you the flexibility you need to solve your automation problems.
This manual provides information about installing and programming the S7-200 Micro PLCs and is designed for engineers, programmers, installers, and electricians who have a general knowledge of programmable logic controllers.
Required Basic Knowledge
To understand this manual, it is necessary to have a general knowledge of automation and programmable logic controllers.
Scope of the Manual
This manual is valid for STEP 7-Micro/WIN, version 4.0 and the S7-200 CPU product family. For a complete list of the S7-200 products and order numbers described in this manual, see Appendix A.
Changes compared to the previous version
This manual has been revised to include two new analog expansion modules and one additional appendix.
☐ EM 231 Analog Input RTD, 4 Inputs
☐ EM 231 Analog Input Thermocouple 8 Inputs
☐ Appendix H, S7-200CN Products
Certification
The SIMATIC S7-200 products have the following certification:
☐ Underwriters Laboratories, Inc. UL 508 Listed (Industrial Control Equipment), Registration number E75310
☐ Canadian Standards Association: CSA C22.2 Number 142 (Process Control Equipment)
☐ Factory Mutual Research: Class Number 3600, Class Number 3611, FM Class I, Division 2, Groups A, B, C, & D Hazardous Locations, T4A and Class I, Zone 2, IIC, T4
Tip The SIMATIC S7-200 series meets the CSA standard. The cULus logo indicates that the S7-200 has been examined and certified by Underwriters Laboratories (UL) to standards UL 508 and CSA 22.2 No. 142.
CE Labeling
Refer to the General Technical Specifications in Appendix A for more information.
C-Tick
The SIMATIC S7-200 products are compliant with requirements of the AS/NZS 2064 (Australian) standard.
Standards:
The SIMATIC S7-200 products fulfill the requirement and criteria of IEC 61131-2, Programmable controllers - Equipment requirements.
Refer to Appendix A for additional compliance information.
Place of this Documentation in the Information Environment
| Product Family | Documentation | Order Number |
|---|---|---|
| S7-200 | S7-200 Point-to-Point Interface Communication Manual (English/German) | 6ES7 298-8GA00-8XH0 |
| SIMATIC Text Display User Manual (included on the STEP 7-Micro/WIN documentation CD) | none | |
| HMI device OP 73micro, TP 177micro (WinCC Flexible) Operating Instructions (English) | 6AV6 691-1DF01-0AB0 | |
| SIMATIC HMI WinCC flexible 2005 Micro User’s Manual (English) | 6AV6 691-1AA01-0AB0 | |
| SIMATIC NET CP 243-2 AS-Interface Master Manual (English) | 6GK7 243-2AX00-8BA0 | |
| SIMATIC NET CP 243-1 Communications processor of Industrial Ethernet Technical Manual (English) | J31069-D0428-U001-A2-7618 | |
| SIMATIC NET CP 243-1 IT Communications Processor of Industrial Ethernet and Information Technology Technical Manual (English) | J31069-D0429-U001-A2-7618 | |
| SIMATIC NET S7Beans / Applets for IT-CPs Programming Tips (English) | C79000-G8976-C180-02 | |
| SIMATIC NET GPRS/GSM-Modem SINAUT MD720-3 System manual (English) | C79000-G8976-C211 | |
| SIMATIC NET SINAUT MICRO SC System manual (English) | C79000-G8900-C210 | |
| SIWAREX MS Device Manual (English) (included with device) | none | |
| S7-200 Programmable Controller System Manual (English) | 6ES7 298-8FA24-8BH0 |
iv
Finding Your Way
If you are a first-time user of S7-200 Micro PLCs, you should read the entire S7-200 Programmable Controller System Manual. If you are an experienced user, refer to the table of contents or index to find specific information.
The S7-200 Programmable Controller System Manual is organized according to the following topics:
- Chapter 1 (Product Overview) provides an overview of some of the features of the S7-200 family of Micro PLC products.
- Chapter 2 (Getting Started) provides a tutorial for creating and downloading a sample control program to an S7-200.
- Chapter 3 (Installing the S7-200) provides the dimensions and basic guidelines for installing the S7-200 CPU modules and expansion I/O modules.
- Chapter 4 (PLC Concepts) provides information about the operation of the S7-200.
- Chapter 5 (Programming Concepts, Conventions, and Features) provides information about the features of STEP 7-Micro/WIN, the program editors and types of instructions (IEC 1131-3 or SIMATIC), S7-200 data types, and guidelines for creating programs.
- Chapter 6 (S7-200 Instruction Set) provides descriptions and examples of programming instructions supported by the S7-200.
- Chapter 7 (Communicating over a Network) provides information for setting up the different network configurations supported by the S7-200.
- Chapter 8 (Hardware Troubleshooting Guide and Software Debugging Tools) provides information for troubleshooting problems with the S7-200 hardware and about the STEP 7-Micro/WIN features that help you debug your program.
- Chapter 9 (Open Loop Motion Control with the S7-200) provides information about three methods of open loop motion control: Pulse Width Modulation, Pulse Train Output, and the EM 253 Position Control Module.
- Chapter 10 (Creating a Program for the Modem Module) provides information about the instructions and wizard used to create a program for the EM 241 Modem module.
- Chapter 11 (Using the USS Protocol Library to Control a MicroMaster Drive) provides information about the instructions used to create a control program for a MicroMaster drive. It also provides information about how to configure the MicroMaster 3 and MicroMaster 4 drives.
- Chapter 12 (Using the Modbus Protocol Library) provides information about the instructions used to create a program that uses the Modbus protocol for communications.
- Chapter 13 (Using Recipes) provides information about organizing and loading automation program recipes in the memory cartridge.
- Chapter 14 (Using Data Logs) provides information about storing process measurement data in the memory cartridge.
- Chapter 15 (PID Auto-Tune and the PID Tuning Control Panel) provides information about using these features to greatly enhance the utility and ease of use of the PID function provided by the S7-200.
- Appendix A (Technical Specifications) provides the technical information and data sheets about the S7-200 hardware.
The other appendices provide additional reference information, such as descriptions of the error codes, descriptions of the Special Memory (SM) area, part numbers for ordering S7-200 equipment, STL instruction execution times, and S7-200CN product information.
In addition to this manual, STEP 7-Micro/WIN provides extensive online help for getting started with programming the S7-200. Included with the purchase of the STEP 7-Micro/WIN software is a free documentation CD. On this CD you can find application tips, an electronic version of this manual and other information.
Online Help Help is only a keystroke away! Pressing F1 accesses the extensive online help for STEP 7-Micro/WIN. The online help includes useful information about getting started with programming the S7-200, as well as many other topics.
Electronic Manual An electronic version of this S7-200 System Manual is available on the documentation CD. You can install the electronic manual onto your computer so that you can easily access the information in the manual while you are working with the STEP 7-Micro/WIN software.
Programming Tips The documentation CD includes Programming Tips, a set of application examples with sample programs. Reviewing or modifying these examples can help you find efficient or innovative solutions for your own application. You can also find the most current version of Programming Tips on the S7-200 Internet site.
Recycling and Disposal Please contact a company certified in the disposal of electronic scrap for environmentally safe recycling and disposal of your device.
Additional Support
Local Siemens Sales Office or Distributor For assistance in answering any technical questions, for training on the S7-200 products, or for ordering S7-200 products, contact your Siemens distributor or sales office. Because your sales representatives are technically trained and have the most specific knowledge about your operations, process and industry, as well as about the individual Siemens products that you are using, they can provide the fastest and most efficient answers to any problems that you might encounter.
Service & Support on the Internet In addition to our documentation, we offer our Know-how online on the Internet at: http://www.siemens.com/automation/service&support where you will find the following:
- www.siemens.com/S7-200 for S7-200 product information The S7-200 Internet site includes frequently asked questions (FAQs), Programming Tips (application examples and sample programs), information about newly released products, and product updates or downloads.
- The newsletter, which constantly provides you with up-to-date information on your products.
- The right documents via our Search function in Service & Support.
- A forum, where users and experts from all over the world exchange their experiences.
- Your local representative for Automation & Drives.
- Information on field service, repairs, spare parts and more under "Services".
Technical Services The highly trained staff of the S7-200 Technical Services center is also available to help you solve any problems that you might encounter. You can call on them 24 hours a day, 7 days a week.
vi
Preface
A&D Technical Support
Worldwide, available 24 hours a day:
Technical Support
Contents
- 1 Product Overview . . . . . . . . . . . . . . . . . . . . . . . . . . . . . . . . . . . . . . . . . . . . . . . . . . . . . . . . . . . . . . . . . . . . . . . . . . . . . . . . . . . . . . . . . . . . . . . . . ........ 1
- What's New? . . . . . . . . . . . . . . . . . . . . . . . . . . . . . . . . . . . . . . . . . . . . . . . . . . . . . . . . . . . . . . . . . . . . . . . . . . . . . . . . . . . . . . . . . . . . . . . . . . . . . . . ........ 2
- S7-200 CPU . . . . . . . . . . . . . . . . . . . . . . . . . . . . . . . . . . . . . . . . . . . . . . . . . . . . . . . . . . . . . . . . . . . . . . . . . . . . . . . . . . . . . . . . . . . . . ........
6 S7-200 Instruction Set . . . . . . . . . . . . . . . . . . . . . . . . . . . . . . . . . . . . . . . . . . . . . . . . . . . . . . 65
- Conventions Used to Describe the Instructions . . . . . . . . . . . . . . . . . . . . . . . . . . . . . . . . . . . . . . . . . . . . . . . . . . . . . . . . . . . . . . . . . . . . . . . . . . . . . . . . . . . . . . . . . . . . . . . . . . . . . . . . . . . . . . . . . . . . . . . . . . . . . . . . . . . . . . ........ 67
- S7-200 Memory Ranges and Features . . . . . . . . . . . . . . . . . . . . . . . . . . . . . . . . . . . . . . . . . . . . . . . . . . . . . . . . . . . . . . . . . . . . . . . . . . . . . . . . . . . . . . . . . . . . . . . . . . . . . . . . . . . . ........ 68
- Bit Logic Instructions . . . . . . . . . . . . . . . . . . . . . . . . . . . . . . . . . . . . . . . . . . . . . . . . . . . . . . . . . . . . . . . . . . . . . . . . . . . . . . . . . . . . . . . . . . . . . . . . . . . . . . . . . . . . ........
Contents
Shift and Rotate Instructions . . . . . . . . . . . . . . . . . . . . . . . . . . . . . . . . . . . . . . 179 Shift Right and Shift Left Instructions . . . . . . . . . . . . . . . . . . . . . . . . . . . . 179 Rotate Right and Rotate Left Instructions . . . . . . . . . . . . . . . . . . . . . . . . . . 179 Shift Register Bit Instruction . . . . . . . . . . . . . . . . . . . . . . . . . . . . . . . . . 181 Swap Bytes Instruction . . . . . . . . . . . . . . . . . . . . . . . . . . . . . . . . . . . . . 183 String Instructions . . . . . . . . . . . . . . . . . . . . . . . . . . . . . . . . . . . . . . . . . . 184 Table Instructions . . . . . . . . . . . . . . . . . . . . . . . . . . . . . . . . . . . . . . . . . . 189 Add To Table . . . . . . . . . . . . . . . . . . . . . . . . . . . . . . . . . . . . . . . . . . . 189 First-In-First-Out and Last-In-First-Out . . . . . . . . . . . . . . . . . . . . . . . . . . 190 Memory Fill . . . . . . . . . . . . . . . . . . . . . . . . . . . . . . . . . . . . . . . . . . . 192 Table Find . . . . . . . . . . . . . . . . . . . . . . . . . . . . . . . . . . . . . . . . . . . . 193 Timer Instructions . . . . . . . . . . . . . . . . . . . . . . . . . . . . . . . . . . . . . . . . . 196 SIMATIC Timer Instructions . . . . . . . . . . . . . . . . . . . . . . . . . . . . . . . . . 196 IEC Timer Instructions . . . . . . . . . . . . . . . . . . . . . . . . . . . . . . . . . . . . 201 Interval Timers . . . . . . . . . . . . . . . . . . . . . . . . . . . . . . . . . . . . . . . . . 203 Subroutine Instructions . . . . . . . . . . . . . . . . . . . . . . . . . . . . . . . . . . . . . . 204
7 Communicating over a Network . . . . . . . . . . . . . . . . . . . . . . . . . . . . . . . . . . 209 Understanding the Basics of S7-200 Network Communications . . . . . . . . . . . . . . 210 Selecting the Communications Protocol for Your Network . . . . . . . . . . . . . . . . . 214 Installing and Removing Communications Interfaces . . . . . . . . . . . . . . . . . . . . 220 Building Your Network . . . . . . . . . . . . . . . . . . . . . . . . . . . . . . . . . . . . . 221 Creating User-Defined Protocols with Freeport Mode . . . . . . . . . . . . . . . . . . . 226 Using Modems and STEP 7-Micro/WIN with Your Network . . . . . . . . . . . . . . . . . . 228 Advanced Topics . . . . . . . . . . . . . . . . . . . . . . . . . . . . . . . . . . . . . . . . 233 Configuring the RS-232/PPI Multi-Master Cable for Remote Operation . . . . . . . . . . 239
8 Hardware Troubleshooting Guide and Software Debugging Tools . . . . . . . . . . . . . . . 243 Features for Debugging Your Program . . . . . . . . . . . . . . . . . . . . . . . . . . . . 244 Displaying the Program Status . . . . . . . . . . . . . . . . . . . . . . . . . . . . . . . . 246 Using a Status Chart to Monitor and Modify the Data in the S7-200 . . . . . . . . . . . 247 Forcing Specific Values . . . . . . . . . . . . . . . . . . . . . . . . . . . . . . . . . . . . 248 Running Your Program for a Specified Number of Scans . . . . . . . . . . . . . . . . . . 248 Hardware Troubleshooting Guide . . . . . . . . . . . . . . . . . . . . . . . . . . . . . . . 249
9 Open Loop Motion Control with the S7-200 . . . . . . . . . . . . . . . . . . . . . . . . . . . 251 Overview . . . . . . . . . . . . . . . . . . . . . . . . . . . . . . . . . . . . . . . . . . . . . 252 Using the PWM (Pulse Width Modulation) Output . . . . . . . . . . . . . . . . . . . . . . 253 Basic Information for Open Loop Position Control Using Steppers or Servos . . . . . . 255 Instructions Created by the Position Control Wizard . . . . . . . . . . . . . . . . . . . 260 Error Codes for the PTO Instructions . . . . . . . . . . . . . . . . . . . . . . . . . . . . 264 Features of the Position Module . . . . . . . . . . . . . . . . . . . . . . . . . . . . . . . 265 Configuring the Position Module . . . . . . . . . . . . . . . . . . . . . . . . . . . . . . . 267 Instructions Created by the Position Control Wizard for the Position Module . . . . . 273 Sample Programs for the Position Module . . . . . . . . . . . . . . . . . . . . . . . . . . 285 Monitoring the Position Module with the EM 253 Control Panel . . . . . . . . . . . . . . 290 Error Codes for the Position Module and the Position Instructions . . . . . . . . . . . 292 Advanced Topics . . . . . . . . . . . . . . . . . . . . . . . . . . . . . . . . . . . . . . . . 294 Understanding the RP Seek Modes Supported by the Position Module . . . . . . . . . . . 303
xi
10 Creating a Program for the Modem Module . . . . . . . . . . . . . . . . . . . . . . . . . . 307 Features of the Modem Module . . . . . . . . . . . . . . . . . . . . . . . . . . . . . . . . . . 308 Using the Modem Expansion Wizard to Configure the Modem Module . . . . . . . . . . . 314 Overview of Modem Instructions and Restrictions . . . . . . . . . . . . . . . . . . . . . 318 Instructions for the Modem Module . . . . . . . . . . . . . . . . . . . . . . . . . . . . . . . 319 Sample Program for the Modem Module . . . . . . . . . . . . . . . . . . . . . . . . . . . . 323 S7-200 CPUs that Support Intelligent Modules . . . . . . . . . . . . . . . . . . . . . . . 323 Special Memory Location for the Modem Module . . . . . . . . . . . . . . . . . . . . . . 323 Advanced Topics . . . . . . . . . . . . . . . . . . . . . . . . . . . . . . . . . . . . . . . . . . . 325 Messaging Telephone Number Format . . . . . . . . . . . . . . . . . . . . . . . . . . . . . 327 Text Message Format . . . . . . . . . . . . . . . . . . . . . . . . . . . . . . . . . . . . . . . 328 CPU Data Transfer Message Format . . . . . . . . . . . . . . . . . . . . . . . . . . . . . . 329 11 Using the USS Protocol Library to Control a MicroMaster Drive . . . . . . . . . . . 331 Requirements for Using the USS Protocol . . . . . . . . . . . . . . . . . . . . . . . . . . 332 Calculating the Time Required for Communicating with the Drive . . . . . . . . . . . 332 Using the USS Instructions . . . . . . . . . . . . . . . . . . . . . . . . . . . . . . . . . . . 333 Instructions for the USS Protocol . . . . . . . . . . . . . . . . . . . . . . . . . . . . . . . 334 Sample Programs for the USS Protocol . . . . . . . . . . . . . . . . . . . . . . . . . . . . 341 USS Execution Error Codes . . . . . . . . . . . . . . . . . . . . . . . . . . . . . . . . . . . 342 Connecting and Setting Up the MicroMaster Series 3 Drive . . . . . . . . . . . . . . . 342 Connecting and Setting Up the MicroMaster Series 4 Drive . . . . . . . . . . . . . . . 345 12 Using the Modbus Protocol Library . . . . . . . . . . . . . . . . . . . . . . . . . . . . . . 347 Overview . . . . . . . . . . . . . . . . . . . . . . . . . . . . . . . . . . . . . . . . . . . . . . . 348 Requirements for Using Modbus Protocol . . . . . . . . . . . . . . . . . . . . . . . . . . 348 Initialization and Execution Time for Modbus Protocol . . . . . . . . . . . . . . . . . 349 Modbus Addressing . . . . . . . . . . . . . . . . . . . . . . . . . . . . . . . . . . . . . . . . 350 Using the Modbus Master Instructions . . . . . . . . . . . . . . . . . . . . . . . . . . . . 351 Using the Modbus Slave Instructions . . . . . . . . . . . . . . . . . . . . . . . . . . . . 352 Instructions for the Modbus Protocol . . . . . . . . . . . . . . . . . . . . . . . . . . . . 353 Advanced Topics . . . . . . . . . . . . . . . . . . . . . . . . . . . . . . . . . . . . . . . . . . 362 13 Using Recipes . . . . . . . . . . . . . . . . . . . . . . . . . . . . . . . . . . . . . . . . . . . 365 Overview . . . . . . . . . . . . . . . . . . . . . . . . . . . . . . . . . . . . . . . . . . . . . . . 366 Recipe Definition and Terminology . . . . . . . . . . . . . . . . . . . . . . . . . . . . . 367 Using the Recipe Wizard . . . . . . . . . . . . . . . . . . . . . . . . . . . . . . . . . . . . 367 Instructions Created by the Recipe Wizard . . . . . . . . . . . . . . . . . . . . . . . . . 371 14 Using Data Logs . . . . . . . . . . . . . . . . . . . . . . . . . . . . . . . . . . . . . . . . . 373 Overview . . . . . . . . . . . . . . . . . . . . . . . . . . . . . . . . . . . . . . . . . . . . . . 374 Using the Data Log Wizard . . . . . . . . . . . . . . . . . . . . . . . . . . . . . . . . . . . 375 Instruction Created by the Data Log Wizard . . . . . . . . . . . . . . . . . . . . . . . . 379 15 PID Auto-Tune and the PID Tuning Control Panel . . . . . . . . . . . . . . . . . . . . . 381 Understanding the PID Auto-Tune . . . . . . . . . . . . . . . . . . . . . . . . . . . . . . 382 Expanded Loop Table . . . . . . . . . . . . . . . . . . . . . . . . . . . . . . . . . . . . . . 382 Prerequisites . . . . . . . . . . . . . . . . . . . . . . . . . . . . . . . . . . . . . . . . . . . 385 Auto-Hysteresis and Auto-Deviation . . . . . . . . . . . . . . . . . . . . . . . . . . . . 385 Auto-Tune Sequence . . . . . . . . . . . . . . . . . . . . . . . . . . . . . . . . . . . . . . . 386
xii
Contents
- Exception Conditions . . . . . . . . . . . . . . . . . . . . . . . . . . . . . . . . . . . . . . . . . . . . . . . . . . . . . . . . . . . . . . . . . . . . . . . . . . . . . . . . . . . . . . . . . . . . . . . . . . . . . . . . . . ........ 387
- Notes Concerning PV Out-of-Range (Result Code 3) . . . . . . . . . . . . . . . . . . . . . . . . . . . . . . . . . . . . . . . . . . . . . . . . . . . . . . . . . . . . . . . . . . . . . . . . . . . . . . . . . . . . . . . . . . . . . . . . . . . . . ........ 387
- PID Tuning Control Panel . . . . . . . . . . . . . . . . . . . . . . . . . . . . . . . . . . . . . . . . . . . . . . . . . . . . . . . . . . . . . . . . . . . . . . . . . . . . . . . . . . . . . . . . . . . . . . . . . . . . . . . . . . ........
SMB186 to SMB194: Receive Message Control (see SMB86 to SMB94) . . . . . . . . . . . . . . . . . . . . 492 SMB200 to SMB549: Intelligent Module Status . . . . . . . . . . . . . . . . . . . . . . . . . . . . . . . . . 493 E S7-200 Order Numbers . . . . . . . . . . . . . . . . . . . . . . . . . . . . . . . . . . . . . . . . . . . . . . . . . . . 495 F Execution Times for STL Instructions . . . . . . . . . . . . . . . . . . . . . . . . . . . . . . . . . . . . . . 499 G S7-200 Quick Reference Information . . . . . . . . . . . . . . . . . . . . . . . . . . . . . . . . . . . . . . 505 H S7-200CN Products . . . . . . . . . . . . . . . . . . . . . . . . . . . . . . . . . . . . . . . . . . . . . . . . . . . . . 511 Certifications and Approvals for S7-200CN Products . . . . . . . . . . . . . . . . . . . . . . . . . . 512 S7-200CN Products . . . . . . . . . . . . . . . . . . . . . . . . . . . . . . . . . . . . . . . . . . . . . . . . . . . . . 513
xiv
Product Overview
The S7-200 series of micro-programmable logic controllers (Micro PLCs) can control a wide variety of devices to support your automation needs.
The S7-200 monitors inputs and changes outputs as controlled by the user program, which can include Boolean logic, counting, timing, complex math operations, and communications with other intelligent devices. The compact design, flexible configuration, and powerful instruction set combine to make the S7-200 a perfect solution for controlling a wide variety of applications.
I n This Chapter
- What's New? . . . . . . . . . . . . . . . . . . . . . . . . . . . . . . . . . . . . . . . . . . . . . . . . . . . . . . . . . . . . . . . . . . . . . . . . . . . . . . . . . . . . . . . . . . . . . . . . . . . . . . . ........ 2
- S7-200 CPU . . . . . . . . . . . . . . . . . . . . . . . . . . . . . . . . . . . . . . . . . . . . . . . . . . . . . . . . . . . . . . . . . . . . . . . . . . . . . . . . . . . . . . . . . . . . . . . . . . . . . . . . . . . . . . . . . . . . . . ........ 2
- S7-200 Expansion Modules . . . . . . . . . . . . . . . . . . . . . . . . . . . . . . . . . . . . . . . . . . . . . . . . . . . . . . . . . . . . . . . . . . . . . . . . . . . . . . . . . . . . . . . . . . . . . . . . . . . . . . . . . . . . . . . ........
What’s New?
The new features of the SIMATIC S7-200 include two new analog expansion modules: ☐ EM 231 Analog Input RTD, 4 Inputs ☐ EM 231 Analog Input Thermocouple 8 Inputs ☐ Appendix H, S7-200CN Products
S7-200 CPU
The S7-200 CPU combines a microprocessor, an integrated power supply, input circuits, and output circuits in a compact housing to create a powerful Micro PLC. See Figure 1-1. After you have downloaded your program, the S7-200 contains the logic required to monitor and control the input and output devices in your application.
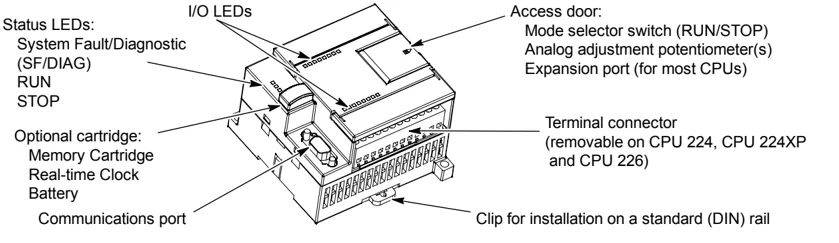
Figure 1-1 S7-200 Micro PLC
Product Overview Chapter 1
Siemens provides different S7-200 CPU models with a diversity of features and capabilities that help you create effective solutions for your varied applications. Table 1-1 briefly compares some of the features of the CPU. For detailed information about a specific CPU, see Appendix A.
Table 1-1 Comparison of the S7-200 CPU Models
| Feature | CPU 221 | CPU 222 | CPU 224 | CPU 224XP CPU 224XPsi | CPU 226 |
|---|---|---|---|---|---|
| Physical size (mm) | 90 x 80 x 62 | 90 x 80 x 62 | 120.5 x 80 x 62 | 140 x 80 x 62 | 190 x 80 x 62 |
| Program memory: with run mode edit without run mode edit | 4096 bytes 4096 bytes | 4096 bytes 4096 bytes | 8192 bytes 12288 bytes | 12288 bytes 16384 bytes | 16384 bytes 24576 bytes |
| Data memory | 2048 bytes | 2048 bytes | 8192 bytes | 10240 bytes | 10240 bytes |
| Memory backup | 50 hours typical | 50 hours typical | 100 hours typical | 100 hours typical | 100 hours typical |
| Local on-board I/O Digital Analog | 6 In/4 Out - | 8 In/6 Out - | 14 In/10 Out - | 14 In/10 Out 2 In/1 Out | 24 In/16 Out - |
| Expansion modules | 0 modules | 2 modules¹ | 7 modules¹ | 7 modules¹ | 7 modules¹ |
| High-speed counters Single phase Two phase | 4 at 30 kHz 2 at 20 kHz | 4 at 30 kHz 2 at 20 kHz | 6 at 30 kHz 4 at 20 kHz | 4 at 30 kHz 2 at 200 kHz 3 at 20 kHz 1 at 100 kHz | 6 at 30 kHz 4 at 20 kHz |
| Pulse outputs (DC) | 2 at 20 kHz | 2 at 20 kHz | 2 at 20 kHz | 2 at 100 kHz | 2 at 20 kHz |
| Analog adjustments | 1 | 1 | 2 | 2 | 2 |
| Real-time clock | Cartridge | Cartridge | Built-in | Built-in | Built-in |
| Communications ports | 1 RS-485 | 1 RS-485 | 1 RS-485 | 2 RS-485 | 2 RS-485 |
| Floating-point math | Yes | ||||
| Digital I/O image size | 256 (128 in, 128 out) | ||||
| Boolean execution speed | 0.22 microseconds/instruction |
¹ You must calculate your power budget to determine how much power (or current) the S7-200 CPU can provide for your configuration. If the CPU power budget is exceeded, you may not be able to connect the maximum number of modules. See Appendix A for CPU and expansion module power requirements, and Appendix B to calculate your power budget.
S7-200 Expansion Modules
To better solve your application requirements, the S7-200 family includes a wide variety of expansion modules. You can use these expansion modules to add additional functionality to the S7-200 CPU. Table 1-2 provides a list of the expansion modules that are currently available. For detailed information about a specific module, see Appendix A.
Table 1-2 S7-200 Expansion Modules
STEP 7-Micro/WIN Programming Package
The STEP 7-Micro/WIN programming package provides a user-friendly environment to develop, edit, and monitor the logic needed to control your application. STEP 7-Micro/WIN provides three program editors for convenience and efficiency in developing the control program for your application. To help you find the information you need, STEP 7-Micro/WIN provides an extensive online help system and a documentation CD that contains an electronic version of this manual, application tips, and other useful information.
Computer Requirements
STEP 7-Micro/WIN runs on either a personal computer or a Siemens programming device, such as a PG 760. Your computer or programming device should meet the following minimum requirements:
Operating system: Windows 2000, Windows XP, Vista
At least 350M bytes of free hard disk space
Mouse (recommended)
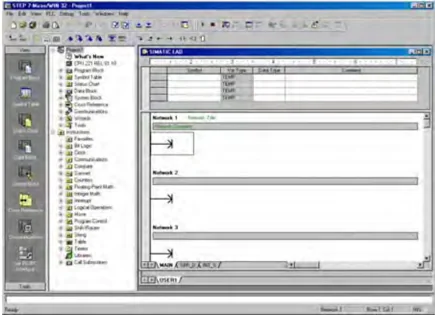
Figure 1-2 STEP 7-Micro/WIN
Installing STEP 7-Micro/WIN
Insert the STEP 7-Micro/WIN CD into the CD-ROM drive of your computer. The installation wizard starts automatically and prompts you through the installation process. Refer to the Readme file for more information about installing STEP 7-Micro/WIN.
Tip To install STEP 7-Micro/WIN on a Windows 2000, Windows XP, or Windows Vista operating system, you must log in with Administrator privileges.
Communications Options
Siemens provides two programming options for connecting your computer to your S7-200: a direct connection with a PPI Multi-Master cable, or a Communications Processor (CP) card with an MPI cable.
The PPI Multi-Master programming cable is the most common and economical method of connecting your computer to the S7-200. This cable connects the communications port of the S7-200 to the serial communications of your computer. The PPI Multi-Master programming cable can also be used to connect other communications devices to the S7-200.
Display Panels
Text Display Units
The Text Display (TD) is a display device that can be connected to the S7-200. Using the Text Display wizard, you can easily program your S7-200 to display text messages and other data pertaining to your application.
The TD device provides a low cost interface to your application by allowing you to view, monitor, and change the process variables pertaining to your application.
The S7-200 product family provides four TD devices:
- The TD100C has a 4-line text display with 2 font choices.
- The TD 200C has a 2-line text display with 20 characters per line for a total of 40 characters.
- The TD 200 has a faceplate which provides four keys with predefined, set-bit functions and allows up to eight set-bit functions.
- The TD400C can have a 2- or 4-line text display depending on your font and character choice.
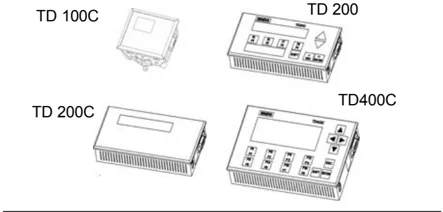
Figure 1-3 Text Display Units
For more information about the Text Display Units, refer to the SIMATIC Text Display (TD) User Manual on the STEP 7-Micro/WIN docuCD.
The Text Display wizard in STEP 7-Micro/WIN helps you configure Text Display messages quickly and easily. To start the Text Display wizard, select the Tools > Text Display Wizard menu command.
Operator and Touch Panel Displays
The OP 73micro and TP 177micro panels are tailored to applications with SIMATIC S7-200 Micro PLC and provide operating and monitoring functions for small-scale machines and plants. Short configuration and commissioning times, and their configuration in WinCC flexible form the highlights of these panels. In addition, these panels support up to 32 configuration languages and five online languages, including the Asian and Cyrillic character sets.
The mounting dimensions of the Operator Panel OP 73micro with its graphical 3" display unit are compatible with OP3 and TD 200.
Touch Panel TP 177micro replaces the Touch Panel TP 070/TP 170micro. It can be mounted vertically to accommodate additional applications. This feature enables its use even when space is restricted.
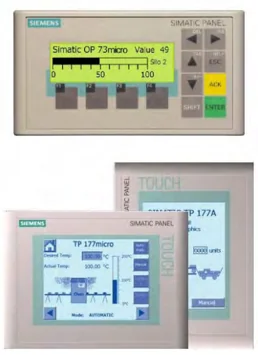
Figure 1-4 Operator and Touch Panel Displays
6
Getting Started
STEP 7-Micro/WIN makes it easy for you to program your S7-200. In just a few short steps using a simple example, you can learn how to connect, program, and run your S7-200.
All you need for this example is a PPI Multi-Master cable, an S7-200 CPU, and a programming device running the STEP 7-Micro/WIN programming software.
I n This Chapter
-
Connecting the S7-200 CPU . . . . . . . . . . . . . . . . . . . . . . . . . . . . . . . . . . . . . . . . . . . . . . . . . . . . . . . . . . . . . . . . . . . . . . . . . . . . . . . . . . . . . . . . . . . . . . . . . . . . . . . . . . . . . . . . . . . . . . . . . . . . . . . . . . . . . . . . . . . . . . . . . . . . . . . . . . . . . . . . . . . . . . . . . . . . . . . . . . . . . . . . ........ 8
-
Creating a Sample Program . . . . . . . . . . . . . . . . . . . . . . . . . . . . . . . . . . . . . . . . . . . . . . . . . . . . . . . . . . . . . . . . . . . . . . . . . . . . . . . . . . . . . . . . . . . . . . . . . . . . . . . . . . . ........ 10
-
Downloading the Sample Program . . . . . . . . . . . . . . . . . . . . . . . . . . . . . . . . . . . . . . . . . . . . . . . . . . . . . . . . . . . . . . . . . . . . . . . . . . . . . . . . . . . . . . . . . . . . . . . . . . . . . . . . ........

Connecting the S7-200 CPU
Connecting your S7-200 is easy. For this example, you only need to connect power to your S7-200 CPU and then connect the communications cable between your programming device and the S7-200 CPU.
Connecting Power to the S7-200 CPU
The first step is to connect the S7-200 to a power source. Figure 2-1 shows the wiring connections for either a DC or an AC model of the S7-200 CPU.
Before you install or remove any electrical device, ensure that the power to that equipment has been turned off. Always follow appropriate safety precautions and ensure that power to the S7-200 is disabled before attempting to install or remove the S7-200.
Warning
Attempts to install or wire the S7-200 or related equipment with power applied could cause electric shock or faulty operation of equipment. Failure to disable all power to the S7-200 and related equipment during installation or removal procedures could result in death or serious injury to personnel, and/or damage to equipment.
Always follow appropriate safety precautions and ensure that power to the S7-200 is disabled before attempting to install or remove the S7-200 or related equipment.
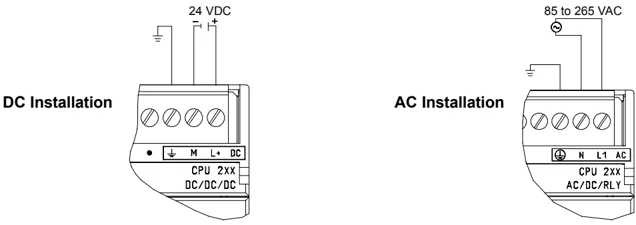
Figure 2-1 Connecting Power to the S7-200 CPU
Connecting the RS-232/PPI Multi-Master Cable
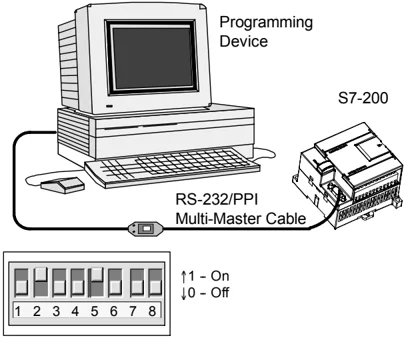
Figure 2-2 shows an RS-232/PPI Multi-Master cable connecting the S7-200 to the programming device. To connect the cable:
- Connect the RS-232 connector (marked "PC") of the RS-232/PPI Multi-Master cable to the communications port of the programming device. (For this example, connect to COM 1.)
- Connect the RS-485 connector (marked "PPI") of the RS-232/PPI Multi-Master cable to Port 0 or Port 1 of the S7-200.
- Ensure that the DIP switches of the RS-232/PPI Multi-Master cable are set as shown in Figure 2-2.
Programming Device S7-200 RS-232/PPI Multi-Master Cable ↑1 - On ↓0 - Off 1 2 3 4 5 6 7 8
Figure 2-2 Connecting the RS-232/PPI Multi-Master Cable
Tip Examples in this manual use the RS-232/PPI Multi-Master cable. The RS-232/PPI Multi-Master cable replaces the previous PC/PPI cable. A USB/PPI Multi-Master cable is also available. Refer to Appendix E for order numbers.
Starting STEP 7-Micro/WIN
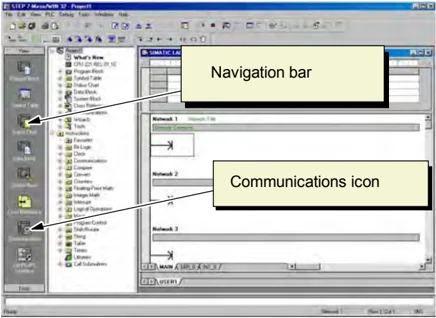
Click on the STEP 7-Micro/WIN icon to open a new project. Figure 2-3 shows a new project.
Notice the navigation bar. You can use the icons on the navigation bar to open elements of the STEP 7-Micro/WIN project.
Click on the Communications icon in the navigation bar to display the Communications dialog box. You use this dialog box to set up the communications for STEP 7-Micro/WIN.
Navigation bar Communications icon
Figure 2-3 New STEP 7-Micro/WIN Project
Verifying the Communications Parameters for STEP 7-Micro/WIN
The example project uses the default settings for STEP 7-Micro/WIN and the RS-232/PPI Multi-Master cable. To verify these settings:
- Verify that the address of the PC/PPI cable in the Communications dialog box is set to 0.
- Verify that the interface for the network parameter is set for PC/PPI cable(COM1).
- Verify that the transmission rate is set to 9.6 kbps.
If you need to change your communications parameter settings, see Chapter 7.
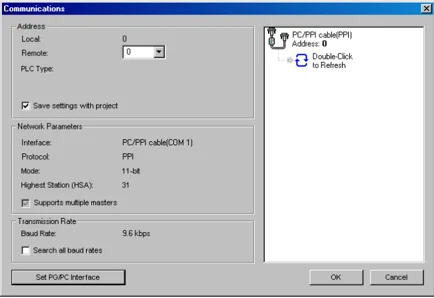
Figure 2-4 Verifying the Communications Parameters
Establishing Communications with the S7-200
Use the Communications dialog box to connect with your S7-200 CPU:
- Double-click the refresh icon in the Communications dialog box. STEP 7-Micro/WIN searches for the S7-200 station and displays a CPU icon for the connected S7-200 station.
- Select the S7-200 and click OK.
If STEP 7-Micro/WIN does not find your S7-200 CPU, check the settings for the communications parameters and repeat these steps.
After you have established communications with the S7-200, you are ready to create and download the example program.
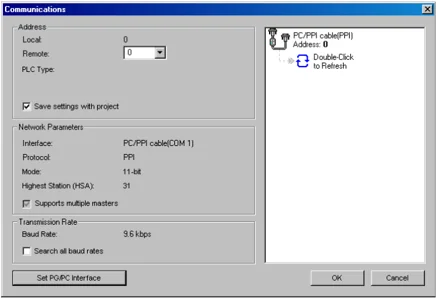
Figure 2-5 Establishing Communications to the S7-200
Creating a Sample Program
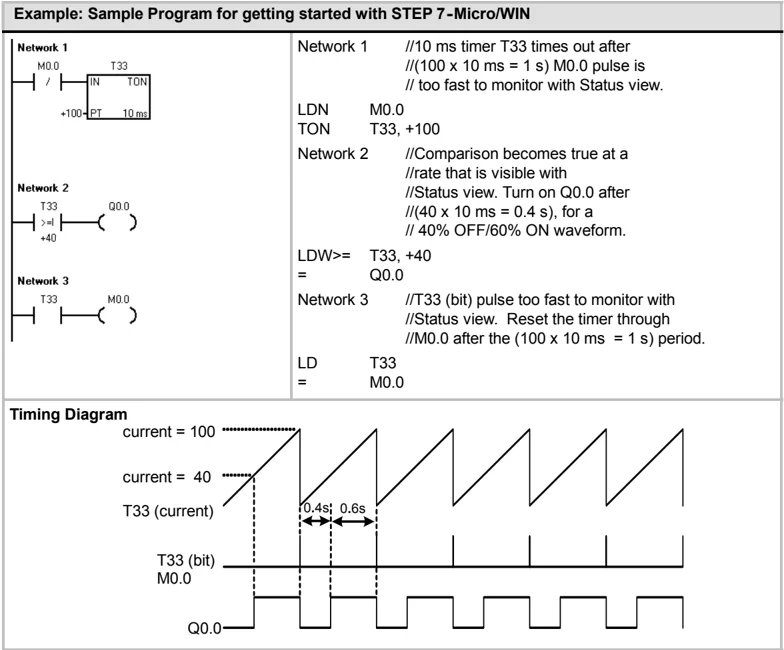
Entering this example of a control program will help you understand how easy it is to use STEP 7-Micro/WIN. This program uses six instructions in three networks to create a very simple, self-starting timer that resets itself.
For this example, you use the Ladder (LAD) editor to enter the instructions for the program. The following example shows the complete program in both LAD and Statement List (STL). The network comments in the STL program explain the logic for each network. The timing diagram shows the operation of the program.
10
Getting Started Chapter 2
Example: Sample Program for getting started with STEP 7-Micro/WIN
\begin{tabular}{p{0.45\textwidth} p{0.5\textwidth}} \textbf{Network 1} & Network 1 \quad //10 ms timer T33 times out after \ M0.0 \quad IN \quad TON \quad T33 & \quad //(100 x 10 ms = 1 s) M0.0 pulse is \ -100 PT \quad 10ms & \quad // too fast to monitor with Status view. \ & LDN \quad M0.0 \ & TON \quad T33, +100 \ \textbf{Network 2} & Network 2 \quad //Comparison becomes true at a \ T33 \quad >H \quad Q0.0 & \quad //rate that is visible with \ +40 & \quad //Status view. Turn on Q0.0 after \ & \quad //(40 x 10 ms = 0.4 s), for a \ & \quad // 40% OFF/60% ON waveform. \ & LDW>= \quad T33, +40 \ & = \quad Q0.0 \ \textbf{Network 3} & Network 3 \quad //T33 (bit) pulse too fast to monitor with \ T33 \quad M0.0 & \quad //Status view. Reset the timer through \ & \quad //M0.0 after the (100 x 10 ms = 1 s) period. \ & LD \quad T33 \ & = \quad M0.0 \ \end{tabular}
Timing Diagram current = 100 current = 40 T33 (current) 0.4s; 0.6s T33 (bit) M0.0 Q0.0
Opening the Program Editor
Click on the Program Block icon to open the program editor. See Figure 2-6.
Notice the instruction tree and the program editor. You use the instruction tree to insert the LAD instructions into the networks of the program editor by dragging and dropping the instructions from the instruction tree to the networks.
The toolbar icons provide shortcuts to the menu commands.
After you enter and save the program, you can download the program to the S7-200.
 Figure 2-6 STEP 7-Micro/WIN Window
11