Encode and Decode Instructions
Encode
The Encode instruction (ENCO) writes the bit number of the least significant bit set of the input word IN into the least significant "nibble" (4 bits) of the output byte OUT.
Decode
The Decode instruction (DECO) sets the bit in the output word OUT that corresponds to the bit number represented by the least significant "nibble" (4 bits) of the input byte IN. All other bits of the output word are set to 0.
SM Bits and ENO
For both the Encode and Decode instructions, the following conditions affect ENO.
Error conditions that set ENO = 0
- 0006 (indirect address)
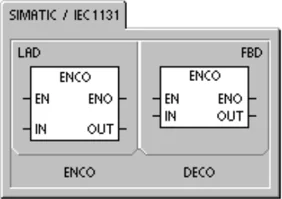
Table 6-21 Valid Operands for the Encode and Decode Instructions \begin{tabular}{|l|l|l|} \hline Inputs/Outputs & Data Types & Operands \ \hline IN & BYTE & IB, QB, VB, MB, SMB, SB, LB, AC, *VD, *LD, *AC, Constant \ & WORD & IW, QW, VW, MW, SMW, SW, T, C, LW, AC, AIW, *VD, *LD, *AC, Constant \ \hline OUT & BYTE & IB, QB, VB, MB, SMB, SB, LB, AC, *VD, *LD, *AC \ & WORD & IW, QW, VW, MW, SMW, SW, T, C, LW, AC, AQW, *VD, *LD, *AC \ \hline \end{tabular}
Example: Decode and Encode Instructions
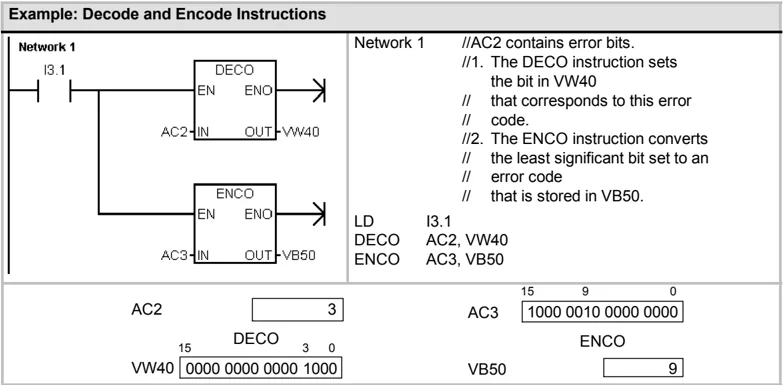
Network 1 //AC2 contains error bits. //1. The DECO instruction sets the bit in VW40 // that corresponds to this error // code. //2. The ENCO instruction converts // the least significant bit set to an // error code // that is stored in VB50.
LD I3.1 DECO AC2, VW40 ENCO AC3, VB50
AC2 3 15 9 0 AC3 1000 0010 0000 0000 DECO 3 0 ENCO VW40 0000 0000 0000 1000 VB50 9
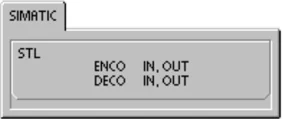
S7-200 Instruction Set Chapter 6
Counter Instructions
SIMATIC Counter Instructions
Count Up Counter
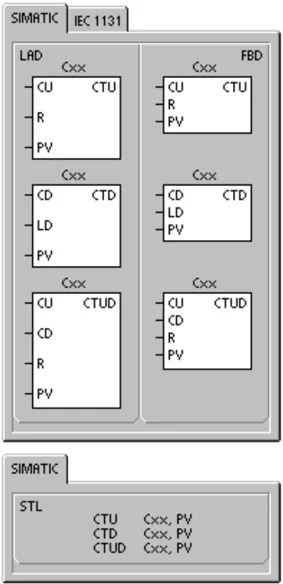
The Count Up instruction (CTU) counts up from the current value each time the count up (CU) input makes the transition from off to on. When the current value Cxx is greater than or equal to the preset value PV, the counter bit Cxx turns on. The counter is reset when the Reset (R) input turns on, or when the Reset instruction is executed. The counter stops counting when it reaches the maximum value (32,767).
STL operation : ■ Reset input: Top of stack ■ Count Up input: Value loaded in the second stack location
Count Down Counter
The Count Down instruction (CTD) counts down from the current value of that counter each time the count down (CD) input makes the transition from off to on. When the current value Cxx is equal to 0, the counter bit Cxx turns on. The counter resets the counter bit Cxx and loads the current value with the preset value PV when the load input LD turns on. The counter stops upon reaching zero, and the counter bit Cxx turns on.
STL operation: ■ Load input: Top of stack ■ Count Down input: Value loaded in the second stack location.
SIMATIC IEC 1131
LAD Cxx FBD Cxx -CU CTU -R -PV -CU CTU -R -PV Cxx -CO CTD -LD -PV Cxx -CO CTD -LD -PV Cxx -CU CTUD -CD -R -PV Cxx -CU CTUD -CD -R -PV
SIMATIC STL CTU Cxx, PV CTD Cxx, PV CTUD Cxx, PV
113
S7-200 Programmable Controller System Manual
Count Up/Down Counter
The Count Up/Down instruction (CTUD) counts up each time the count up (CU) input makes the transition from off to on, and counts down each time the count down (CD) input makes the transition from off to on. The current value Cxx of the counter maintains the current count. The preset value PV is compared to the current value each time the counter instruction is executed.
Upon reaching maximum value (32,767), the next rising edge at the count up input causes the current count to wrap around to the minimum value (-32,768). On reaching the minimum value (-32,768), the next rising edge at the count down input causes the current count to wrap around to the maximum value (32,767).
When the current value Cxx is greater than or equal to the preset value PV, the counter bit Cxx turns on. Otherwise, the counter bit turns off. The counter is reset when the Reset (R) input turns on, or when the Reset instruction is executed.
STL operation: ■ Reset input: Top of stack ■ Count Down input: Value loaded in the second stack location ■ Count Up input: Value loaded in the third stack location
Table 6-22 Valid Operands for the SIMATIC Counter Instructions \begin{tabular}{|l|l|l|} \hline Inputs/Outputs & Data Types & Operands \ \hline Cxx & WORD & Constant (C0 to C255) \ \hline CU, CD, LD, R & BOOL & I, Q, V, M, SM, S, T, C, L, Power Flow \ \hline PV & INT & IW, QW, VW, MW, SMW, SW, LW, T, C, AC, AIW, *VD, *LD, *AC, Constant \ \hline \end{tabular}
Tip Since there is one current value for each counter, do not assign the same number to more than one counter. (Up Counters, Up/Down Counters, and Down counters with the same number access the same current value.)
When you reset a counter using the Reset instruction, the counter bit is reset and the counter current value is set to zero. Use the counter number to reference both the current value and the counter bit of that counter.
Table 6-23 Operations of the Counter Instructions \begin{tabular}{|l|p{4cm}|p{3cm}|p{3cm}|} \hline Type & Operation & Counter Bit & Power Cycle/First Scan \ \hline CTU & CU increments the current value. Current value continues to increment until it reaches 32,767. & The counter bit turns on when: Current value $>=$ Preset & Counter bit is off. Current value can be retained.$^1$ \ \hline CTUD & CU increments the current value. CD decrements the current value. Current value continues to increment or decrement until the counter is reset. & The counter bit turns on when: Current value $>=$ Preset & Counter bit is off. Current value can be retained.$^1$ \ \hline CTD & CD decrements the current value until the current value reaches 0. & The counter bit turns on when: Current value = 0 & Counter bit is off. Current value can be retained.$^1$ \ \hline \end{tabular}
$^1$ You can select that the current value for the counter be retentive. See Chapter 4 for information about memory retention for the S7-200 CPU.
114
S7-200 Instruction Set Chapter 6
Example: SIMATIC Count Down Counter Instruction
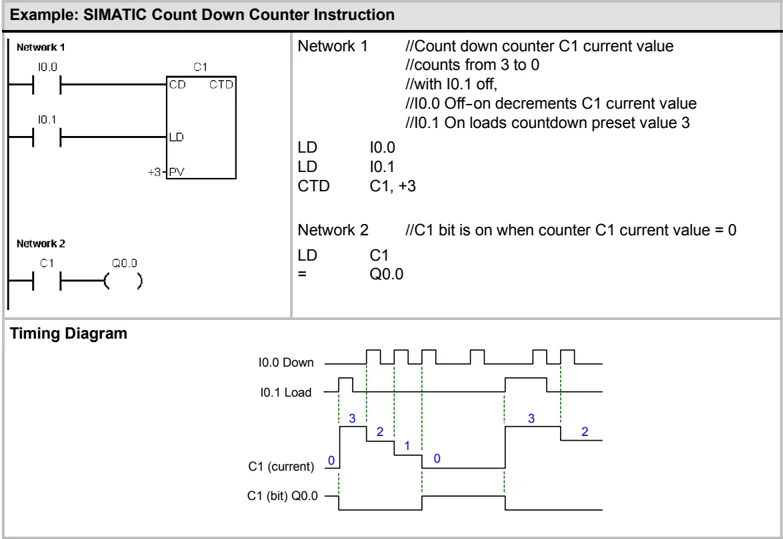
Timing Diagram
Example: SIMATIC Count Up/Down Counter Instruction
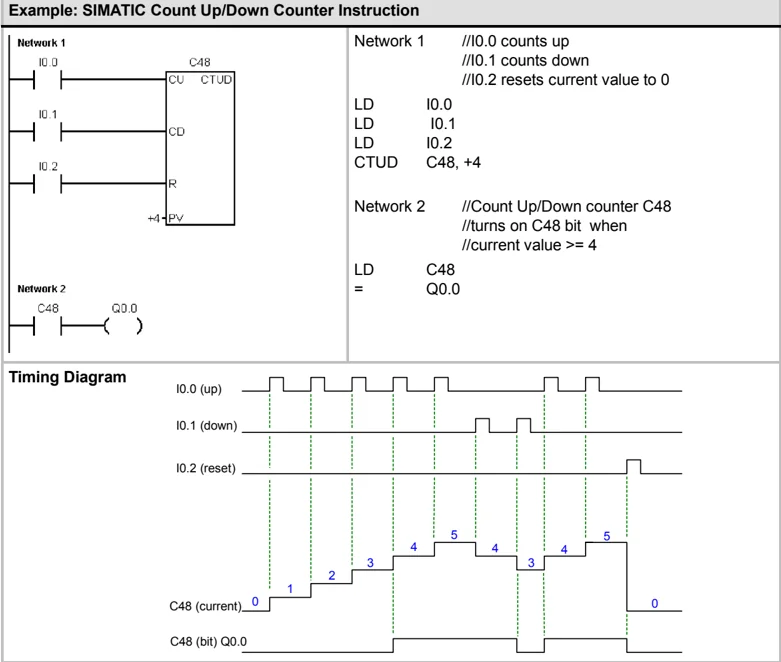
Timing Diagram
115
IEC Counter Instructions
Up Counter
The Count Up instruction (CTU) counts up from the current value to the preset value (PV) on the rising edges of the Count Up (CU) input. When the current value (CV) is greater than or equal to the preset value, the counter output bit (Q) turns on. The counter resets when the reset input (R) is enabled. The Up Counter stops counting when it reaches the preset value.
Down Counter
The Count Down instruction (CTD) counts down from the preset value (PV) on the rising edges of the Count Down (CD) input. When the current value (CV) is equal to zero, the counter output bit (Q) turns on. The counter resets and loads the current value with the preset value when the load input (LD) is enabled. The Down Counter stops counting when it reaches zero.
Up/Down Counter
The Count Up/Down instruction (CTUD) counts up or down from the current value (CV) on the rising edges of the Count Up (CU) or Count Down (CD) input. When the current value is equal to preset, the up output (QU) turns on. When the current value is equal to zero, the down output (QD) turns on. The counter loads the current value with the preset value (PV) when the load (LD) input is enabled. Similarly, the counter resets and loads the current value with 0 when the reset (R) is enabled. The counter stops counting when it reaches preset or 0.
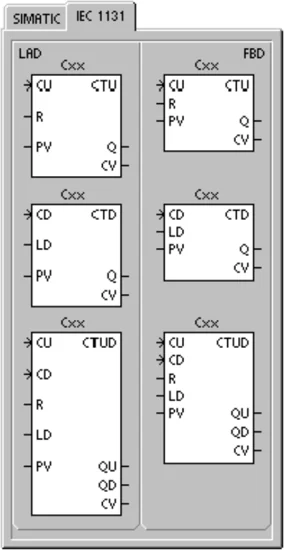
Table 6-24 Valid Operands for the IEC Counter Instructions \begin{tabular}{|l|l|l|} \hline Inputs/Outputs & Data Types & Operands \ \hline Cxx & CTU, CTD, CTUD & Constant (C0 to C255) \ \hline CU, CD, LD, R & BOOL & I, Q, V, M, SM, S, T, C, L, Power Flow \ \hline PV & INT & IW, QW, VW, MW, SMW, SW, LW, AC, AIW, *VD, *LD, *AC, Constant \ \hline Q, QU, QD & BOOL & I, Q, V, M, SM, S, L \ \hline CV & INT & IW, QW, VW, MW, SW, LW, AC, *VD, *LD, *AC \ \hline \end{tabular}
Tip Since there is one current value for each counter, do not assign the same number to more than one counter. (Up Counters, Down Counters, and Up/Down Counters access the same current value.)
S7-200 Instruction Set Chapter 6
Example: IEC Counter Instructions
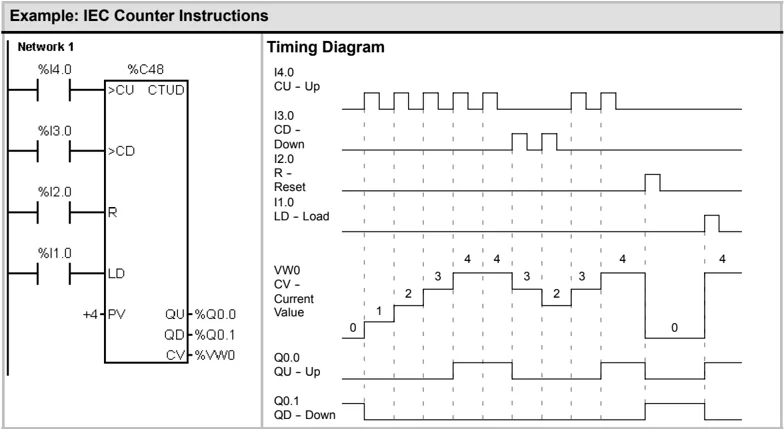
117
S7-200 Programmable Controller System Manual
High-Speed Counter Instructions
High-Speed Counter Definition
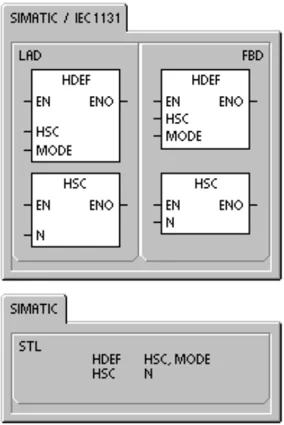
The High-Speed Counter Definition instruction (HDEF) selects the operating mode of a specific high-speed counter (HSCx). The mode selection defines the clock, direction, start, and reset functions of the high-speed counter.
You use one High-Speed Counter Definition instruction for each high-speed counter.
Error conditions that set ENO = 0 ■ 0003 (input point conflict) ■ 0004 (illegal instruction in interrupt) ■ 000A (HSC redefinition)
High-Speed Counter
The High-Speed Counter (HSC) instruction configures and controls the high-speed counter, based on the state of the HSC special memory bits. The parameter N specifies the high-speed counter number.
The high-speed counters can be configured for up to twelve different modes of operation. See Table 6-26.
Each counter has dedicated inputs for clocks, direction control, reset, and start, where these functions are supported. For the two-phase counters, both clocks can run at their maximum rates. In quadrature modes, you can select one times (1x) or four times (4x) the maximum counting rates. All counters run at maximum rates without interfering with one another.
Error conditions that set ENO = 0 ■ 0001 (HSC before HDEF) ■ 0005 (simultaneous HSC/PLS)
Table 6-25 Valid Operands for the High-Speed Counter Instructions \begin{tabular}{|l|l|l|} \hline Inputs/Outputs & Data Types & Operands \ \hline HSC, MODE & BYTE & Constant \ \hline N & WORD & Constant \ \hline \end{tabular}
Programming Tips Refer to the Programming Tips on the documentation CD for programs that use high-speed counters. See Tip 4 and Tip 29.
High-speed counters count high-speed events that cannot be controlled at S7-200 scan rates. The maximum counting frequency of a high-speed counter depends upon your S7-200 CPU model. Refer to Appendix A for more information.
Tip CPU 221 and CPU 222 support four high-speed counters: HSC0, HSC3, HSC4, and HSC5. These CPUs do not support HSC1 and HSC2. CPU 224, CPU 224XP, and CPU 226 support six high-speed counters: HSC0 to HSC5.
118
Typically, a high-speed counter is used as the drive for a drum timer, where a shaft rotating at a constant speed is fitted with an incremental shaft encoder. The shaft encoder provides a specified number of counts per revolution and a reset pulse that occurs once per revolution. The clock(s) and the reset pulse from the shaft encoder provide the inputs to the high-speed counter.
The high-speed counter is loaded with the first of several presets, and the desired outputs are activated for the time period where the current count is less than the current preset. The counter is set up to provide an interrupt when the current count is equal to preset and also when reset occurs.
As each current-count-value-equals-preset-value interrupt event occurs, a new preset is loaded and the next state for the outputs is set. When the reset interrupt event occurs, the first preset and the first output states are set, and the cycle is repeated.
Since the interrupts occur at a much lower rate than the counting rates of the high-speed counters, precise control of high-speed operations can be implemented with relatively minor impact to the overall PLC scan cycle. The method of interrupt attachment allows each load of a new preset to be performed in a separate interrupt routine for easy state control. (Alternatively, all interrupt events can be processed in a single interrupt routine.)
Understanding the Different High-Speed Counters
All counters function the same way for the same counter mode of operation. There are four basic types of counters: single-phase counter with internal direction control, single-phase counter with external direction control, two-phase counter with 2 clock inputs, and A/B phase quadrature counter. Note that every mode is not supported by every counter. You can use each type: without reset or start inputs, with reset and without start, or with both start and reset inputs.
When you activate the reset input, it clears the current value and holds it clear until you deactivate reset.
When you activate the start input, it allows the counter to count. While start is deactivated, the current value of the counter is held constant and clocking events are ignored.
If reset is activated while start is inactive, the reset is ignored and the current value is not changed. If the start input becomes active while the reset input is active, the current value is cleared.
Before you use a high-speed counter, you use the HDEF instruction (High-S peed Counter Definition) to select a counter mode. Use the first scan memory bit, S M0.1 (this bit is turned on for the first scan and is then turned off), to call a subroutine that contains the HDEF instruction.
Programming a High-Speed Counter
You can use the HSC Instruction Wizard to configure the counter. The wizard uses the following information: type and mode of counter, counter preset value, counter current value, and initial counting direction. To start the HSC Instruction Wizard, select the Tools > Instruction Wizard menu command and then select HSC from the Instruction Wizard window.
To program a high-speed counter, you must perform the following basic tasks:
Define the counter and mode.
Set the control byte.
Set the current value (starting value).
Set the preset value (target value).
Assign and enable the interrupt routine.
Activate the high-speed counter.
Defining Counter Modes and Inputs
Use the High-Speed Counter Definition instruction to define the counter modes and inputs.
Table 6-26 shows the inputs used for the clock, direction control, reset, and start functions associated with the high-speed counters. The same input cannot be used for two different functions, but any input not being used by the present mode of its high-speed counter can be used for another purpose. For example, if HS C0 is being used in mode 1, which uses I0.0 and I0.2, I0.1 can be used for edge interrupts or for HS C3.
Tip
Note that all modes of HS C0 (except mode 12) always use I0.0 and all modes of HS C4 always use I0.3, so these points are never available for other uses when these counters are in use.
Table 6-26 Inputs for the High-Speed Counters
| Mode | Description | Inputs | |||
|---|---|---|---|---|---|
| HSC0 | I0.0 | I0.1 | I0.2 | ||
| HSC1 | I0.6 | I0.7 | I1.0 | I1.1 | |
| HSC2 | I1.2 | I1.3 | I1.4 | I1.5 | |
| HSC3 | I0.1 | ||||
| HSC4 | I0.3 | I0.4 | I0.5 | ||
| HSC5 | I0.4 | ||||
| 0 | Single-phase counter with internal direction control | Clock | |||
| 1 | Clock | Reset | |||
| 2 | Clock | Reset | Start | ||
| 3 | Single-phase counter with external direction control | Clock | Direction | ||
| 4 | Clock | Direction | Reset | ||
| 5 | Clock | Direction | Reset | Start | |
| 6 | Two-phase counter with 2 clock inputs | Clock Up | Clock Down | ||
| 7 | Clock Up | Clock Down | Reset | ||
| 8 | Clock Up | Clock Down | Reset | Start | |
| 9 | A/B phase quadrature counter | Clock A | Clock B | ||
| 10 | Clock A | Clock B | Reset | ||
| 11 | Clock A | Clock B | Reset | Start | |
| 12 | Only HS C0 and HS C3 support mode12.HS C0 counts the number of pulses going out of Q0.0.HS C3 counts the number of pulses going out of Q0.1. |
120
S7-200 Instruction Set Chapter 6
Examples of HSC Modes
The timing diagrams in Figure 6-22 through Figure 6-26 show how each counter functions according to mode.
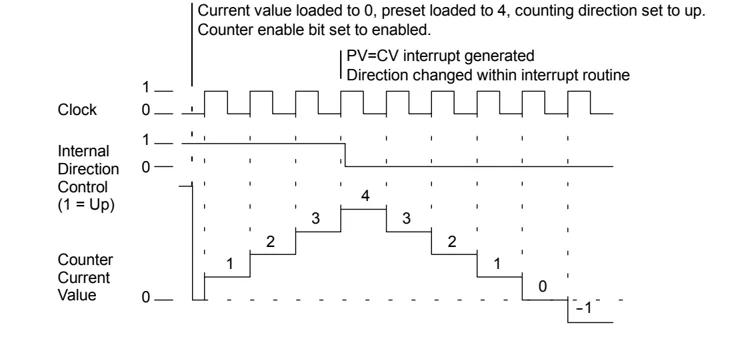
Figure 6-22 Operation Example of Modes 0, 1, or 2
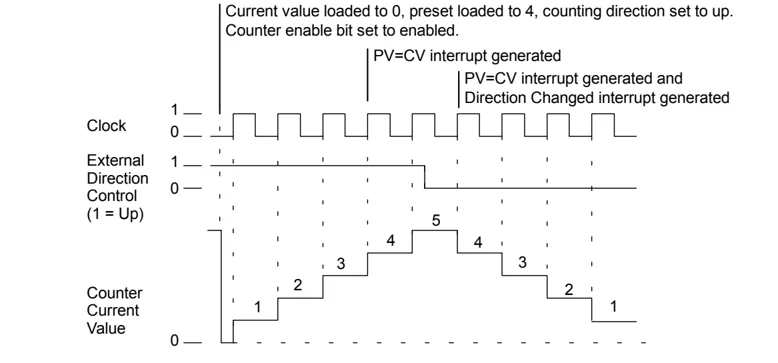
Figure 6-23 Operation Example of Modes 3, 4, or 5
121
When you use counting modes 6, 7, or 8, and rising edges on both the up clock and down clock inputs occur within 0.3 microseconds of each other, the high-speed counter could see these events as happening simultaneously. If this happens, the current value is unchanged and no change in counting direction is indicated. As long as the separation between rising edges of the up and down clock inputs is greater than this time period, the high-speed counter captures each event separately. In either case, no error is generated and the counter maintains the correct count value.
 Figure 6-24 Operation Example of Modes 6, 7, or 8
 Figure 6-25 Operation Example of Modes 9, 10, or 11 (Quadrature 1x Mode)
122
S7-200 Instruction Set Chapter 6
 Figure 6-26 Operation Example of Modes 9, 10, or 11 (Quadrature 4x Mode)
Reset and Start Operation
The operation of the reset and start inputs shown in Figure 6-27 applies to all modes that use reset and start inputs. In the diagrams for the reset and start inputs, both reset and start are shown with the active state programmed to a high level.
 Figure 6-27 Operation Examples Using Reset with and without Start
123
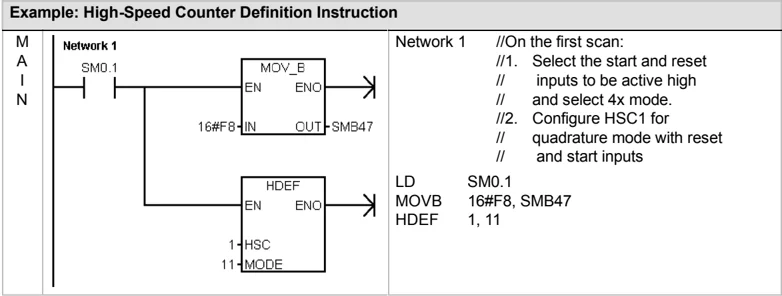
Four counters have three control bits that are used to configure the active state of the reset and start inputs and to select 1x or 4x counting modes (quadrature counters only). These bits are located in the control byte for the respective counter and are only used when the HDEF instruction is executed. These bits are defined in Table 6-27.
Tip You must set these three control bits to the desired state before the HDEF instruction is executed. Otherwise, the counter takes on the default configuration for the counter mode selected. Once the HDEF instruction has been executed, you cannot change the counter setup unless you first place the S7-200 in STOP mode.
Table 6-27 Active Level for Reset, Start, and 1x/4x Control Bits
| HSC0 | HSC1 | HSC2 | HSC4 | Description (used only when HDEF is executed) |
|---|---|---|---|---|
| SM37.0 | SM47.0 | SM57.0 | SM147.0 | Active level control bit for Reset¹: 0 = Reset is active high 1 = Reset is active low |
| --- | SM47.1 | SM57.1 | --- | Active level control bit for Start¹: 0 = Start is active high 1 = Start is active low |
| SM37.2 | SM47.2 | SM57.2 | SM147.2 | Counting rate selection for quadrature counters: 0 = 4X counting rate 1 = 1X counting rate |
¹ The default setting of the reset input and the start input are active high, and the quadrature counting rate is 4x (or four times the input clock frequency).
Example: High-Speed Counter Definition Instruction

Setting the Control Byte
After you define the counter and the counter mode, you can program the dynamic parameters of the counter. Each high-speed counter has a control byte that allows the following actions:
- Enabling or disabling the counter
- Controlling the direction (modes 0, 1, and 2 only), or the initial counting direction for all other modes
- Loading the current value
- Loading the preset value
Examination of the control byte and associated current and preset values is invoked by the execution of the HSC instruction. Table 6-28 describes each of these control bits.
124
S7-200 Instruction Set Chapter 6
Table 6-28 Control Bits for HSC0, HSC1, HSC2, HSC3, HSC4, and HSC5
| HSC0 | HSC1 | HSC2 | HSC3 | HSC4 | HSC5 | Description |
|---|---|---|---|---|---|---|
| SM37.3 | SM47.3 | SM57.3 | SM137.3 | SM147.3 | SM157.3 | Counting direction control bit: |
| 0 = Count down 1 = Count up | ||||||
| SM37.4 | SM47.4 | SM57.4 | SM137.4 | SM147.4 | SM157.4 | Write the counting direction to the HSC: |
| 0 = No update 1 = Update direction | ||||||
| SM37.5 | SM47.5 | SM57.5 | SM137.5 | SM147.5 | SM157.5 | Write the new preset value to the HSC: |
| 0 = No update 1 = Update preset | ||||||
| SM37.6 | SM47.6 | SM57.6 | SM137.6 | SM147.6 | SM157.6 | Write the new current value to the HSC: |
| 0 = No update 1 = Update current value | ||||||
| SM37.7 | SM47.7 | SM57.7 | SM137.7 | SM147.7 | SM157.7 | Enable the HSC: |
| 0 = Disable the HSC 1 = Enable the HSC |
Reading the Current Value
The current value of each high-speed counter can only be read using the data type HC (High-Speed-Counter Current) followed by the counter number (0, 1, 2, 3, 4, or 5) as shown in Table 6-29. Use the HC data type whenever you wish to read the current count, either in a status chart or in the user program. The HC data type is read-only; you cannot write a new current count to the high speed counter using the HC data type.
Table 6-29 Current Values of HSC0, HSC1, HSC2, HSC3, HSC4, and HSC5
| Value to be Read | HSC0 | HSC1 | HSC2 | HSC3 | HSC4 | HSC5 |
|---|---|---|---|---|---|---|
| Current value (CV) | HC0 | HC1 | HC2 | HC3 | HC4 | HC5 |
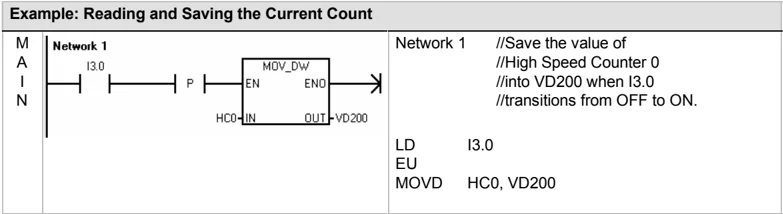
Example: Reading and Saving the Current Count
| M A I N | Network 1 |
|---|---|
| I3.0 P EN MOV_DW END | |
| HC0 IN OUT VD200 | |
| Network 1 //Save the value of | |
| //High Speed Counter 0 | |
| //into VD200 when I3.0 | |
| //transitions from OFF to ON. | |
| LD I3.0 | |
| EU | |
| MOVD HC0, VD200 |
Setting Current Values and Preset Values
Each high-speed counter has a 32-bit current value (CV) and a 32-bit preset value (PV) stored internally. The current value is the actual count value of the counter, while the preset value is a comparison value optionally used to trigger an interrupt when the current value reaches the preset value. You can read the current value using the HC data type as described in the previous section. You cannot read the preset value directly. To load a new current or preset value into the high-speed counter, you must set up the control byte and the special memory double-word(s) that hold the desired new current and/or new preset values, and also execute the HSC instruction to cause the new values to the transferred to the high-speed counter. Table 6-30 lists the special memory double words used to hold the desired new current and preset values.
125
Use the following steps to write a new current value and/or new preset value to the high-speed counter (steps 1 and 2 can be done in either order):
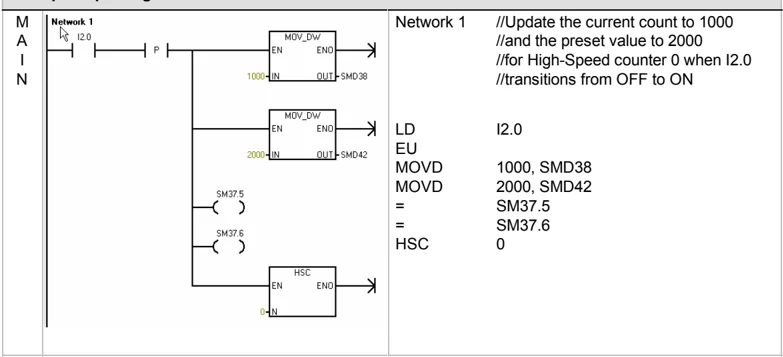
- Load the value to be written into the appropriate SM new-current value and/or new preset value (Table 6-30). Loading these new values does not affect the high-speed counter yet.
- Set or clear the appropriate bits in the appropriate control byte (Table 6-28) to indicate whether to update the current and/or preset values (bit x.5 for preset and x.6 for current). Manipulating these bits does not affect the high-speed counter yet.
- Execute the HSC instruction referencing the appropriate high-speed counter number. Executing this instruction causes the control byte to be examined. If the control byte specifies an update for the current, the preset, or both, then the appropriate values are copied from the SM new current value and/or new preset value locations into the high-speed counter internal registers.
Table 6-30 New Current and New Preset Values of HSC0, HSC1, HSC2, HSC3, HSC4, and HSC5
| Value to be Loaded | HSC0 | HSC1 | HSC2 | HSC3 | HSC4 | HSC5 |
|---|---|---|---|---|---|---|
| New current value (new CV) | SMD38 | SMD48 | SMD58 | SMD138 | SMD148 | SMD158 |
| New preset value (new PV) | SMD42 | SMD52 | SMD62 | SMD142 | SMD152 | SMD162 |
Tip Changes to the control byte and the SM locations for new current value and new preset value will not affect the high-speed counter until the corresponding HSC instruction is executed.
Example: Updating the Current and Preset Values

Assigning Interrupts All counter modes support an interrupt event when the current value of the HSC is equal to the loaded preset value. Counter modes that use an external reset input support an interrupt on activation of the external reset. All counter modes except modes 0, 1, and 2 support an interrupt on a change in counting direction. Each of these interrupt conditions can be enabled or disabled separately. For a complete discussion on the use of interrupts, see the section on Communications and Interrupt instructions.
Notice A fatal error can occur if you attempt either to load a new current value or to disable and then re-enable the high-speed counter from within the external reset interrupt routine.
Status Byte A status byte for each high-speed counter provides status memory bits that indicate the current counting direction and whether the current value is greater or equal to the preset value. Table 6-31 defines these status bits for each high-speed counter.
126
S7-200 Instruction Set Chapter 6

Tip
S status bits are valid only while the high-speed counter interrupt routine is being executed. The purpose of monitoring the state of the high-speed counter is to enable interrupts for the events that are of consequence to the operation being performed.
Table 6-31 Status Bits for HSC0, HSC1, HSC2, HSC3, HSC4, and HSC5
| HSC0 | HSC1 | HSC2 | HSC3 | HSC4 | HSC5 | Description |
|---|---|---|---|---|---|---|
| SM36.0 | SM46.0 | SM56.0 | SM136.0 | SM146.0 | SM156.0 | Not used |
| SM36.1 | SM46.1 | SM56.1 | SM136.1 | SM146.1 | SM156.1 | Not used |
| SM36.2 | SM46.2 | SM56.2 | SM136.2 | SM146.2 | SM156.2 | Not used |
| SM36.3 | SM46.3 | SM56.3 | SM136.3 | SM146.3 | SM156.3 | Not used |
| SM36.4 | SM46.4 | SM56.4 | SM136.4 | SM146.4 | SM156.4 | Not used |
| SM36.5 | SM46.5 | SM56.5 | SM136.5 | SM146.5 | SM156.5 | Current counting direction status bit: 0 = Counting down 1 = Counting up |
| SM36.6 | SM46.6 | SM56.6 | SM136.6 | SM146.6 | SM156.6 | Current value equals preset value status bit: 0 = Not equal 1 = Equal |
| SM36.7 | SM46.7 | SM56.7 | SM136.7 | SM146.7 | SM156.7 | Current value greater than preset value status bit: 0 = Less than or equal 1 = Greater than |
Sample Initialization Sequences for the High-Speed Counters
HSC1 is used as the model counter in the following descriptions of the initialization and operation sequences. The initialization descriptions assume that the S7-200 has just been placed in RUN mode, and for that reason, the first scan memory bit is true. If this is not the case, remember that the HDEF instruction can be executed only one time for each high-speed counter after entering RUN mode. Executing HDEF for a high-speed counter a second time generates a run-time error and does not change the counter setup from the way it was set up on the first execution of HDEF for that counter.
Tip
Although the following sequences show how to change direction, current value, and preset value individually, you can change all or any combination of them in the same sequence by setting the value of SMB47 appropriately and then executing the HSC instruction.
Initialization Modes 0, 1, or 2
The following steps describe how to initialize HSC1 for Single Phase Up/Down Counter with Internal Direction (Modes 0, 1, or 2).
-
Use the first scan memory bit to call a subroutine in which the initialization operation is performed. Since you use a subroutine call, subsequent scans do not make the call to the subroutine, which reduces scan time execution and provides a more structured program.
-
In the initialization subroutine, load SMB47 according to the desired control operation. For example:
SMB47 = 16#F8 Produces the following results:
- Enables the counter
- Writes a new current value
- Writes a new preset value
- Sets the direction to count up
- Sets the start and reset inputs to be active high
127
- Execute the HDEF instruction with the HSC input set to 1 and the MODE input set to one of the following: 0 for no external reset or start, 1 for external reset and no start, or 2 for both external reset and start.
- Load SMD48 (double-word-sized value) with the desired current value (load with 0 to clear it).
- Load SMD52 (double-word-sized value) with the desired preset value.
- In order to capture the current value equal to preset event, program an interrupt by attaching the CV = PV interrupt event (event 13) to an interrupt routine. See the section that discusses the Interrupt Instructions for complete details on interrupt processing.
- In order to capture an external reset event, program an interrupt by attaching the external reset interrupt event (event 15) to an interrupt routine.
- Execute the global interrupt enable instruction (ENI) to enable interrupts.
- Execute the HSC instruction to cause the S7-200 to program HSC1.
- Exit the subroutine.
Initialization Modes 3, 4, or 5 The following steps describe how to initialize HSC1 for Single Phase Up/Down Counter with External Direction (Modes 3, 4, or 5):
-
Use the first scan memory bit to call a subroutine in which the initialization operation is performed. Since you use a subroutine call, subsequent scans do not make the call to the subroutine, which reduces scan time execution and provides a more structured program.
-
In the initialization subroutine, load SMB47 according to the desired control operation. For example:
SMB47 = 16#F8 Produces the following results: Enables the counter Writes a new current value Writes a new preset value Sets the initial direction of the HSC to count up Sets the start and reset inputs to be active high
-
Execute the HDEF instruction with the HSC input set to 1 and the MODE input set to one of the following: 3 for no external reset or start, 4 for external reset and no start, or 5 for both external reset and start.
-
Load SMD48 (double-word-sized value) with the desired current value (load with 0 to clear it).
-
Load SMD52 (double-word-sized value) with the desired preset value.
-
In order to capture the current-value-equal-to-preset event, program an interrupt by attaching the CV = PV interrupt event (event 13) to an interrupt routine. See the section that discusses the Interrupt Instructions for complete details on interrupt processing.
-
In order to capture direction changes, program an interrupt by attaching the direction changed interrupt event (event 14) to an interrupt routine.
-
In order to capture an external reset event, program an interrupt by attaching the external reset interrupt event (event 15) to an interrupt routine.
-
Execute the global interrupt enable instruction (ENI) to enable interrupts.
-
Execute the HSC instruction to cause the S7-200 to program HSC1.
-
Exit the subroutine.
128
S7-200 Instruction Set Chapter 6
I nitialization Modes 6, 7, or 8
The following steps describe how to initialize HSC1 for Two Phase Up/Down Counter with Up/Down Clocks (Modes 6, 7, or 8):
-
Use the first scan memory bit to call a subroutine in which the initialization operations are performed. Since you use a subroutine call, subsequent scans do not make the call to the subroutine, which reduces scan time execution and provides a more structured program.
-
In the initialization subroutine, load SMB47 according to the desired control operation. For example:
SMB47 = 16#F8 Produces the following results: Enables the counter Writes a new current value Writes a new preset value Sets the initial direction of the HSC to count up Sets the start and reset inputs to be active high
-
Execute the HDEF instruction with the HSC input set to 1 and the MODE set to one of the following: 6 for no external reset or start, 7 for external reset and no start, or 8 for both external reset and start.
-
Load SMD48 (double-word-sized value) with the desired current value (load with 0 to clear it).
-
Load SMD52 (double-word-sized value) with the desired preset value.
-
In order to capture the current-value-equal-to-preset event, program an interrupt by attaching the CV = PV interrupt event (event 13) to an interrupt routine. See the section on interrupts.
-
In order to capture direction changes, program an interrupt by attaching the direction changed interrupt event (event 14) to an interrupt routine.
-
In order to capture an external reset event, program an interrupt by attaching the external reset interrupt event (event 15) to an interrupt routine.
-
Execute the global interrupt enable instruction (ENI) to enable interrupts.
-
Execute the HSC instruction to cause the S7-200 to program HSC1.
-
Exit the subroutine.
I nitialization Modes 9, 10, or 11
The following steps describe how to initialize HSC1 for A/B Phase Quadrature Counter (for modes 9, 10, or 11):
-
Use the first scan memory bit to call a subroutine in which the initialization operations are performed. Since you use a subroutine call, subsequent scans do not make the call to the subroutine, which reduces scan time execution and provides a more structured program.
-
In the initialization subroutine, load SMB47 according to the desired control operation.
Example (1x counting mode):
SMB47 = 16#FC Produces the following results: Enables the counter Writes a new current value Writes a new preset value Sets the initial direction of the HSC to count up Sets the start and reset inputs to be active high
Example (4x counting mode):
SMB47 = 16#F8 Produces the following results: Enables the counter Writes a new current value Writes a new preset value Sets the initial direction of the HSC to count up Sets the start and reset inputs to be active high
129
-
Execute the HDEF instruction with the HSC input set to 1 and the MODE input set to one of the following: 9 for no external reset or start, 10 for external reset and no start, or 11 for both external reset and start.
-
Load SMD48 (double-word-sized value) with the desired current value (load with 0 to clear it).
-
Load SMD52 (double-word-sized value) with the desired preset value.
-
In order to capture the current-value-equal-to-preset event, program an interrupt by attaching the CV = PV interrupt event (event 13) to an interrupt routine. See the section on enabling interrupts (ENI) for complete details on interrupt processing.
-
In order to capture direction changes, program an interrupt by attaching the direction changed interrupt event (event 14) to an interrupt routine.
-
In order to capture an external reset event, program an interrupt by attaching the external reset interrupt event (event 15) to an interrupt routine.
-
Execute the global interrupt enable instruction (ENI) to enable interrupts.
-
Execute the HSC instruction to cause the S7-200 to program HSC1.
-
Exit the subroutine.
I nitialization Mode 12
The following steps describe how to initialize HSC0 for counting pulses generated by PTO0 (Mode 12).
-
Use the first scan memory bit to call a subroutine in which the initialization operation is performed. Since you use a subroutine call, subsequent scans do not make the call to the subroutine, which reduces scan time execution and provides a more structured program.
-
In the initialization subroutine, load SMB37 according to the desired control operation. For example:
SMB37 = 16#F8 Produces the following results: Enables the counter Writes a new current value Writes a new preset value Sets the direction to count up Sets the start and reset inputs to be active high
-
Execute the HDEF instruction with the HSC input set to 0 and the MODE input set to 12.
-
Load SMD38 (double-word-sized value) with the desired current value (load with 0 to clear it).
-
Load SMD42 (double-word-sized value) with the desired preset value.
-
In order to capture the current value equal to preset event, program an interrupt by attaching the CV = PV interrupt event (event 12) to an interrupt routine. See the section that discusses the Interrupt Instructions for complete details on interrupt processing.
-
Execute the global interrupt enable instruction (ENI) to enable interrupts.
-
Execute the HSC instruction to cause the S7-200 to program HSC0.
-
Exit the subroutine.
Change Direction in Modes 0, 1, 2, or 12
The following steps describe how to configure HSC1 for Change Direction for Single Phase Counter with Internal Direction (Modes 0, 1, 2, or 12):
- Load SMB47 to write the desired direction:
SMB47 = 16#90 Enables the counter Sets the direction of the HSC to count down
SMB47 = 16#98 Enables the counter Sets the direction of the HSC to count up
- Execute the HSC instruction to cause the S7-200 to program HSC1.
S7-200 Instruction Set Chapter 6
Loading a New Current Value (Any Mode) Changing the current value forces the counter to be disabled while the change is made. While the counter is disabled, it does not count or generate interrupts.
The following steps describe how to change the counter current value of HSC1 (any mode):
- Load SMB47 to write the desired current value: SMB47 = 16#C0 Enables the counter Writes the new current value
- Load SMD48 (double-word-sized value) with the desired current value (load with 0 to clear it).
- Execute the HSC instruction to cause the S7-200 to program HSC1.
Loading a New Preset Value (Any Mode) The following steps describe how to change the preset value of HSC1 (any mode):
- Load SMB47 to write the desired preset value: SMB47 = 16#A0 Enables the counter Writes the new preset value
- Load SMD52 (double-word-sized value) with the desired preset value.
- Execute the HSC instruction to cause the S7-200 to program HSC1.
Disabling a High-Speed Counter (Any Mode) The following steps describe how to disable the HSC1 high-speed counter (any mode):
- Load SMB47 to disable the counter: SMB47 = 16#00 Disables the counter
- Execute the HSC instruction to disable the counter.
131
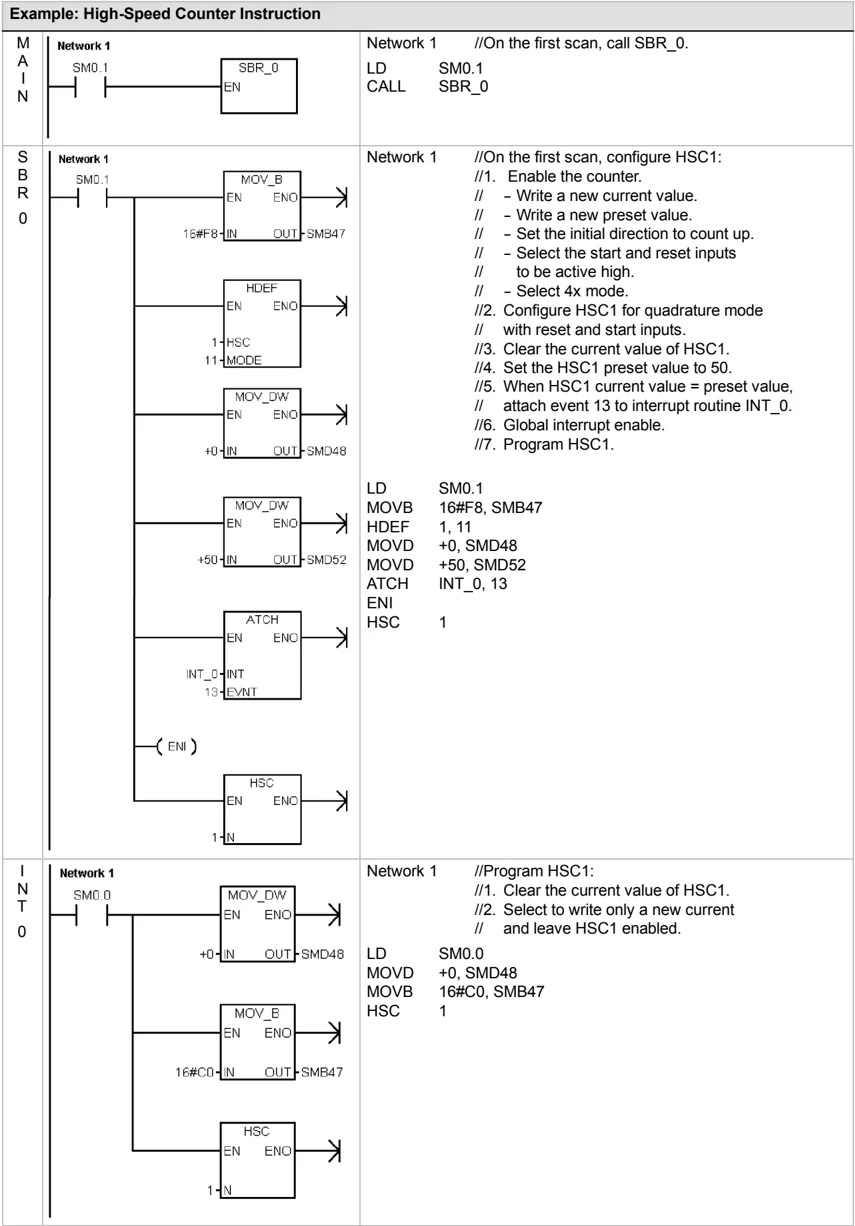
Example: High-Speed Counter Instruction
| MAIN | Network 1SM0.1EN | Network 1//On the first scan, call SBR_0.LD S M0.1CALL SBR_0 |
|---|---|---|
| SBR 0 | Network 1SM0.1ENMOV_B16#F8 IN OUT SMB47ENHDEF1 HSC11 MODEENMOV_DW+0 IN OUT SMD48ENMOV_DW+50 IN OUT SMD52ENATCHINT_0 INT13 EVENTEN( ENI )ENHSC1 N | Network 1//On the first scan, configure HSC1://1. Enable the counter.// - Write a new current value.// - Write a new preset value.// - Set the initial direction to count up.// - Select the start and reset inputs// to be active high.// - Select 4x mode.//2. Configure HSC1 for quadrature mode// with reset and start inputs.//3. Clear the current value of HSC1.//4. Set the HSC1 preset value to 50.//5. When HSC1 current value = preset value,// attach event 13 to interrupt routine INT_0.//6. Global interrupt enable.//7. Program HSC1.LD S M0.1MOVB 16#F8, SMB47HDEF 1, 11MOVD +0, SMD48MOVD +50, SMD52ATCH INT_0, 13ENIHSC 1 |
| INT 0 | Network 1SM0.0ENMOV_DW+0 IN OUT SMD48ENMOV_B16#C0 IN OUT SMB47ENHSC1 N | Network 1//Program HSC1://1. Clear the current value of HSC1.//2. Select to write only a new current// and leave HSC1 enabled.LD S M0.0MOVD +0, SMD48MOVB 16#C0, SMB47HSC 1 |
132
Pulse Output Instruction
The Pulse Output instruction (PLS) is used to control the Pulse Train Output (PTO) and Pulse Width Modulation (PWM) functions available on the high-speed outputs (Q0.0 and Q0.1).
Position Control
The improved Position Control Wizard creates instructions customized to your application that simplify your programming tasks and take advantage of the extra features of the S7-200 CPUs. Refer to Chapter 9 for more information about the Position Control Wizard.
You can continue to use the old PLS instruction to create your own motion application, but the linear ramp on the PTO is only supported by instructions created by the improved Position Control Wizard.
PTO provides a square wave (50% duty cycle) output with user control of the cycle time and the number of pulses.
PWM provides a continuous, variable duty cycle output with user control of the cycle time and the pulse width.
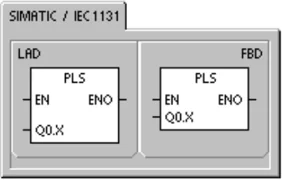
The S7-200 has two PTO/PWM generators that create either a high-speed pulse train or a pulse width modulated waveform. One generator is assigned to digital output point Q0.0, and the other generator is assigned to digital output point Q0.1. A designated special memory (SM) location stores the following data for each generator: a control byte (8-bit value), a pulse count value (an unsigned 32-bit value), and a cycle time and pulse width value (an unsigned 16-bit value).
The PTO/PWM generators and the process-image register share the use of Q0.0 and Q0.1. When a PTO or PWM function is active on Q0.0 or Q0.1, the PTO/PWM generator has control of the output, and normal use of the output point is inhibited. The output waveform is not affected by the state of the process-image register, the forced value of the point, or the execution of immediate output instructions. When the PTO/PWM generator is inactive, control of the output reverts to the process-image register. The process-image register determines the initial and final state of the output waveform, causing the waveform to start and end at a high or low level.
Table 6-32 Valid Operands for Pulse Output Instruction \begin{tabular}{|l|l|l|} \hline Inputs/Outputs & Data Types & Operands \ \hline Q0.X & WORD & Constant: 0 (= Q0.0) or 1 (= Q0.1) \ \hline \end{tabular}
Tip Before enabling PTO or PWM operation, set the value of the process-image register for Q0.0 and Q0.1 to 0.
Default values for all control bits, cycle time, pulse width, and pulse count values are 0.
The PTO/PWM outputs must have a minimum load of at least 10% of rated load to provide crisp transitions from off to on, and from on to off.
Programming Tips
Refer to the Programming Tips on the documentation CD for programs that use the PLS instruction for PTO/PWM operation. See Tip 7, Tip 22, Tip 23, Tip 30, and Tip 50.
Pulse Train Operation (PTO)
PTO provides a square wave (50% duty cycle) output for a specified number of pulses and a specified cycle time. (See Figure 6-28.) PTO can produce either a single train of pulses or multiple trains of pulses (using a pulse profile). You specify the number of pulses and the cycle time (in either microsecond or millisecond increments):
Number of pulses: 1 to 4,294,967,295 Cycle time: 10 µs to 65,535 µs or 2 ms to 65,535 ms.
Specifying an odd number of microseconds or milliseconds for the cycle time (such as 75 ms), causes some distortion in the duty cycle.
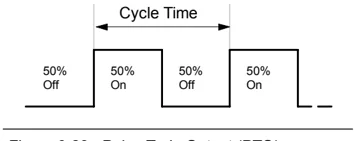
Figure 6-28 Pulse Train Output (PTO)
See Table 6-33 for pulse count and cycle time limitations.
Table 6-33 Pulse Count and Cycle Time in the PTO function \begin{tabular}{|l|l|} \hline Pulse Count/Cycle TIme & Reaction \ \hline Cycle time < 2 time units & Cycle time defaults to 2 time units. \ \hline Pulse count = 0 & Pulse count defaults to 1 pulse. \ \hline \end{tabular}
The PTO function allows the "chaining" or "pipelining" of pulse trains. When the active pulse train is complete, the output of a new pulse train begins immediately. This allows continuity between subsequent output pulse trains.
Using the Position Control Wizard
The Position Control Wizard automatically handles single and multiple segment pipelining of PTO pulses, pulse width modulation, SM Location configuration, and creating a profile table. The information is here for your reference. It is recommended that you use the Position Control Wizard. For more information about the Position Control Wizard, see Chapter 9.
Single-Segment Pipelining of PTO Pulses
In single-segment pipelining, you are responsible for updating the SM locations for the next pulse train. After the initial PTO segment has been started, you must modify immediately the SM locations as required for the second waveform and execute the PLS instruction again. The attributes of the second pulse train are held in a pipeline until the first pulse train is completed. Only one entry at a time can be stored in the pipeline. When the first pulse train completes, the output of the second waveform begins, and the pipeline is made available for a new pulse train specification. You can then repeat this process to set up the characteristics of the next pulse train.
Smooth transitions between pulse trains occur unless there is a change in the time base or the active pulse train completes before a new pulse train setup is captured by the execution of the PLS instruction.
134
Multiple-Segment Pipelining of PTO Pulses
In multiple-segment pipelining, the S7-200 automatically reads the characteristics of each pulse train segment from a profile table located in V memory. The SM locations used in this mode are the control byte, the status byte, and the starting V memory offset of the profile table (SMW168 or SMW178). The time base can be either microseconds or milliseconds, but the selection applies to all cycle time values in the profile table, and cannot be changed while the profile is running. Execution on the PLS instruction starts multiple segment operation.
Each segment entry is 8 bytes in length, and is composed of a 16-bit cycle time value, a 16-bit cycle time delta value, and a 32-bit pulse count value. Table 6-34 shows the format of the profile table. You can increase or decrease the cycle time automatically by programming a specified amount for each pulse. A positive value in the cycle time delta field increases cycle time, a negative value in the cycle time delta field decreases cycle time, and 0 results in an unchanging cycle time.
While the PTO profile is operating, the number of the currently active segment is available in SMB166 (or SMB176).
Table 6-34 Profile Table Format for Multiple-Segment PTO Operation
$^{1}$ Entering a value of 0 for the number of segments generates a non-fatal error. No PTO output is generated.
Pulse Width Modulation (PWM)
PWM provides a fixed cycle time output with a variable duty cycle. (See Figure 6-29.) You can specify the cycle time and the pulse width in either microsecond or millisecond increments:
Cycle time: 10 \mus to 65,535 \mus or 2 ms to 65,535 ms
Pulse width time: 0 \mus to 65,535 \mus or 0 ms to 65,535 ms
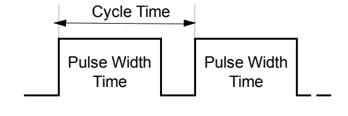
As shown in Table 6-35, setting the pulse width equal to the cycle time (which makes the duty cycle 100 percent) turns the output on continuously. Setting the pulse width to 0 (which makes the duty cycle 0 percent) turns the output off.
Table 6-35 Pulse Width Time and Cycle Time and Reactions in the PWM Function