Using the USS Protocol Library to Control a MicroMaster Drive Chapter 11
USS_CTRL Instruction
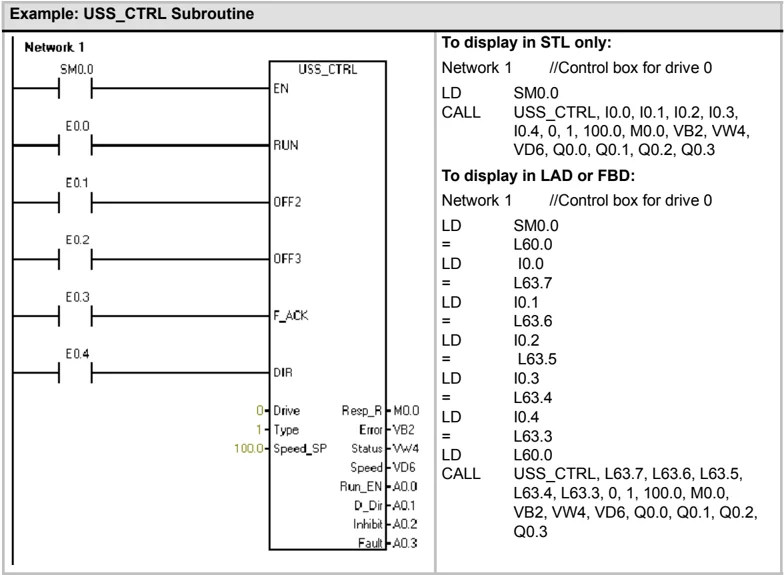
The USS_CTRL (port 0) or USS_CTRL_P1 (port 1) instruction is used to control an active MicroMaster drive. The USS_CTRL instruction places the selected commands in a communications buffer, which is then sent to the addressed drive (Drive parameter), if that drive has been selected in the Active parameter of the USS_INIT instruction.
Only one USS_CTRL instruction should be assigned to each drive.
Some drives report speed only as a positive value. If the speed is negative, the drive reports the speed as positive but reverses the D_Dir (direction) bit.
The EN bit must be on to enable the USS_CTRL instruction. This instruction should always be enabled.
RUN (RUN/STOP) indicates whether the drive is on (1) or off (0). When the RUN bit is on, the MicroMaster drive receives a command to start running at the specified speed and direction. In order for the drive to run, the following must be true:
☐ Drive must be selected as Active in USS_INIT.
☐ OFF2 and OFF3 must be set to 0.
☐ Fault and Inhibit must be 0.
When RUN is off, a command is sent to the MicroMaster drive to ramp the speed down until the motor comes to a stop. The OFF2 bit is used to allow the MicroMaster drive to coast to a stop. The OFF3 bit is used to command the MicroMaster drive to stop quickly.
The Resp_R (response received) bit acknowledges a response from the drive. All the Active drives are polled for the latest drive status information. Each time the S7-200 receives a response from the drive, the Resp_R bit is turned on for one scan and all the following values are updated.
The F_ACK (fault acknowledge) bit is used to acknowledge a fault in the drive. The drive clears the fault (Fault) when F_ACK goes from 0 to 1.
The DIR (direction) bit indicates in which direction the drive should move.
Table 11-3 Parameters of the USS_CTRL Instruction
 \begin{tabular}{|l|l|l|}
\hline
Inputs/Outputs & Data Types & Operands \
\hline
RUN, OFF 2, OFF 3, F_ACK, DIR & BOOL & I, Q, M, S, SM, T, C, V, L, Power Flow \
\hline
Resp_R, Run_EN, D_Dir, Inhibit, Fault & BOOL & I, Q, M, S, SM, T, C, V, L \
\hline
Drive, Type & BYTE & VB, IB, QB, MB, SB, SMB, LB, AC, *VD, *AC, *LD, Constant \
\hline
Error & BYTE & VB, IB, QB, MB, SB, SMB, LB, AC, *VD, *AC, *LD \
\hline
Status & WORD & VW, T, C, IW, QW, SW, MW, SMW, LW, AC, AQW, *VD, *AC, *LD \
\hline
Speed_SP & REAL & VD, ID, QD, MD, SD, SMD, LD, AC, *VD, *AC, *LD, Constant \
\hline
Speed & REAL & VD, ID, QD, MD, SD, SMD, LD, AC, *VD, *AC, *LD \
\hline
\end{tabular}
The Drive (drive address) input is the address of the MicroMaster drive to which the USS_CTRL command is to be sent. Valid addresses: 0 to 31
The Type (drive type) input selects the type of drive. For a MicroMaster 3 (or earlier) drive, set Type to 0. For a MicroMaster 4 drive, set Type to 1.
Speed_SP (speed setpoint) is drive speed as a percentage of full speed. Negative values of Speed_SP cause the drive to reverse its direction of rotation. Range: -200.0% to 200.0%
Error is an error byte that contains the result of the latest communications request to the drive. Table 11-6 defines the error conditions that could result from executing the instruction.
Status is the raw value of the status word returned by the drive. Figure 11-3 shows the status bits for Standard Status Word and Main Feedback.
Speed is drive speed as a percentage of full speed. Range: -200.0% to 200.0%
Run_EN (RUN enable) indicates whether the drive is running (1) or stopped (0).
D_Dir indicates the drive's direction of rotation.
Inhibit indicates the state of the inhibit bit on the drive (0 – not inhibited, 1 – inhibited). To clear the inhibit bit, the Fault bit must be off, and the RUN, OFF2, and OFF3 inputs must also be off.
Fault indicates the state of the fault bit (0 – no fault, 1 – fault). The drive displays the fault code. (Refer to the manual for your drive). To clear the Fault bit, correct the cause of the fault and turn on the F_ACK bit.
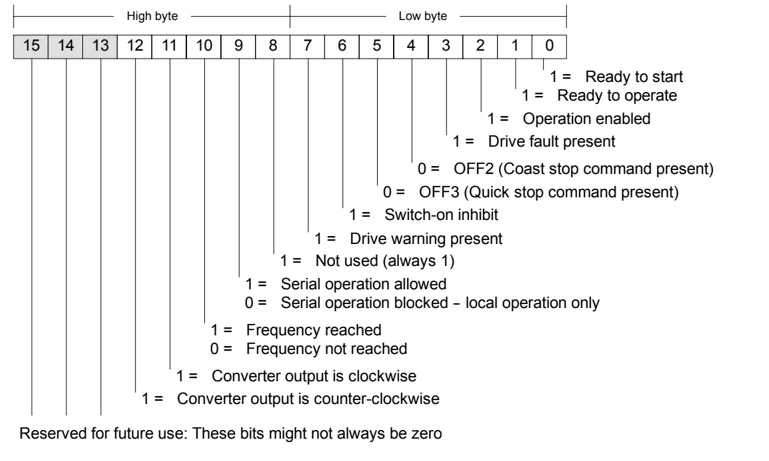
Figure 11-3 Status Bits for Standard Status Word for MicroMaster 3 and Main Feedback
Using the US S Protocol Library to Control a MicroMaster Drive Chapter 11
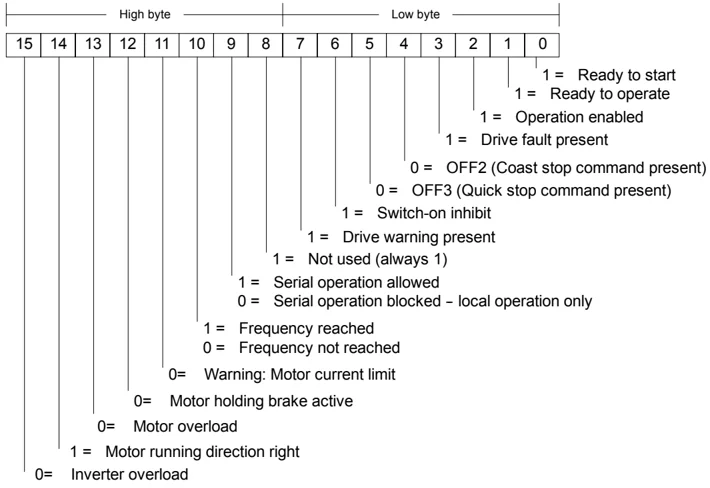
Figure 11-4 Status Bits for Standard Status Word for MicroMaster 4 and Main Feedback
Example: USS_CTRL Subroutine
| Network 1 | To display in STL only: |
|---|---|
| SM0.0 | Network 1 //Control box for drive 0 |
| E0.0 | LD SM0.0 |
| E0.1 | CALL USS_CTRL, I0.0, I0.1, I0.2, I0.3, |
| E0.2 | I0.4, 0, 1, 100.0, M0.0, VB2, VW4, |
| E0.3 | VD6, Q0.0, Q0.1, Q0.2, Q0.3 |
| E0.4 | To display in LAD or FBD: |
| Network 1 //Control box for drive 0 | |
| LD SM0.0 | |
| = L60.0 | |
| LD I0.0 | |
| = L63.7 | |
| LD I0.1 | |
| = L63.6 | |
| LD I0.2 | |
| = L63.5 | |
| LD I0.3 | |
| = L63.4 | |
| LD I0.4 | |
| = L63.3 | |
| LD L60.0 | |
| CALL USS_CTRL, L63.7, L63.6, L63.5, | |
| L63.4, L63.3, 0, 1, 100.0, M0.0, | |
| VB2, VW4, VD6, Q0.0, Q0.1, Q0.2, | |
| Q0.3 |
337
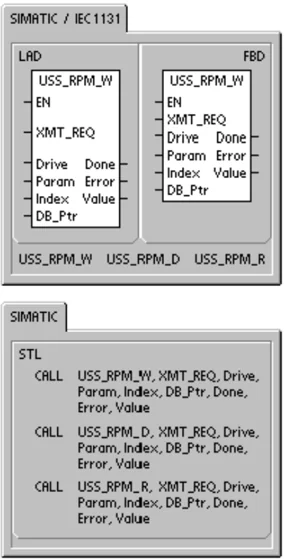
USS_RPM_x Instruction
There are three read instructions for the USS protocol:
☐ USS_RPM_W (port 0) or USS_RPM_W_P1 (port 1) instruction reads an unsigned word parameter.
☐ USS_RPM_D (port 0) or USS_RPM_D_P1 (port 1) instruction reads an unsigned double word parameter.
☐ USS_RPM_R (port 0) or USS_RPM_R_P1 (port 1) instruction reads a floating-point parameter.
Only one read (USS_RPM_x) or write (USS_WPM_x) instruction can be active at a time.
The USS_RPM_x transactions complete when the MicroMaster drive acknowledges receipt of the command, or when an error condition is posted. The logic scan continues to execute while this process awaits a response.
The EN bit must be on to enable transmission of a request, and should remain on until the Done bit is set, signaling completion of the process. For example, a USS_RPM_x request is transmitted to the MicroMaster drive on each scan when XMT_REQ input is on. Therefore, the XMT_REQ input should be pulsed on through an edge detection element which causes one request to be transmitted for each positive transition of the EN input.
The Drive input is the address of the MicroMaster drive to which the USS_RPM_x command is to be sent. Valid addresses of individual drives are 0 to 31.
Param is the parameter number. Index is the index value of the parameter that is to be read. Value is the parameter value returned. The address of a 16-byte buffer must be supplied to the DB_Ptr input. This buffer is used by the USS_RPM_x instruction to store the results of the command issued to the MicroMaster drive.
When the USS_RPM_x instruction completes, the Done output is turned on and the Error output byte and the Value output contain the results of executing the instruction. Table 11-6 defines the error conditions that could result from executing the instruction. The Error and Value outputs are not valid until the Done output turns on.
Table 11-4 Valid Operands for the USS_RPM_x
\begin{tabular}{|l|l|l|} \hline Inputs/Outputs & Data Type & Operands \ \hline XMT_REQ & BOOL & I, Q, M, S, SM, T, C, V, L, Power Flow conditioned by a rising edge detection element \ \hline Drive & BYTE & VB, IB, QB, MB, SB, SMB, LB, AC, *VD, *AC, *LD, Constant \ \hline Param, Index & WORD & VW, IW, QW, MW, SW, SMW, LW, T, C, AC, AIW, *VD, *AC, *LD, Constant \ \hline DB_Ptr & DWORD & &VB \ \hline Value & WORD & VW, IW, QW, MW, SW, SMW, LW, T, C, AC, AQW, *VD, *AC, *LD \ \hline & DWORD, REAL & VD, ID, QD, MD, SD, SMD, LD, *VD, *AC, *LD \ \hline Done & BOOL & I, Q, M, S, SM, T, C, V, L \ \hline Error & BYTE & VB, IB, QB, MB, SB, SMB, LB, AC. *VD, *AC, *LD \ \hline \end{tabular}
USS_WPM_x Instruction
There are three write instructions for the USS protocol:
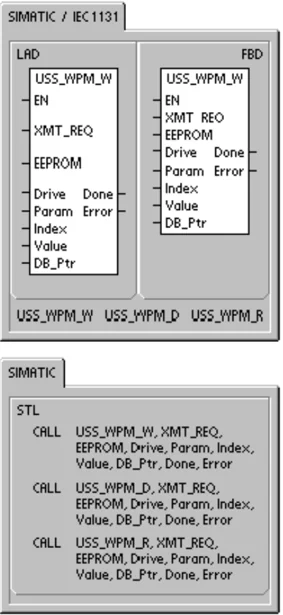
☐ USS_WPM_W (port 0) or USS_WPM_W_P1 (port 1) instruction writes an unsigned word parameter.
☐ USS_WPM_D (port 0) or USS_WPM_D_P1 (port 1) instruction writes an unsigned double word parameter.
☐ USS_WPM_R (port 0) or USS_WPM_R_P1 (port 1) instruction writes a floating-point parameter.
Only one read (USS_RPM_x) or write (USS_WPM_x) instruction can be active at a time.
The USS_WPM_x transactions complete when the MicroMaster drive acknowledges receipt of the command, or when an error condition is posted. The logic scan continues to execute while this process awaits a response.
The EN bit must be on to enable transmission of a request, and should remain on until the Done bit is set, signaling completion of the process. For example, a USS_WPM_x request is transmitted to the MicroMaster drive on each scan when XMT_REQ input is on. Therefore, the XMT_REQ input should be pulsed on through an edge detection element which causes one request to be transmitted for each positive transition of the EN input.
The EEPROM input enables writing to both RAM and EEPROM of the drive when it is on and only to the RAM when it is off. Note that this function is not supported by MM3 drives, so this input must be off.
The Drive input is the address of the MicroMaster drive to which the USS_WPM_x command is to be sent. Valid addresses of individual drives are 0 to 31.
Param is the parameter number. Index is the index value of the parameter that is to be written. Value is the parameter value to be written to the RAM in the drive. For MicroMaster 3 drives, you can also write this value to the EEPROM of the drive, based on how you have configured P971 (EEPROM Storage Control).
The address of a 16-byte buffer must be supplied to the DB_Ptr input. This buffer is used by the USS_WPM_x instruction to store the results of the command issued to the MicroMaster drive.
When the USS_WPM_x instruction completes, the Done output is turned on and the Error output byte contains the result of executing the instruction. Table 11-6 defines the error conditions that could result from executing the instruction.
When the EEPROM input is turned on, the instruction writes to both the RAM and the EEPROM of the drive. When the the input is turned off, the instruction writes only to the RAM of the drive. Because the MicroMaster 3 drive does not support this function, you must ensure that this input is off in order to use this instruction with a MicroMaster 3 drive.
Table 11-5 Valid Operands for the USS_WPM_x Instructions
\begin{tabular}{|l|l|l|} \hline Inputs/Outputs & Data Type & Operands \ \hline XMT_REQ & BOOL & I, Q, M, S,SM,T,C,V,L, Power Flow conditioned by a rising edge detection element \ \hline EEPROM & BOOL & I, Q, M, S, SM, T, C, V, L, Power Flow \ \hline Drive & BYTE & VB, IB, QB, MB, SB, SMB, LB, AC, *VD, *AC, *LD, Constant \ \hline Param, Index & WORD & VW, IW, QW, MW, SW, SMW, LW, T, C, AC, AIW, *VD, *AC, *LD, Constant \ \hline DB_Ptr & DWORD & &VB \ \hline Value & WORD & VW, IW, QW, MW, SW, SMW, LW, T, C, AC, AQW, *VD, *AC, *LD \ \cline{2-3} & DWORD, REAL & VD, ID, QD, MD, SD, SMD, LD, *VD, *AC, *LD \ \hline \end{tabular}
Table 11-5 Valid Operands for the USS_WPM_x Instructions, continued
| Inputs/Outputs | Data Type | Operands |
|---|---|---|
| Done | BOOL | I, Q, M, S, SM, T, C, V, L |
| Error | BYTE | VB, IB, QB, MB, SB, SMB, LB, AC. *VD, *AC, *LD |
Caution
When you use an USS_WPM_x instruction to update the parameter set stored in drive EEPROM, you must ensure that the maximum number of write cycles (approximately 50,000) to the EEPROM is not exceeded.
Exceeding the maximum number of write cycles will result in corruption of the stored data and subsequent data loss. The number of read cycles is unlimited.
If frequent writes to the drive parameters are required, then you should first set the EEPROM storage control parameter in the drive to zero (for MicroMaster 3 drives) and turn off the EEPROM input for MicroMaster 4 drives.
Example: USS_RPM_x and USS_WPM_x
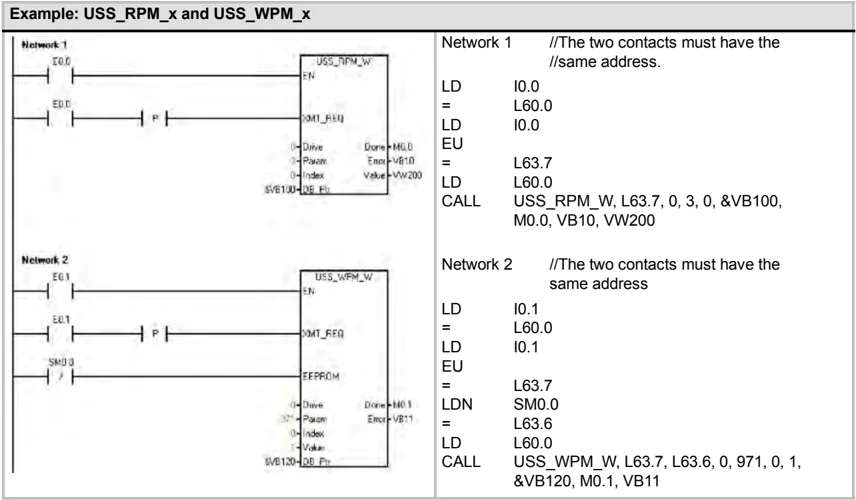
Network 1 //The two contacts must have the //same address. LD I0.0 = L60.0 LD I0.0 EU = L63.7 LD L60.0 CALL USS_RPM_W, L63.7, 0, 3, 0, &VB100, M0.0, VB10, VW200
Network 2 //The two contacts must have the same address LD I0.1 = L60.0 LD I0.1 EU = L63.7 LDN SM0.0 = L63.6 LD L60.0 CALL USS_WPM_W, L63.7, L63.6, 0, 971, 0, 1, &VB120, M0.1, VB11
340
Sample Programs for the USS Protocol
Example: USS Instructions Sample Program that Correctly Displays in STL
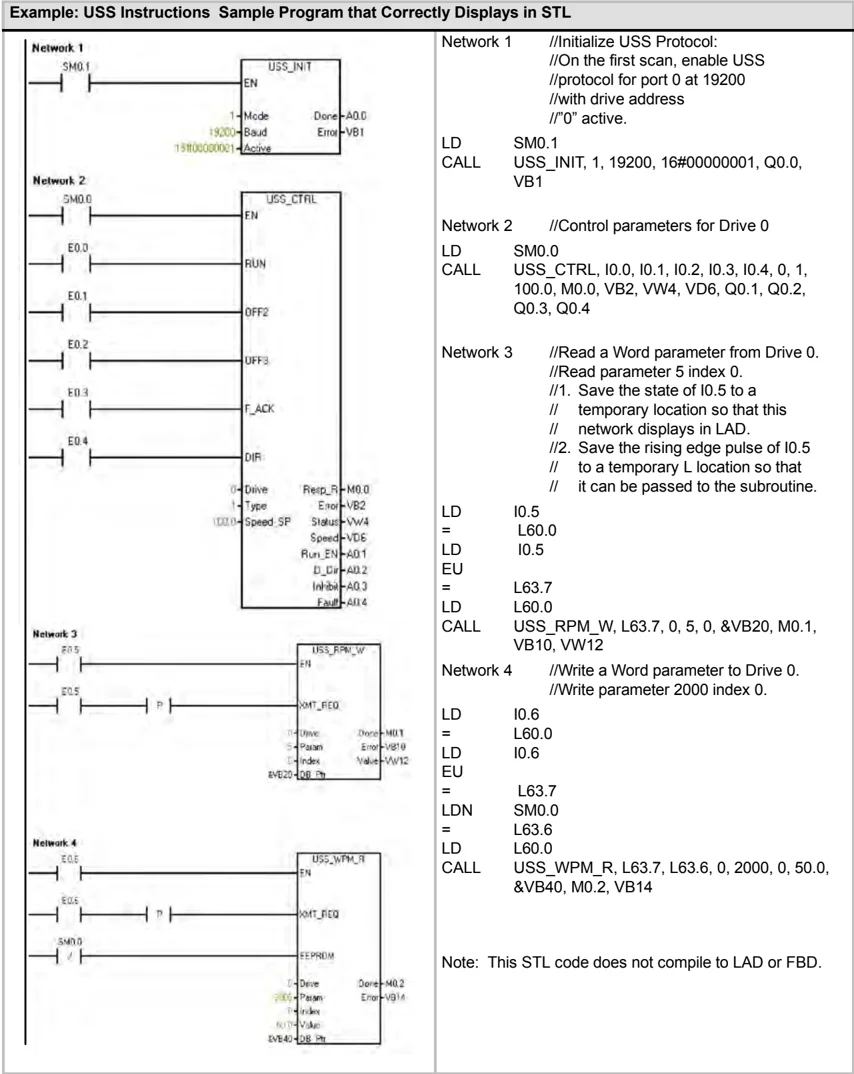
Network 1 //Initialize USS Protocol: //On the first scan, enable USS //protocol for port 0 at 19200 //with drive address //"0" active. LD SM0.1 CALL USS_INIT, 1, 19200, 16#00000001, Q0.0, VB1
Network 2 //Control parameters for Drive 0 LD SM0.0 CALL USS_CTRL, I0.0, I0.1, I0.2, I0.3, I0.4, 0, 1, 100.0, M0.0, VB2, VW4, VD6, Q0.1, Q0.2, Q0.3, Q0.4
Network 3 //Read a Word parameter from Drive 0. //Read parameter 5 index 0. //1. Save the state of I0.5 to a // temporary location so that this // network displays in LAD. //2. Save the rising edge pulse of I0.5 // to a temporary L location so that // it can be passed to the subroutine. LD I0.5 = L60.0 LD I0.5 EU = L63.7 LD L60.0 CALL USS_RPM_W, L63.7, 0, 5, 0, &VB20, M0.1, VB10, VW12
Network 4 //Write a Word parameter to Drive 0. //Write parameter 2000 index 0. LD I0.6 = L60.0 LD I0.6 EU = L63.7 LDN SM0.0 = L63.6 LD L60.0 CALL USS_WPM_R, L63.7, L63.6, 0, 2000, 0, 50.0, &VB40, M0.2, VB14
Note: This STL code does not compile to LAD or FBD.
USS Execution Error Codes
Table 11-6 Execution Error Codes for the USS Instructions
Connecting and Setting Up the MicroMaster Series 3 Drive
Connecting the MicroMaster 3 Drive
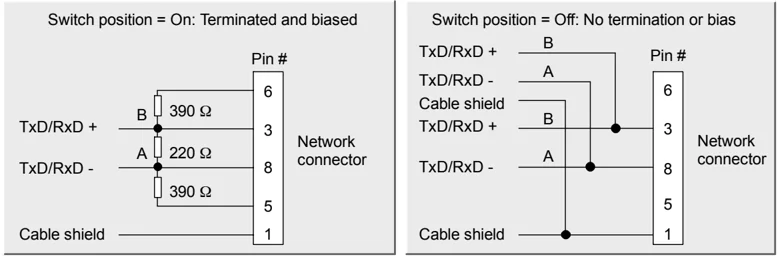
You can use the standard PROFIBUS cable and connectors to connect the S7-200 to the MicroMaster Series 3 (MM3) drive. See Figure 11-5 for the proper cable bias and termination of the interconnecting cable.
Caution
Interconnecting equipment with different reference potentials can cause unwanted currents to flow through the interconnecting cable.
These unwanted currents can cause communications errors or damage equipment.
Be sure all equipment that you are about to connect with a communications cable either shares a common circuit reference or is isolated to prevent unwanted current flows.
The shield must be tied to chassis ground or pin 1 on the 9-pin connector. It is recommended that you tie wiring terminal 2-0V on the MicroMaster drive to chassis ground.
Using the USS Protocol Library to Control a MicroMaster Drive Chapter 11
 C able must be terminated and biased at both ends.
Switch position = On Terminated and biased On A B A B
Switch position = Off No termination or bias Off A B A B
Switch position = On Terminated and biased On A B A B
Bare shielding: approximately 12 mm (1/2 in.) must contact the metal guides of all locations.
Switch position = On: Terminated and biased Pin # 6 TxD/RxD + B 390 Ω 3 Network connector TxD/RxD - A 220 Ω 8 390 Ω 5 Cable shield 1
Switch position = Off: No termination or bias B TxD/RxD + Pin # A TxD/RxD - Cable shield B TxD/RxD + 3 Network connector A TxD/RxD - 8 5 Cable shield 1
Figure 11-5 Bias and Termination of the Network Cable
Setting Up the MicroMaster 3 Drive
Before you connect a drive to the S7-200, you must ensure that the drive has the following system parameters. Use the keypad on the drive to set the parameters:
-
Reset the drive to factory settings (optional). Press the P key; P000 is displayed. Press the up or down arrow key until the display shows the P944. Press P to enter the parameter. P944=1
-
Enable the read/write access to all parameters. Press the P key. Press the up or down arrow key until the display shows P009. Press P to enter the parameter. P009=3
-
Check motor settings for your drive. The settings will vary according to the motor(s) being used. Press the P key. Press the up or down arrow key until the display shows the motor setting for your drive. Press P to enter the parameter. P081=Nominal frequency of motor (Hz) P082=Nominal speed of motor (RPM) P083=Nominal current of motor (A) P084=Nominal voltage of motor (V) P085=Nominal power of motor (kW/HP)
-
Set the Local/Remote control mode. Press the P key. Press the up or down arrow key until the display shows P910. Press P to enter the parameter. P910=1 Remote control mode
343
-
Set the Baud Rate of the RS-485 serial interface. Press the P key. Press the up or down arrow key until P092 appears. Press P to enter the parameter. Press the up or down arrow key until the display shows the number that corresponds to the baud rate of your RS-485 serial interface. Press P to enter. P092 3 (1200 baud) 4 (2400 baud) 5 (4800 baud) 6 (9600 baud - default) 7 (19200 baud)
-
Enter the Slave address. Each drive (a maximum of 31) can be operated over the bus. Press the P key. Press the up or down arrow key until P091 appears. Press P to enter the parameter. Press the up or down arrow key until the display shows the slave address you want. Press P to enter. P091=0 through 31.
-
Ramp up time (optional). This is the time in seconds that it takes the motor to accelerate to maximum frequency. Press the P key. Press the up or down arrow key until P002 appears. Press P to enter the parameter. Press the up or down arrow key until the display shows the ramp up time you want. Press P to enter. P002=0-650.00
-
Ramp down time (optional). This is the time in seconds that it takes the motor to decelerate to a complete stop. Press the P key. Press the up or down arrow key until P003 appears. Press P to enter the parameter. Press the up or down arrow key until the display shows the ramp down time you want. Press P to enter. P003=0-650.00
-
Serial Link Time-out. This is the maximum permissible period between two incoming data telegrams. This feature is used to turn off the inverter in the event of a communications failure. Timing starts after a valid data telegram has been received. If a further data telegram is not received within the specified time period, the inverter will trip and display fault code F008. Setting the value to zero switches off the control. Use Table 11-1 to calculate the time between the status polls to the drive. Press the P key. Press the up or down arrow key until P093 appears. Press P to enter the parameter. Press the up or down arrow key until the display shows the serial link time-out you want. Press P to enter. P093=0-240 (0 is default; time is in seconds)
-
Serial Link Nominal System Setpoint. This value can vary, but will typically correspond to 50 Hz or 60 Hz, which defines the corresponding 100% value for PVs or SPs. Press the P key. Press the up or down arrow key until P094 appears. Press P to enter the parameter. Press the up or down arrow key until the display shows the serial link nominal system setpoint you want. Press P to enter. P094=0-400.00
-
USS Compatibility (optional). Press the P key. Press the up or down arrow key until P095 appears. Press P to enter the parameter. Press the up or down arrow key until the display shows the number that corresponds to the USS compatibility you want. Press P to enter. P095 = 0 0.1 Hz resolution (default) 1 0.01 Hz resolution
-
EEPROM storage control (optional). Press the P key. Press the up or down arrow key until P971 appears. Press P to enter the parameter. Press the up or down arrow key until the display shows the number that corresponds to the EEPROM storage control you want. Press P to enter. P971 = 0 Changes to parameter settings (including P971) are lost when power is removed. 1 (default) Changes to parameter settings are retained during periods when power is removed.
-
Operating display. Press P to exit out of parameter mode.
344
Connecting and Setting Up the MicroMaster Series 4 Drive
Connecting the MicroMaster 4 Drive
To make the connection to the MicroMaster Series 4 (MM4) drive, insert the ends of the RS-485 cable into the two caged clamp, screwless terminals provided for USS operation. The standard PROFIBUS cable and connectors can be used to connect the S7-200.
Caution Interconnecting equipment with different reference potentials can cause unwanted currents to flow through the interconnecting cable.
These unwanted currents can cause communications errors or damage equipment.
Be sure all equipment that you are about to connect with a communications cable either shares a common circuit reference or is isolated to prevent unwanted current flows.
The shield must be tied to chassis ground or pin 1 on the 9-pin connector. It is recommended that you tie wiring terminal 2-0V on the MicroMaster drive to chassis ground.
As shown in Figure 11-6, the two wires at the opposite end of the RS-485 cable must be inserted into the MM4 drive terminal blocks. To make the cable connection on a MM4 drive, remove the drive cover(s) to access the terminal blocks. See the MM4 user manual for details about how to remove the covers(s) of your specific drive.
The terminal block connections are labeled numerically. Using a PROFIBUS connector on the S7-200 side, connect the A terminal of the cable to the drive terminal 15 (for an MM420) or terminal 30 (MM440). Connect the B terminal of the cable connector to terminal 14 (MM420) or terminal 29 (MM440).
 Figure 11-6 Connecting to the MM420 Terminal Block
If the S7-200 is a terminating node in the network, or if the connection is point-to-point, it is necessary to use terminals A1 and B1 (not A2 and B2) of the connector since they allow the termination settings to be set (for example, with DP connector type 6ES7 972-0BA40-0X40).
Caution Make sure the drive covers are replaced properly before supplying power to the unit.
If the drive is configured as the terminating node in the network, then termination and bias resistors must also be wired to the appropriate terminal connections. For example, Figure 11-7 shows an example of the connections necessary for termination and bias for the MM4 drive.
 Figure 11-7 Sample Termination and Bias
Setting Up the MM4 Drive
Before you connect a drive to the S7-200, you must ensure that the drive has the following system parameters. Use the keypad on the drive to set the parameters:
-
Reset the drive to factory settings (optional):
- P0010=30
- P0970=1
If you skip this step, ensure that the following parameters are set to these values:
- USS PZD length: P2012 Index 0=2
- USS PKW length: P2013 Index 0=127
-
Enable the read/write access to all parameters (Expert mode): P0003=3
-
Check motor settings for your drive:
- P0304=Rated motor voltage (V)
- P0305=Rated motor current (A)
- P0307=Rated motor power (W)
- P0310=Rated motor frequency (Hz)
- P0311=Rated motor speed (RPM)
The settings will vary according to the motor(s) being used.
In order to set the parameters P304, P305, P307, P310, and P311, you must first set parameter P010 to 1 (quick commissioning mode). When you are finished setting the parameters, set parameter P010 to 0. Parameters P304, P305, P307, P310, and P311 can only be changed in the quick commissioning mode.
-
Set the local/remote control mode: P0700 Index 0=5
-
Set selection of frequency setpoint to USS on COM Link: P1000 Index 0=5
-
Ramp up time (optional): P1120=0 to 650.00
This is the time in seconds that it takes the motor to accelerate to maximum frequency.
-
Ramp down time (optional): P1121=0 to 650.00
This is the time in seconds that it takes the motor to decelerate to a complete stop.
-
Set the serial link reference frequency: P2000=1 to 650 Hz
-
Set the USS normalization: P2009 Index 0=0
-
Set the baud rate of the RS-485 serial interface: P2010 Index 0=
- 4 (2400 baud)
- 5 (4800 baud)
- 6 (9600 baud)
- 7 (19200 baud)
- 8 (38400 baud)
- 9 (57600 baud)
- 12 (115200 baud)
-
Enter the Slave address: P2011 Index 0=0 to 31
Each drive (a maximum of 31) can be operated over the bus.
-
Set the serial link timeout: P2014 Index 0=0 to 65,535 ms (0=timeout disabled)
This is the maximum permissible period between two incoming data telegrams. This feature is used to turn off the inverter in the event of a communications failure. Timing starts after a valid data telegram has been received. If a further data telegram is not received within the specified time period, the inverter will trip and display fault code F0070. Setting the value to zero switches off the control. Use Table 11-1 to calculate the time between the status polls to the drive.
-
Transfer the data from RAM to EEPROM: P0971=1 (Start transfer) Save the changes to the parameter settings to EEPROM
Using the Modbus Protocol Library
The STEP 7-Micro/WIN Instruction Libraries make communicating to Modbus devices easier by including pre-configured subroutines and interrupt routines that are specifically designed for Modbus communications. With the Modbus Protocol Instructions, you can configure the S7-200 to act as a Modbus master or slave device.
You find these instructions in the Libraries folder of the STEP 7-Micro/WIN instruction tree. When you put a Modbus instruction in your program, one or more associated subroutines are automatically added to your project.
Siemens Libraries are sold on a separate CD, STEP 7-Micro/WIN Add-On: Instruction Library, with the order number 6ES7 830-2BC00-0YX0. After version 1.1 of the Siemens Library is purchased and installed, any subsequent STEP 7-Micro/WIN V3.2x and V4.0 upgrade that you install will also upgrade your libraries automatically at no additional cost (when library additions or modifications are made).
I n This C hapter
- Overview . . . . . . . . . . . . . . . . . . . . . . . . . . . . . . . . . . . . . . . . . . . . . . . . . . . . . . . . . . . . . . . . . . . . . . . . . . . . . . . . . . . . . . . . . . . . . . . . . . . . . . . . . . . . . . . . . . . . . . . . . . . . . . . . . . . . . . . . ........ 348
- Requirements for Using Modbus Protocol . . . . . . . . . . . . . . . . . . . . . . . . . . . . . . . . . . . . . . . . . . . . . . . . . . . . . . . . . . . . . ........ 348
- Initialization and Execution Time for Modbus Protocol . . . . . . . . . . . . . . . . . . . . . . . . . . . . . . . . . . . . . . . . . . . . . . . . . . . . . . . . . . . . . . . . . . . . . . . . . . . . . . . . . . . . . . . . . . . . . . . . . . . . . . . . . . . . . . . . . . . . . . . . . . . . . . . . . . . . . . . . . . . . . . . . . . . . . . . . . . . . . . . . . . . . . . . . . . . . . . . . . . . . . . . . . . . . . . . . . . . . . . . . . . . . . . . . . . . . . . . . . . . . . . . ........
S7-200 Programmable Controller System Manual
Overview
STEP 7-Micro/WIN Instruction Libraries make communicating to Modbus master and slave devices easier by including pre-configured subroutines and interrupt routines that are specifically designed for Modbus communications.
Modbus slave instructions can configure the S7-200 to act as a Modbus RTU slave device and communicate to Modbus master devices.
Modbus master instructions can configure the S7-200 to act as a Modbus RTU master device and communicate to one or more Modbus slave devices.
The Modbus instructions are installed into the libraries folder in the STEP 7-Micro/WIN instruction tree. These instructions enable the S7-200 to act as a Modbus device. When you place a Modbus instruction in your program, one or more associated subroutines are automatically added to your project.
There are two versions of the Modbus master protocol library. One version uses port 0 of the CPU and the other uses port 1 of the CPU. The port 1 library has a _P1 appended to the POU names (for example, MBUS_CTRL_P1) to denote that the POU utilizes port 1 on the CPU. The two Modbus master libraries are identical in all other respects.
The Modbus slave library only supports port 0 communication.
Requirements for Using Modbus Protocol
The Modbus Master Protocol instructions use the following resources from the S7-200:
☐ Initializing the Modbus Slave Protocol dedicates the specific CPU port for Modbus Master Protocol communications.
When the CPU port is being used for Modbus Master Protocol communications, it cannot be used for any other purpose, including communications with STEP 7-Micro/WIN. The MBUS_CTRL instruction controls assignment of Port 0 to Modbus Master Protocol or PPI. The MBUS_CTRL_P1 instruction (from the port 1 library) controls assignment of Port 1 to Modbus Master Protocol or PPI
☐ The Modbus Master Protocol instructions affect all of the SM locations associated with Freeport communications port in use
☐ The Modbus Master Protocol instructions use 3 subroutines and 1 interrupt routine.
☐ The Modbus Master Protocol instructions require about 1620 bytes of program space for the two Modbus Master instructions and the support routines.
☐ The variables for the Modbus Master Protocol instructions require a 284 byte block of V memory. The starting address for this block is assigned by the user and is reserved for Modbus variables.
☐ The S7-200 CPU must be firmware revision 2.00 or greater to support the Modbus Master Protocol Library (CPU MLFB 21x-2xx23-0XB0)
☐ The Modbus Master Library uses the user interrupts for some functions. The user interrupts must not be disabled by the user program.
Tip To change the operation of the CPU communications port back to PPI so that you can communicate with STEP 7-Micro/WIN, you can do one of the following: – Set the Mode parameter of the MBUS_CTRL instruction to a zero (0). – Set the mode switch on the S7-200 to STOP mode position. Either of these methods will set the CPU communications port to communicate with STEP 7-Micro/WIN.
348
The Modbus Slave Protocol instructions use the following resources from the S7-200:
☐ Initializing the Modbus Slave Protocol dedicates Port 0 for Modbus Slave Protocol communications.
When Port 0 is being used for Modbus Slave Protocol communications, it cannot be used for any other purpose, including communications with STEP 7-Micro/WIN. The MBUS_INIT instruction controls assignment of Port 0 to Modbus Slave Protocol or PPI.
☐ The Modbus Slave Protocol instructions affect all of the SM locations associated with Freeport communications on Port 0.
☐ The Modbus Slave Protocol instructions use 3 subroutines and 2 interrupts.
☐ The Modbus Slave Protocol instructions require 1857 bytes of program space for the two Modbus Slave instructions and the support routines.
☐ The variables for the Modbus Slave Protocol instructions require a 779-byte block of V memory. The starting address for this block is assigned by the user and is reserved for Modbus variables.
Tip To change the operation of Port 0 back to PPI so that you can communicate with STEP 7-Micro/WIN, you can do one of the following: – Use another MBUS_INIT instruction to reassign Port 0. – Set the mode switch on the S7-200 to STOP mode.
Either of these methods will set the parameters for Port 0 so that you can communicate with STEP 7-Micro/WIN.
I nitialization and Execution Time for Modbus Protocol
Modbus Master Protocol – The Modbus Master Protocol requires a small amount of time every scan to execute the MBUS_CTRL instruction. The time will be about 1.11 milliseconds when the MBUS_CTRL is initializing the Modbus Master (first scan), and about 0.41 milliseconds on subsequent scans.
The scan time is extended when the MBUS_MSB subroutine executes a request. Most of the time is spent calculating the Modbus CRC for the request and the response. The CRC (Cyclic Redundancy Check) insures the integrity of the communications message. The scan time is extended by about 1.85 milliseconds for each word in request and in the response. A maximum request/response (read or write of 120 words) extends the scan time to approximately 222 milliseconds. A read request extends the scan mainly when the response is received from the slave, and to a lesser extent when the request is sent. A write request extends the scan mainly when the data is sent to the slave, and to a lesser extent when the response is received.
Modbus Slave Protocol – Modbus communications utilize a CRC (cyclic redundancy check) to insure the integrity of the communications messages. The Modbus Slave Protocol uses a table of precalculated values to decrease the time required to process a message. The initialization of this CRC table requires about 240 milliseconds. This initialization is done inside the MBUS_INIT subroutine and is normally done in the first scan of the user program after entering RUN mode. You are responsible for resetting the watchdog timer and keeping the outputs enabled (if required for expansion modules) if the time required by the MBUS_INIT subroutine and any other user initialization exceeds the 500 millisecond scan watchdog. The output module watchdog timer is reset by writing to the outputs of the module. See the Watchdog Reset Instruction in Chapter 6.
The scan time is extended when the MBUS_SLAVE subroutine services a request. Since most of the time is spent calculating the Modbus CRC, the scan time is extended by about 420 microseconds for every byte in the request and in the response. A maximum request/response (read or write of 120 words) extends the scan time by approximately 100 milliseconds.
Modbus Addressing
Modbus addresses are normally written as 5 character values containing the data type and the offset. The first character determines the data type, and the last four characters select the proper value within the data type.
Modbus Master Addressing
The Modbus Master instructions then map the address to the correct functions to send to the slave device. The following Modbus addresses are supported by the Modbus Master instructions:
- 00001 to 09999 are discrete outputs (coils)
- 10001 to 19999 are discrete inputs (contacts)
- 30001 to 39999 are input registers (generally analog inputs)
- 40001 to 49999 are holding registers
All Modbus addresses are one-based, meaning that the first data value starts at address one. The range of valid addresses will depend on the slave device. Different slave devices will support different data types and address ranges.
Modbus Slave Addressing
The Modbus Master device then maps the addresses to the correct functions. The following addresses are supported by the Modbus Slave instructions:
- 00001 to 00128 are discrete outputs mapped to Q0.0 - Q15.7
- 10001 to 10128 are discrete inputs mapped to I0.0 - I15.7
- 30001 to 30032 are analog input registers mapped to AIW0 to AIW62
- 40001 to 04xxxx are holding registers mapped to V memory.
All Modbus addresses are one-based. Table 12-1 shows the mapping of Modbus addresses to the S7-200 addresses.
The Modbus Slave Protocol allows you to limit the amount of inputs, outputs, analog inputs, and holding registers (V memory) accessible to a Modbus master.
The MaxIQ parameter of the MBUS_INIT instruction specifies the maximum number of discrete inputs or outputs (Is or Qs) the Modbus master is allowed to access.
The MaxAI parameter of the MBUS_INIT instruction specifies the maximum number of input registers (AIWs) the Modbus master is allowed to access.
The MaxHold parameter of the MBUS_INIT instruction specifies the maximum number of holding registers (V memory words) the Modbus master is allowed to access.
See the description of the MBUS_INIT instruction for more information on setting up the memory restrictions for the Modbus slave.
Table 12-1 Mapping Modbus Addresses to the S7-200
| Modbus Address | S7-200 Address |
|---|---|
| 00001 | Q0.0 |
| 00002 | Q0.1 |
| 00003 | Q0.2 |
| ... | ... |
| 00127 | Q15.6 |
| 00128 | Q15.7 |
| 10001 | I0.0 |
| 10002 | I0.1 |
| 10003 | I0.2 |
| ... | ... |
| 10127 | I15.6 |
| 10128 | I15.7 |
| 30001 | AIW0 |
| 30002 | AIW2 |
| 30003 | AIW4 |
| ... | ... |
| 30032 | AIW62 |
| 40001 | HoldStart |
| 40002 | HoldStart+2 |
| 40003 | HoldStart+4 |
| ... | ... |
| 4xxxx | HoldStart+2 x (xxxx-1) |
Using the Modbus Protocol Library Chapter 12
Configuring the Symbol Table
After you enter an address for the first symbol, the table automatically calculates and assigns the remainder of the symbols in the table.
You should assign a starting V location for the table which occupies 779 bytes. Be sure that the assignment of the Modbus Slave symbols do not overlap with the V memory assigned to the Modbus holding registers with the HoldStart and MaxHold parameters on the MBUS_INIT instruction. If there is any overlap of the memory areas, the MBUS_INIT instruction returns an error.
Using the Modbus Master Instructions
To use the Modbus Master instructions in your S7-200 program, follow these steps:
- Insert the MBUS_CTRL instruction in your program and execute the MBUS_CTRL on every scan. You can use the MBUS_CTRL instruction either to initiate or to change the Modbus communications parameters.
When you insert the MBUS_CTRL instruction, several hidden subroutines and interrupt routines are automatically added to your program.
-
Use the Library Memory command to assign a starting address for the V memory required for Modbus Master Protocol instructions.
-
Place one or more MBUS_MSG instructions in your program. You can add as many MBUS_MSG instructions to your program as you require, but only one of these instructions can be active at a time.
-
Connect the communications cable between Port 0 on the S7-200 CPU (or Port 1 for the Port 1 library), and the Modbus slave devices.
Caution Interconnecting equipment with different reference potentials can cause unwanted currents to flow through the interconnecting cable. These unwanted currents can cause communications errors or damage equipment.
Ensure that all equipment that is connected with a communications cable either shares a common circuit reference or is isolated to prevent unwanted current flows.
The Modbus Master instructions use the Modbus functions shown below to read or write a specific Modbus address. The Modbus slave device must support the Modbus function(s) required to read or write a particular Modbus address.
Table 12-2 Required Modbus Slave Function Support
Using the Modbus Slave Instructions
To use the Modbus Slave instructions in your S7-200 program, follow these steps:
- Insert the MBUS_INIT instruction in your program and execute the MBUS_INIT instruction for one scan only. You can use the MBUS_INIT instruction either to initiate or to change the Modbus communications parameters. When you insert the MBUS_INIT instruction, several hidden subroutines and interrupt routines are automatically added to your program.
- Use the Library Memory command to assign a starting address for the V memory required for Modbus Slave Protocol instructions.
- Place only one MBUS_SLAVE instruction in your program. This instruction is called every scan to service any requests that have been received.
- Connect the communications cable between Port 0 on the S7-200 and the Modbus master device.
Caution Interconnecting equipment with different reference potentials can cause unwanted currents to flow through the interconnecting cable. These unwanted currents can cause communications errors or damage equipment.
Ensure that all equipment that is connected with a communications cable either shares a common circuit reference or is isolated to prevent unwanted current flows.
The accumulators (AC0, AC1, AC2, AC3) are utilized by the Modbus slave instructions and appear in the Cross Reference listing. Prior to execution, the values in the accumulators of a Modbus Slave instruction are saved and restored to the accumulators before the Modbus Slave instruction is complete, ensuring that all user data in the accumulators is preserved while executing a Modbus Slave instruction.
The Modbus Slave Protocol instructions support the Modbus RTU protocol. These instructions utilize the Freeport utilities of the S7-200 to support the most common Modbus functions. The following Modbus functions are supported:
Table 12-3 Modbus Slave Protocol Functions Supported \begin{tabular}{ll} \hline Function & Description \ \hline 1 & Read single/multiple coil (discrete output) status. Function 1 returns the on/off status of any number of output points (Qs). \ 2 & Read single/multiple contact (discrete input) status. Function 2 returns the on/off status of any number of input points (Is). \ 3 & Read single/multiple holding registers. Function 3 returns the contents of V memory. Holding registers are word values under Modbus and allow you to read up to 120 words in one request. \ 4 & Read single/multiple input registers. Function 4 returns Analog Input values. \ 5 & Write single coil (discrete output). Function 5 sets a discrete output point to the specified value. The point is not forced and the program can overwrite the value written by the Modbus request. \ 6 & Write single holding register. Function 6 writes a single holding register value to the V memory of the S7-200. \ 15 & Write multiple coils (discrete outputs). Function 15 writes the multiple discrete output values to the Q image register of the S7-200. The starting output point must begin on a byte boundary (for example, Q0.0 or Q2.0) and the number of outputs written must be a multiple of eight. This is a restriction for the Modbus Slave Protocol instructions. The points are not forced and the program can overwrite the values written by the Modbus request. \ 16 & Write multiple holding registers. Function 16 writes multiple holding registers to the V memory of the S7-200. There can be up to 120 words written in one request. \ \hline \end{tabular}
352
Instructions for the Modbus Protocol
MBUS_INIT Instruction (Initialize Slave)
The MBUS_INIT instruction is used to enable and initialize, or to disable Modbus communications. Before the MBUS_SLAVE instruction can be used, the MBUS_INIT instruction must be executed without errors. The instruction completes and the Done bit is set immediately, before continuing to the next instruction.
The instruction is executed on each scan when the EN input is on.
The MBUS_INIT instruction should be executed exactly once for each change in communications state. Therefore, the EN input should be pulsed on through an edge detection element, or executed only on the first scan.
The value for the Mode input selects the communications protocol: an input value of 1 assigns port 0 to Modbus protocol and enables the protocol, and an input value of 0 assigns port 0 to PPI and disables Modbus protocol.
The parameter Baud sets the baud rate at 1200, 2400, 4800, 9600, 19200, 38400, 57600, or 115200. Baud rates 57600 and 115200 are supported by S7-200 CPUs version 1.2 or later.
The parameter Addr sets the address at inclusive values between 1 and 247.
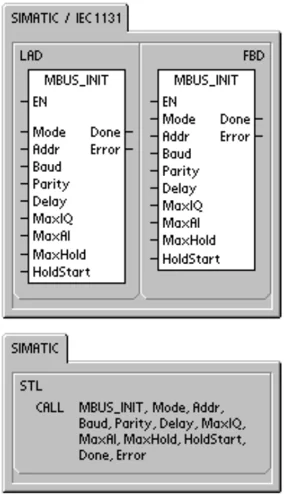
Table 12-4 Parameters for the MBUS_INIT Instruction \begin{tabular}{|l|l|l|} \hline Inputs/Outputs & Data Type & Operands \ \hline Mode, Addr, Parity & BYTE & VB, IB, QB, MB, SB, SMB, LB, AC, Constant, *VD, *AC, *LD \ \hline Baud, HoldStart & DWORD & VD, ID, QD, MD, SD, SMD, LD, AC, Constant, *VD, *AC, *LD \ \hline Delay, MaxIQ, MaxAI, MaxHold & WORD & VW, IW, QW, MW, SW, SMW, LW, AC, Constant, *VD, *AC, *LD \ \hline Done & BOOL & I, Q, M, S, SM, T, C, V, L \ \hline Error & BYTE & VB, IB, QB, MB, SB, SMB, LB, AC, *VD, *AC, *LD \ \hline \end{tabular}
The parameter Parity is set to match the parity of the Modbus master. All settings use one stop bit. The accepted values are:
- 0-no parity
- 1-odd parity
- 2-even parity
The parameter Delay extends the standard Modbus end-of-message timeout condition by adding the specified number of milliseconds to the standard Modbus message timeout. The typical value for this parameter should be 0 when operating on a wired network. If you are using modems with error correction, set the delay to a value of 50 to 100 milliseconds. If you are using spread spectrum radios, set the delay to a value of 10 to 100 milliseconds. The Delay value can be 0 to 32767 milliseconds.
The parameter MaxIQ sets the number of I and Q points available to Modbus addresses 0xxxx and 1xxxx at values of 0 to 128. A value of 0 disables all reads and writes to the inputs and outputs. The suggested value for MaxIQ is 128, which allows access to all I and Q points in the S7-200.
The parameter MaxAI sets the number of word input (AI) registers available to Modbus address 3xxxx at values of 0 to 32. A value of 0 disables reads of the analog inputs. The suggested value for MaxAI to allow access to all of the S7-200 analog inputs, is as follows:
☐ 0 for CPU 221
☐ 16 for CPU 222
☐ 32 for CPU 224, CPU 224XP, and CPU 226
The parameter MaxHold sets the number of word holding registers in V memory available to Modbus address 4xxxx. For example, to allow the master to access 2000 bytes of V memory, set MaxHold to a value of 1000 words (holding registers).
The parameter HoldStart is the address of the start of the holding registers in V memory. This value is generally set to VB0, so the parameter HoldStart is set to &VB0 (address of VB0). Other V memory addresses can be specified as the starting address for the holding registers to allow VB0 to be used elsewhere in the project. The Modbus master has access to MaxHold number of words of V memory starting at HoldStart.
When the MBUS_INIT instruction completes, the Done output is turned on. The Error output byte contains the result of executing the instruction. Table 12-6 defines the error conditions that could result from executing the instruction.
MBUS_SLAVE Instruction
The MBUS_SLAVE instruction is used to service a request from the Modbus master and must be executed every scan to allow it to check for and respond to Modbus requests.
The instruction is executed on each scan when the EN input is on.
The MBUS_SLAVE instruction has no input parameters.
The Done output is on when the MBUS_SLAVE instruction responds to a Modbus request. The Done output is turned off if there was no request serviced.
The Error output contains the result of executing the instruction. This output is only valid if Done is on. If Done is off, the error parameter is not changed. Table 12-6 defines the error conditions that could result from executing the instruction.
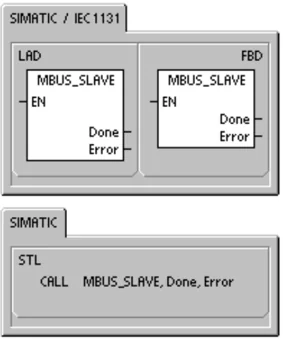
Table 12-5 Parameters for the MBUS_SLAVE Instruction \begin{tabular}{|l|l|l|} \hline Parameter & Data Type & Operands \ \hline Done & BOOL & I, Q, M, S, SM, T, C, V, L \ \hline Error & BYTE & VB, IB, QB, MB, SB, SMB, LB, AC, *VD, *AC, *LD \ \hline \end{tabular}
Table 12-6 Modbus Slave Protocol Execution Error Codes \begin{tabular}{|l|l|} \hline Error Codes & Description \ \hline 0 & No Error \ \hline 1 & Memory range error \ \hline 2 & Illegal baud rate or parity \ \hline 3 & Illegal slave address \ \hline 4 & Illegal value for Modbus parameter \ \hline 5 & Holding registers overlap Modbus Slave symbols \ \hline 6 & Receive parity error \ \hline 7 & Receive CRC error \ \hline 8 & Illegal function request/function not supported \ \hline 9 & Illegal memory address in request \ \hline 10 & Slave function not enabled \ \hline \end{tabular}
Using the Modbus Protocol Library Chapter 12
Example of Programming the Modbus Slave Protocol
 Network 1
SM0.1
MBUS_INIT
EN
1 Mode Done M0.1
1 Addr Error MB1
9600 Baud
2 Parity
0 Delay
128 MaxIQ
32 MaxAI
1000 MaxHold
&VB0 HoldStart
Network 2 SM0.0 MBUS_SLAVE EN Done M0.2 Error MB2
Network 1 //Initialize the Modbus Slave Protocol on the //first scan. Set the slave address to 1, set //port 0 to 9600 baud with even parity, all //access to all I, Q and AI values, allow //access to 1000 holding registers (2000 //bytes) starting at VB0. LD S M0.1 CALL MBUS_INIT,1,1,9600,2,0,128,32,1000, &VB0,M0.1,MB1
Network 2 //Execute the Modbus Slave Protocol on //every scan. LD S M0.0 CALL MBUS_SLAVE,M0.2,MB2
355
MBUS_CTRL Instruction (Initialize Master)
The MBUS_CTRL instruction for S7-200 port 0 (or MBUS_CTRL_P1 for port 1) is used to initialize, monitor, or to disable Modbus communications. Before the MBUS_MSG instruction can be used, the MBUS_CTRL instruction must be executed without errors. The instruction completes and the Done bit is set immediately before continuing to the next instruction. This instruction is executed on each scan when the EN input is on.
The MBUS_CTRL instruction must be called every scan (including the first scan) to allow it to monitor the progress of any outstanding messages initiated with the MBUS_MSG instruction. The Modbus Master Protocol will not operate correctly unless MBUS_CTRL is called every scan.
The value for the Mode input selects the communications protocol. An input value of 1 assigns the CPU port to Modbus protocol and enables the protocol. An input value of 0 assigns the CPU port to PPI system protocol and disables Modbus protocol.
The parameter Parity is set to match the parity of the Modbus slave device. All settings use one start bit and one stop bit. The allowed values are:
- 0 – no parity
- 1 – odd parity
- 2 – even parity
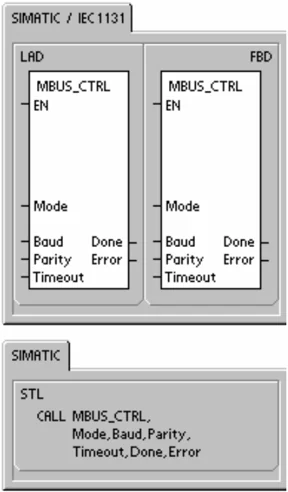
The parameter Timeout is set to the number of milliseconds to wait for the response from the slave. The Timeout value can be set anywhere in the range of 1 millisecond through 32767 milliseconds. A typical value would be 1000 milliseconds (1 second). The Timeout parameter should be set to a value large enough so that the slave device has time to respond at the selected baud rate.
The Timeout parameter is used to determine if the Modbus slave device is responding to a request. The Timeout value determines how long the Modbus Master will wait for the first character of the response after the last character of the request has been sent. The Modbus Master will receive the entire response from the Modbus slave device if at least one character of the response is received within the Timeout time.
When the MBUS_CTRL instruction completes, the Done output is turned on.
The Error output contains the result of executing the instruction. Table 12-8 defines the error conditions that could result from executing the MBUS_CTRL instruction.
Table 12-7 Parameters for the MBUS_CTRL Instruction \begin{tabular}{|l|l|l|} \hline Parameter & Data Type & Operands \ \hline Mode & BOOL & I, Q, M, S, SM, T, C, V, L \ \hline Baud & DWORD & VD, ID, QD, MD, SD, SMD, LD, AC, Constant, *VD, *AC, *LD \ \hline Parity & BYTE & VB, IB, QB, MB, SB, SMB, LB, AC, Constant, *VD, *AC, *LD \ \hline Timeout & WORD & VW, IW, QW, MW, SW, SMW, LW, AC, Constant, *VD, *AC, *LD \ \hline Done & BOOL & I, Q, M, S, SM, T, C, V, L \ \hline Error & BYTE & VB, IB, QB, MB, SB, SMB, LB, AC, *VD, *AC, *LD \ \hline \end{tabular}
Table 12-8 Modbus Slave Protocol Execution Error Codes
MBUS_MSG Instruction
The MBUS_MSG instruction (or MBUS_MSG_P1 for port 1) is used to initiate a request to a Modbus slave and process the response.
The MBUS_MSG instruction initiates a request to a Modbus slave when both the EN input and the First inputs are on. Sending the request, waiting for the response, and processing the response usually requires several scans. The EN input must be on to enable the sending of the request, and should remain on until the Done bit is set.
Note: Only one MBUS_MSG instruction can be active at a time. If there is more than one MBUS_MSG instruction enabled, the first MBUS_MSG instruction executed will be processed and all subsequent MBUS_MSG instructions will abort with an error code 6.
The parameter First should be on for only one scan when there is a new request to send. The First input should be pulsed on through an edge detection element (i.e. Positive Edge) which will cause the request to be transmitted one time. See the example program.
The parameter Slave is the address of the Modbus slave device. The allowed range is 0 through 247. Address 0 is the broadcast address and can only be used for write requests. There is no response to a broadcast request to address 0. Not all slave devices will support the broadcast address. The S7-200 Modbus Slave Library does not support the broadcast address.
The parameter RW specifies if this message is to be a read or a write. The following two values are allowed for RW.
☐ 0 - Read
☐ 1 - Write
Discrete outputs (coils) and holding registers support both read and write requests. Discrete inputs (contacts) and input registers only support read requests. The parameter Addr is the starting Modbus address. The following ranges of values are allowed:
☐ 00001 to 09999 for discrete outputs (coils)
☐ 10001 to 19999 for discrete inputs (contacts)
☐ 30001 to 39999 for input registers
☐ 40001 to 49999 for holding registers
The specific range of values for Addr are based on the addresses that the Modbus slave device supports.
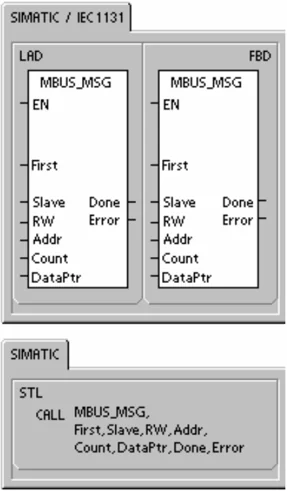
The parameter Count specifies the number of data elements to read or write in this request. The Count will be the number of bits for the bit data types, and the number of words for the word data types.
- Address 0xxxx Count is the number of bits to read or write
- Address 1xxxx Count is the number of bits to read
- Address 3xxxx Count is the number of input register words to read
- Address 4xxxx Count is the number of holding register words to read or write
The MBUS_MSG instruction will read or write a maximum of 120 words or 1920 bits (240 bytes of data). The actual limit on the value of Count will depend upon the limits in the Modbus slave device.
The parameter DataPtr is an indirect address pointer which points to the V memory in the S7-200 CPU for the data associated with the read or write request. For a read request, DataPtr should point to the first CPU memory location used to store the data read from the Modbus slave. For a write request, DataPtr should point to the first CPU memory location of the data to be sent to the Modbus slave.
The DataPtr value is passed into MBUS_MSG as an indirect address pointer. For example, if the data to be written to a Modbus slave device starts at address VW200 in the S7-200 CPU, the value for the DataPtr would be &VB200 (address of VB200). Pointers must always be a type VB even if they point to word data.
Table 12-9 Parameters for the MBUS_MSG Instruction
| Parameter | Data Type | Operands |
|---|---|---|
| First | BOOL | I, Q, M, S, SM, T, C, V, L (Power flow conditioned by a positive edge detection element) |
| Slave | BYTE | VB, IB, QB, MB, SB, SMB, LB, AC, Constant, *VD, *AC, *LD |
| RW | BYTE | VB, IB, QB, MB, SB, SMB, LB, AC, Constant, *VD, *AC, *LD |
| Addr | DWORD | VD, ID, QD, MD, SD, SMD, LD, AC, Constant, *VD, *AC, *LD |
| Count | INT | VW, IW, QW, MW, SW, SMW, LW, AC, Constant, *VD, *AC, *LD |
| DataPtr | DWORD | &VB |
| Done | BOOL | I, Q, M, S, SM, T, C, V, L |
| Error | BYTE | VB, IB, QB, MB, SB, SMB, LB, AC, *VD, *AC, *LD |
Holding registers (address 4xxxx) and input registers (address 3xxxx) are word values (2 bytes or 16 bits). S7-200 CPU words are formatted the same as Modbus registers. The lower numbered V-memory address is the most significant byte of the register. The higher numbered V-memory address is the least significant byte of the register. The table below shows how the S7-200 byte and word addressing corresponds to the Modbus register format.
Table 12-10 Modbus Holding Register
| S7-200 CPU Memory Byte Address | S7-200 CPU Memory Word Address | Modbus Holding Register Address | |||
|---|---|---|---|---|---|
| Address | Hex Data | Address | Hex Data | Address | Hex Data |
| VB200 | 12 | VW200 | 12 34 | 4001 | 12 34 |
| VB201 | 34 | ||||
| VB202 | 56 | VW202 | 56 78 | 4002 | 56 78 |
| VB203 | 78 | ||||
| VB204 | 9A | VW204 | 9A BC | 4003 | 9A BC |
| VB205 | BC |
The bit data (addresses 0xxxx and 1xxxx) areas are read and written as packed bytes, that is, 8 bits are packed into each byte of data. The least significant bit of the first data byte is the addressed bit number (the parameter Addr). If only a single bit is written then the bit must be in the least significant bit of the byte pointed to by DataPtr.
358
Using the Modbus Protocol Library Chapter 12
 Figure 12-1 Format for Packed Bytes (Discrete Input Addresses)
For bit data addresses that do not start on even byte boundaries, the bit corresponding to the starting address must be in the least significant bit of the byte. See below for an example of the packed byte format for 3 bits starting at Modbus address 10004.
 Figure 12-2 Format for Packed Bytes (Discrete input starting at address 10004)
When writing to the discrete output data type (coils), the user is responsible for placing the bits in the correct bit positions within the packed byte before the data is passed to the MBUS_MSG instruction via DataPtr.
The Done output is off while a request is being sent and the response is being received. The Done output is on when the response is complete or when the MBUS_MSG instruction was aborted because of an error.
The Error output is valid only when the Done output is on. See the Modbus Master MBUS_MSG Execution Errors returned by the MBUS_MSG instruction.
The low numbered error codes (1 through 8) are errors that are detected by the MBUS_MSG instruction. These error codes generally indicate a problem with the input parameters of the MBUS_MSG instruction, or a problem receiving the response from the slave. Parity and CRC errors indicate that there was a response but that the data was not received correctly. This is usually caused by an electrical problem such as a bad connection or electrical noise.
The high numbered error codes (starting with 101) are errors that are returned by the Modbus slave device. These errors indicate that the slave does not support the requested function or that the requested address (either data type or range of addresses) is not supported by the Modbus slave device.
Table 12-11 Modbus Master MBUS_MSG Execution Error Codes